
This blog post forms part of the Automation Series where I try to automate a “mystery” process. While the initial blog posts will not provide any specific details, they will provide the building blocks used during the development process and technologies I learnt along the way.
 The Mystery icon will differentiate the Automation Series blog posts from the rest. The outcome of this series will be revealed in the final blog post with links to the (hopefully) completed Open Source project that I am currently working on - the actual icon will be revealed along with the Open Source project.
The second part of this automation series is going to rely on a bot. The bot of choice for this specific process is going to be Telegram since it suits my specific needs, but Slack would be a good alternative since a large portion of companies make use of Slack on a daily basis. The basic flow of what this blogpost will cover is shown below:

Part 1: Creating a Telegram Bot
In order to get started with creating a bot, you will need to register an account using your mobile number.
- Phone application - https://play.google.com/store/apps/details?id=org.telegram.messenger&hl=en_ZA
- Web browser - https://web.telegram.org/
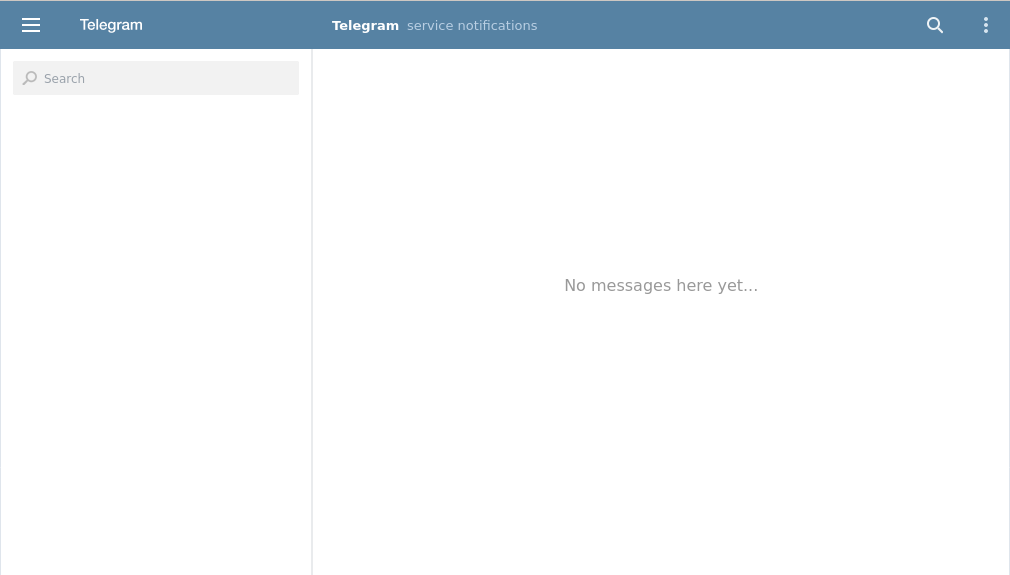
After registering for a telegram account, you will be able to access it via the web interface. A screenshot of the initial instance is shown below:
In order to create your first bot, you will need to search for the BotFather (@botfather). After clicking start, the BotFather will provide you with a list of supported functionality. In order to generate your own bot, you can simply type /newbot into the chat and follow the onscreen prompts. If you are hosting several bots, you can find information related to all of them by typing /mybots into the BotFather chat.

Once the process has been completed, you will receive a message from the BotFather, similar to what is shown below. The most important part is the API Key which we are going to be using in order to interact with the bot.
Done! Congratulations on your new bot. You will find it at
t.me/<BOT_NAME>. You can now add a description, about section and profile picture for your bot, see /help for a list of commands. By the way, when you’ve finished creating your cool bot, ping our Bot Support if you want a better username for it. Just make sure the bot is fully operational before you do this.Use this token to access the HTTP API:
<API_KEY>. Keep your token secure and store it safely, it can be used by anyone to control your bot.For a description of the Bot API, see this page: https://core.telegram.org/bots/api
Accepted Requests
Before you get started, it’s important to ensure that the bot will suit your specific requirements. Currently, Telegram Bots support GET and POST HTTP methods and they support four ways of passing parameters in Bot API requests:
- URL query string
- application/x-www-form-urlencoded
- application/json (except for uploading files)
- multipart/form-data (use to upload files)
Okay but how does it work?
Every time you message a bot, it forwards your message in the form of an API call to a server. This server is what processes and responds to all the messages you send to the bot. There are two ways we can go about receiving updates whenever someone sends messages to a Telegram bot:
- Long polling: Periodically scan for any messages that may have appeared. This can be every few seconds, minutes, days, etc.
- Webhooks: Have the bot interact with the API whenever it receives a message.
For our purposes, we are going to be making use of a Webhook since we want the bot to be interactive. Depending on your programming language preferences, there are several ways which you can go about setting Webhooks, some examples are listed below:
Part 2: Creating a Webhook
For this Automation Series, I am making use of Python and ngrok. In order to set a Webhook which will be used to interact with the Telegram API, you can simply set it by accessing the /setWebHook functionality – api. telegram. org/bot<API_KEY>/setWebHook?url=https://<NGROK_URL>.
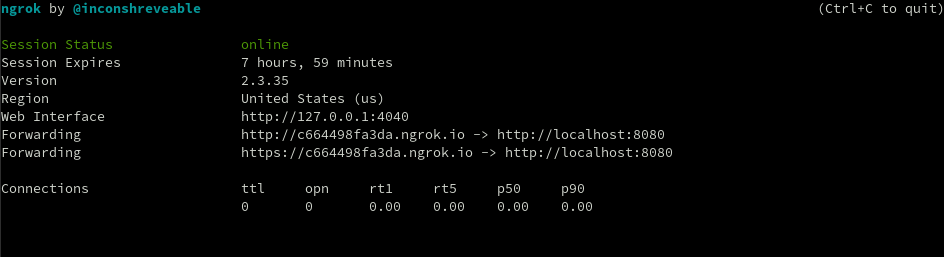
After running ngrok, you will be able to retrieve your NGROK_URL which you can use in conjunction with the API_KEY in order to set the Webhook. The screenshot below shows what the ngrok application looks like when it is initially started:
If everything was successful, you should get a 200 OK message, which you can confirm by navigating to the /getWebhookInfo URL – api. telegram. org/bot<API_Key>/getWebhookInfo.
Part 3: Interacting with Python
Now that we have a bot and a Webhook, we can start interacting with the API via Python. The first thing that I am going to automate is setting the Webhook. In order to do that, we need to do the following:
- Interact with the local interface (127.0.0.1:4040)
- Extract the Forwarding address for HTTPS
- Send a request to the
/setWebHookinterface
This can be achieved as shown in the code snippet below:
1
2
3
4
5
6
7
8
9
10
11
12
13
14
15
16

    BOT_URL = 'https://api.telegram.org/bot<API_KEY>'
    ngrokURL = ""

    url = "http://127.0.0.1:4040/api/tunnels"
    res = requests.get(url)
    res_unicode = res.content.decode("utf-8")
    res_json = json.loads(res_unicode)
    for res in res_json['tunnels']:
        if res['name'] == "command_line":
            ngrokURL =  res['public_url']
            break

    webhook_url = BOT_URL + 'setWebHook?url=' + ngrokURL
    print("Setting Webhook using: “+ webhook_url + ” : " + str(requests.get(webhook_url)))
The next part will be to receive the user input from our bot. Since we have already set the Webhook, we just need to interact with it. In order to view messages sent to the bot, we can interact with the “/” route on localhost. The script below will read all information forwarded from the Telegram bot to the ngrok Webhook and output the data.
1
2
3
4
5
6
7
8
9
10
11
from bottle import run, post, request as bottle_request

@post('/')
def main():
    data = bottle_request.json
    print(data)

    return

if __name__ == '__main__':
    run(host='127.0.0.1', port=8080, debug=True)
Example output is shown below:
1
2
3
127.0.0.1 - - [31/Jul/2020 12:52:50] "POST / HTTP/1.1" 200 0

{'update_id': 191503447, 'message': {'message_id': 7, 'from': {'id': 1398906750, 'is_bot': False, 'first_name': 'Kyhle', 'language_code': 'en'}, 'chat': {'id': 1398906750, 'first_name': 'Kyhle', 'type': 'private'}, 'date': 1596192544, 'text': 'testing123'}}
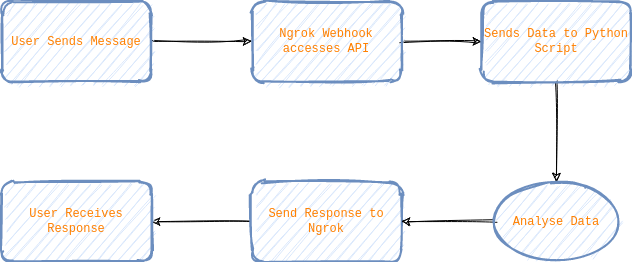
Since we are able to receive messages from the user via out Telegram bot, we will be able to interact with the data and respond accordingly. The basic process flow for the interaction is shown below:
The basic Python script below combines the Webhook functionality with the data retrieval functionality and a generic message – “Basic response to any message!” – back to the user.
1
2
3
4
5
6
7
8
9
10
11
12
13
14
15
16
17
18
19
20
21
22
23
24
25
26
27
28
29
30
31
32
33
34
35
36
37
38
39
40
41
42
43
44
45
46
47
48
49
50
51
52
53
54
55
56
57
58
59
60
61
62
63
64
65
66
67
68
69
#!/usr/bin/python3
import requests
import json
from bottle import Bottle, response, request as bottle_request


class ChatHandler:
    BOT_URL = None

    def get_chat_id(self, data):
         chat_id = data['message']['chat']['id']

        return chat_id

    def get_message(self, data):
        message_text = data['message']['text']

        return message_text

    def send_message(self, prepared_data):
        message_url = self.BOT_URL + 'sendMessage'
        requests.post(message_url, json=prepared_data)

class TelegramBot(ChatHandler, Bottle):
    BOT_URL = 'https://api.telegram.org/bot<API_KEY>'

    def __init__(self, *args, **kwargs):
        super(TelegramBot, self).__init__()
        self.route('/', callback=self.post_handler, method="POST")

    def respond(self,text):
        return "Basic response to any message!"

    def prepare_data_for_answer(self, data):
        message = self.get_message(data)
        answer = self.respond(message)
        chat_id = self.get_chat_id(data)
        json_data = {
            "chat_id": chat_id,
            "text": answer,
        }

        return json_data

    def post_handler(self):
        data = bottle_request.json
        answer_data = self.prepare_data_for_answer(data)
        self.send_message(answer_data)

        return response

if __name__ == '__main__':
    BOT_URL = 'https://api.telegram.org/bot<API_KEY>'
    ngrokURL = ""

    url = "http://127.0.0.1:4040/api/tunnels"
    res = requests.get(url)
    res_unicode = res.content.decode("utf-8")
    res_json = json.loads(res_unicode)
    for i in res_json['tunnels']:
        if i['name'] == "command_line":
            ngrokURL =  i['public_url']
            break

    webhook_url = BOT_URL + 'setWebHook?url=' + ngrokURL
    print("Setting Webhook using: “+ webhook_url + ” : " + str(requests.get(webhook_url)))

    app = TelegramBot()
    app.run(host='127.0.0.1', port=8080,debug=True)
This functionality isn’t useful as is, but it does provide a base from which to work. In order to ensure that the bot is useful, it will be useful to keep the following functionality in mind:
- Use Privacy mode – A bot running in privacy mode will not receive all messages that people send to the group. Instead, it will only receive messages that; Start with a slash ‘/’, Replies to the bot’s own messages, Service messages (people added or removed from the group, etc.), Messages from channels where it’s a member.
- Commands – Commands present a more flexible way to communicate with your bot.
- Keyboards – Telegram apps that receive the message will display predetermined actions. Tapping any of the buttons will immediately send the respective command which will drastically simplify user interaction with your bot.
I hope all went well and that you successfully managed to create your first Telegram Bot!
Useful Resources:
Documentation on Telegram bots can be found using the following resources:
Other blog posts which implement Telegram bots:
- https://www.sohamkamani.com/blog/2016/09/21/making-a-telegram-bot/
- https://towardsdatascience.com/how-to-deploy-a-telegram-bot-using-heroku-for-free-9436f89575d2
- https://djangostars.com/blog/how-to-create-and-deploy-a-telegram-bot/
- https://medium.com/@panjeh/telegram-bot-get-webhook-updates-send-message-49156ac02375