
This blog post forms part of the Automation Series where I try to automate a “mystery” process. While the initial blog posts will not provide any specific details, they will provide the building blocks used during the development process and technologies I learnt along the way.
 The Mystery icon will differentiate the Automation Series blog posts from the rest. The outcome of this series will be revealed in the final blog post with links to the (hopefully) completed Open Source project that I am currently working on - the actual icon will be revealed along with the Open Source project.
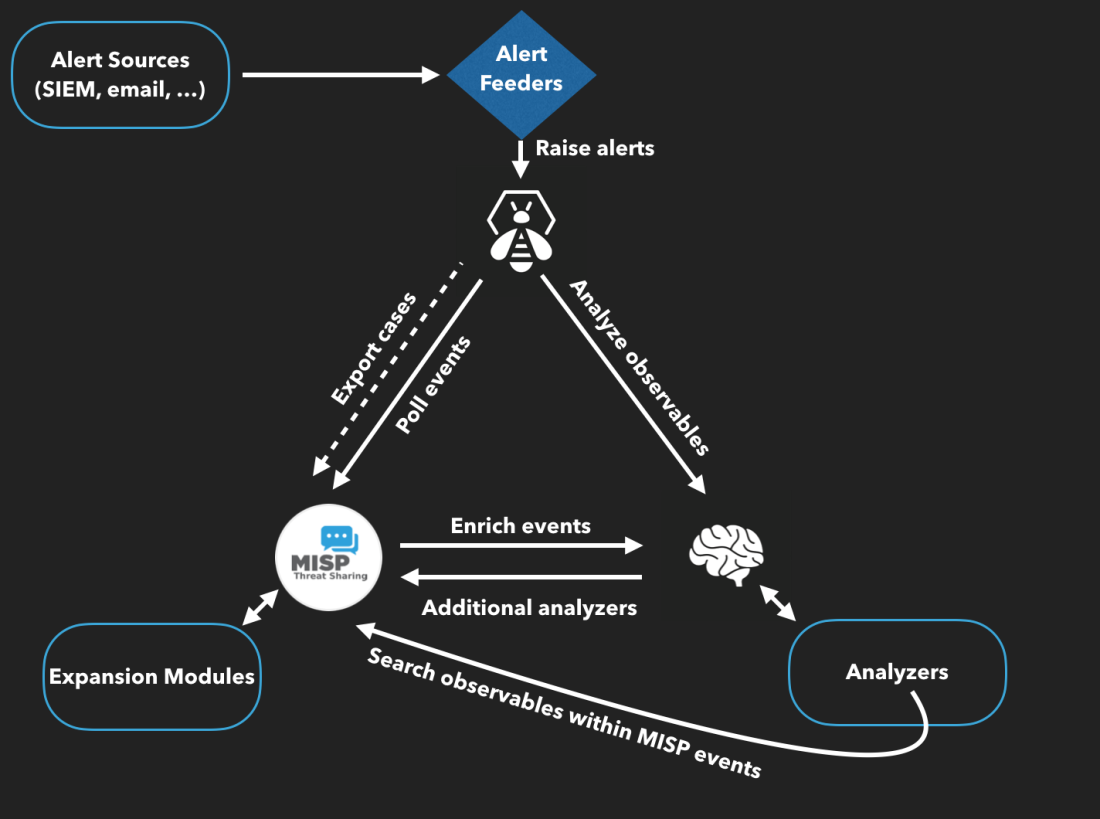
The third part of this automation series is going to be looking at TheHive. TheHive is a scalable, free, open source Security Incident Response Platform that is designed to make life easier for security personnel dealing with security incidents. The image below shows how several free, open source products can integrate with one another.
Part 1: TheHive
In order to install TheHive, there is great documentation on Github, but I am going to provide the steps that I followed below. To install the Debian package, I used the following commands:
Installing TheHive
1
2
3
4
echo 'deb https://dl.bintray.com/thehive-project/debian-stable any main' | sudo tee -a /etc/apt/sources.list.d/thehive-project.list
sudo apt-key adv --keyserver hkp://pgp.mit.edu --recv-key 562CBC1C
sudo apt-get update
sudo apt-get install thehive
Some environments may block access to the pgp.mit.edu key server. As a result, the command sudo apt-key adv --keyserver hkp://pgp.mit.edu --recv-key 562CBC1C will fail. In that case, you can run the following command instead:
1
curl https://raw.githubusercontent.com/TheHive-Project/TheHive/master/PGP-PUBLIC-KEY | sudo apt-key add -
Once TheHive has been installed, you will need to modify the application.conf file within the /etc/thehive directory to include a Crypto key. In order to generate a Crypto key, you can use the following command:
1
2
play_crypto_secret="$(cat /dev/urandom | tr -dc 'a-zA-Z0-9' | fold -w 64 | head -n 1)"
echo $play_crypto_secret
Once you have the Crypto key, you simply need to include it at the top of the application.conf file and your basic setup for TheHive is complete. Even though this post is going to work off of the basic implementation, you can modify the application.conf file to suit your needs, e.g. including SSL, LDAP authentication, etc.
Installing ElasticSearch
Before you are able to run TheHive, you need to install ElasticSearch. There is great documentation on Github, but I am going to provide the steps that I followed, below. To install ElasticSearch, I used the following commands:
1
2
3
4
5
6
7
8
9
10
11
12
13
14
# PGP key installation
sudo apt-key adv --keyserver hkp://keyserver.ubuntu.com:80 --recv-key D88E42B4

# Alternative PGP key installation
# wget -qO - https://artifacts.elastic.co/GPG-KEY-elasticsearch | sudo apt-key add -

# Debian repository configuration
echo "deb https://artifacts.elastic.co/packages/5.x/apt stable main" | sudo tee -a /etc/apt/sources.list.d/elastic-5.x.list

# Install https support for apt
sudo apt install apt-transport-https

# Elasticsearch installation
sudo apt update && sudo apt install elasticsearch
Once the files have been downloaded, you need to edit the /etc/elasticsearch/elasticsearch.yml file. You need to set the cluster name and increase the Threadpool queue size – the default size will get easily overloaded. The basic configuration settings that I included in my setup are shown below:
1
2
3
4
5
6
network.host: 127.0.0.1
script.inline: true
cluster.name: hive
thread_pool.index.queue_size: 100000
thread_pool.search.queue_size: 100000
thread_pool.bulk.queue_size: 100000
Once the configuration file has been changed, you can start the ElasticSearch service using the following command:
1
2
3
sudo systemctl enable elasticsearch.service
sudo systemctl start elasticsearch.service
sudo systemctl status elasticsearch.service
Part 2: Running TheHive
Now that you have the basic requirements – you can start TheHive by pointing it to the configuration file:
1
thehive -Dconfig.file=/etc/thehive/application.conf
Once the application is running, you will be able to access TheHive by navigating to the following URL: http://127.0.0.1:9000. After the initial installation, you will need to update the database and the web application will open the login screen, as shown below:
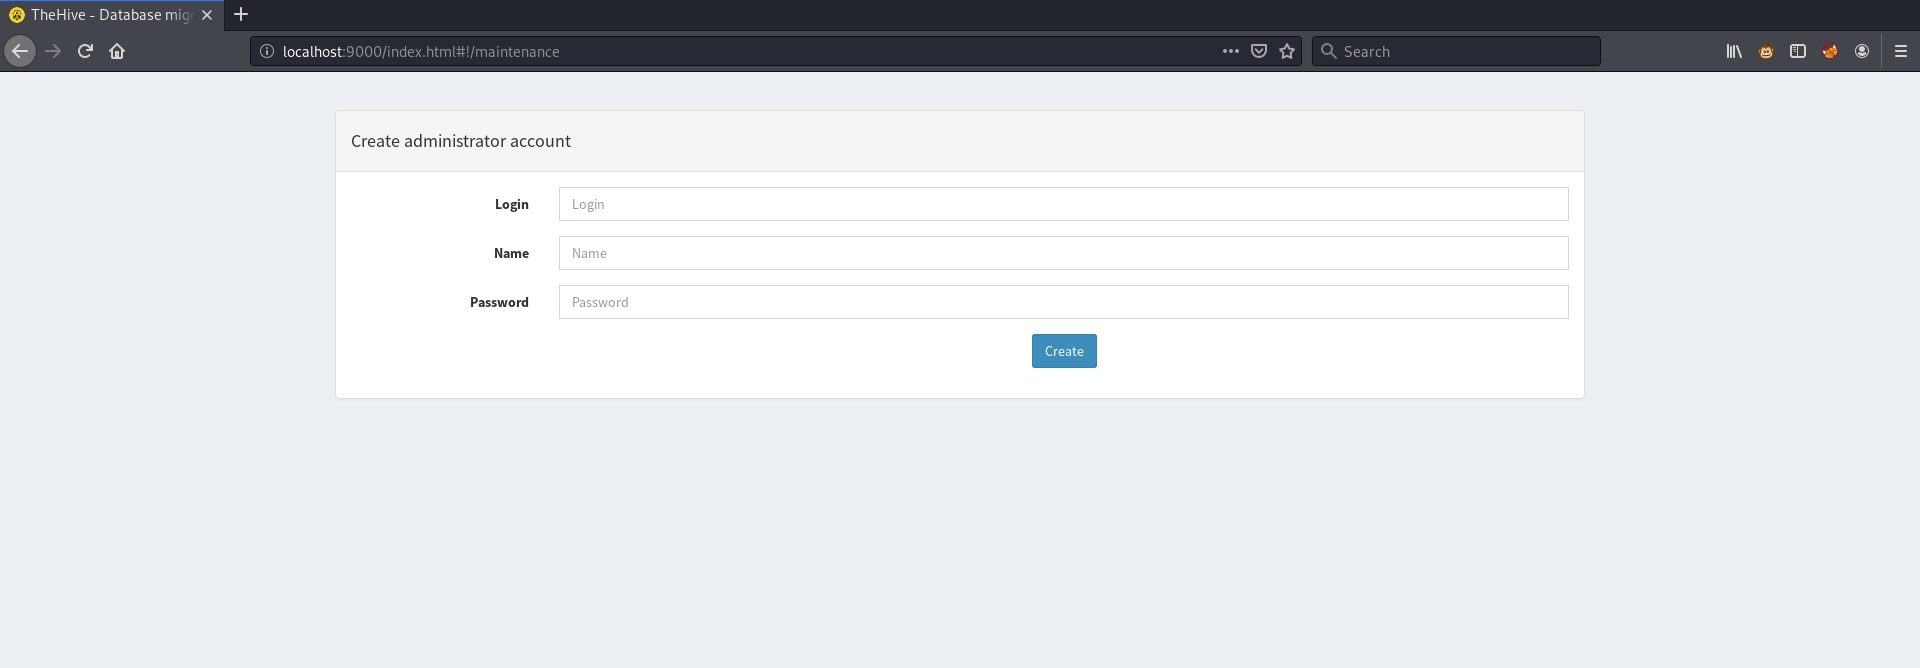
Here you can create the initial administrator account which you will then use to access the application. This account will serve as the main administrative user, so you should ensure that the password is secure – preferably by making use of a password manager to generate the password. If a user isn’t created at this point, it seems to destroy the database and you will receive an error when attempting to access the host in the future.
API Calls
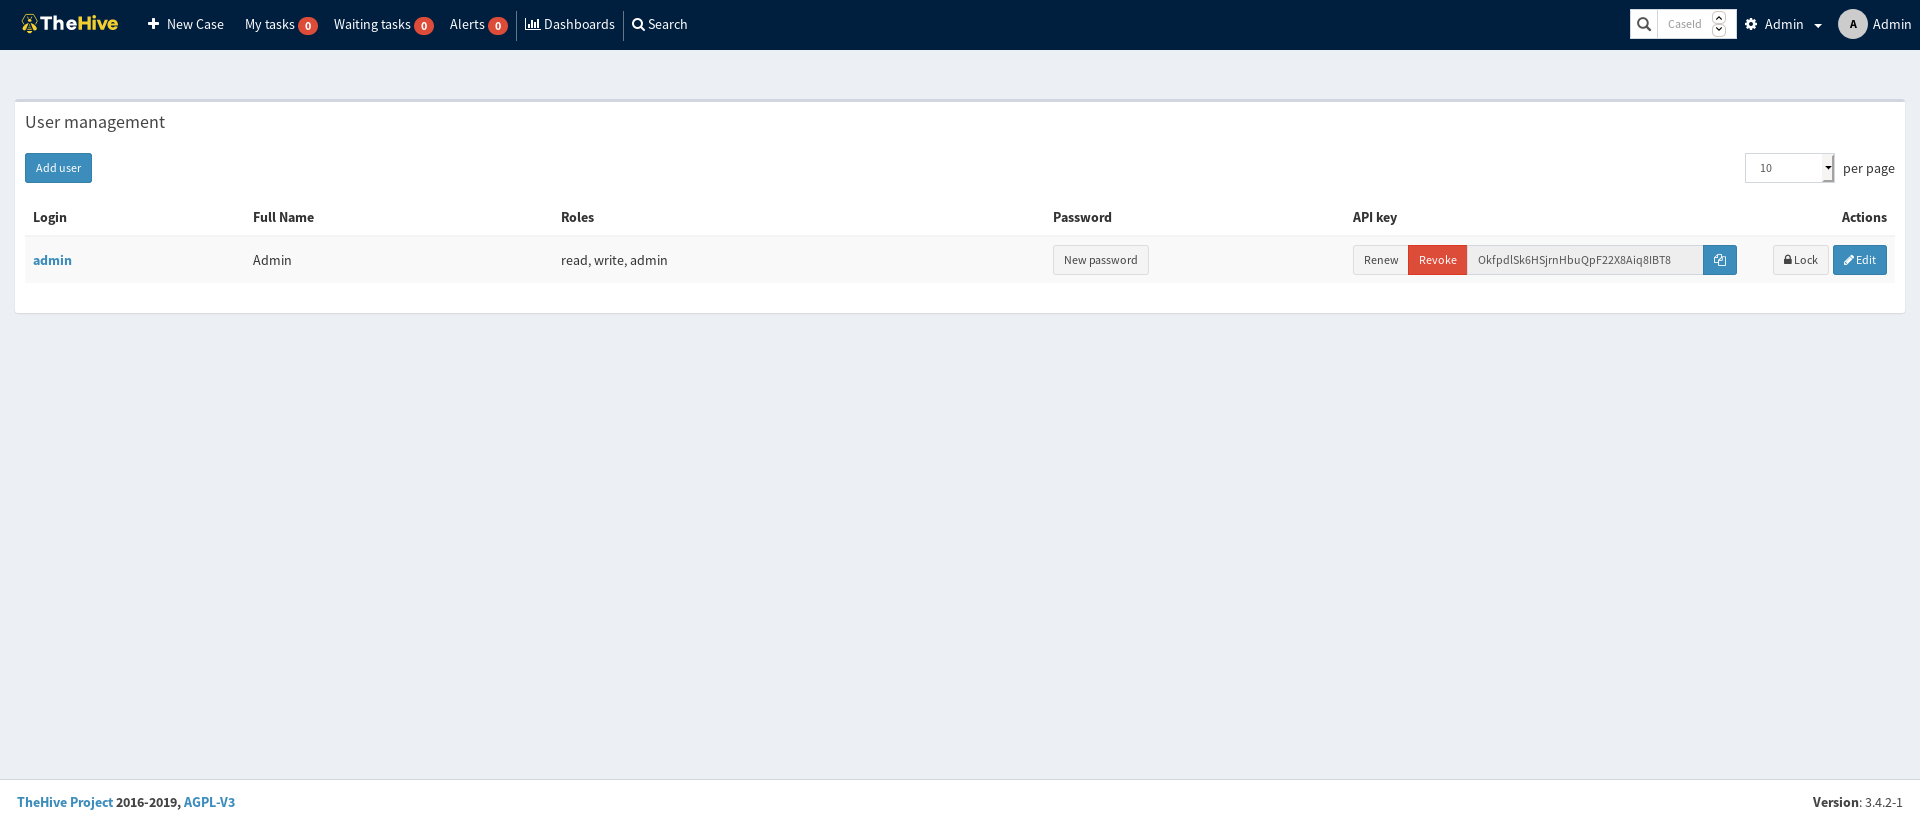
Once you have logged in to the application, you can create additional users to suit your needs. You can definitely do everything through the web application itself, however for this series we are looking to automate a large portion of the work, which can be accomplished through the use of API calls. In order to access the application via API calls, you need to generate the API key associated with relevant user which can be done in the User Management tab as shown below:
Once you have your new API key, you can use cURL to ensure that it is working as intended. For example, the following command will create a new case within TheHive:
1
curl -XPOST -H 'Authorization: Bearer OkfpdlSk6HSjrnHbuQpF22X8Aiq8IBT8' -H 'Content-Type: application/json' http://127.0.0.1:9000/api/case -d '{"title": "My first case","description": "This is a test case"}'
If it was successful, you should receive a JSON response similar to the following:
1
2

{"owner":"admin","severity":2,"_routing":"AXPIxdp7CjxhYhH1HK21","flag":false,"customFields":{},"_type":"case","description":"This case has been created by my custom script","title":"My first case","createdAt":1596801276149,"_parent":null,"createdBy":"admin","caseId":2,"tlp":2,"metrics":{},"_id":"AXPIxdp7CjxhYhH1HK21","id":"AXPIxdp7CjxhYhH1HK21","_version":1,"pap":2,"startDate":1596801276535,"status":"Open"}
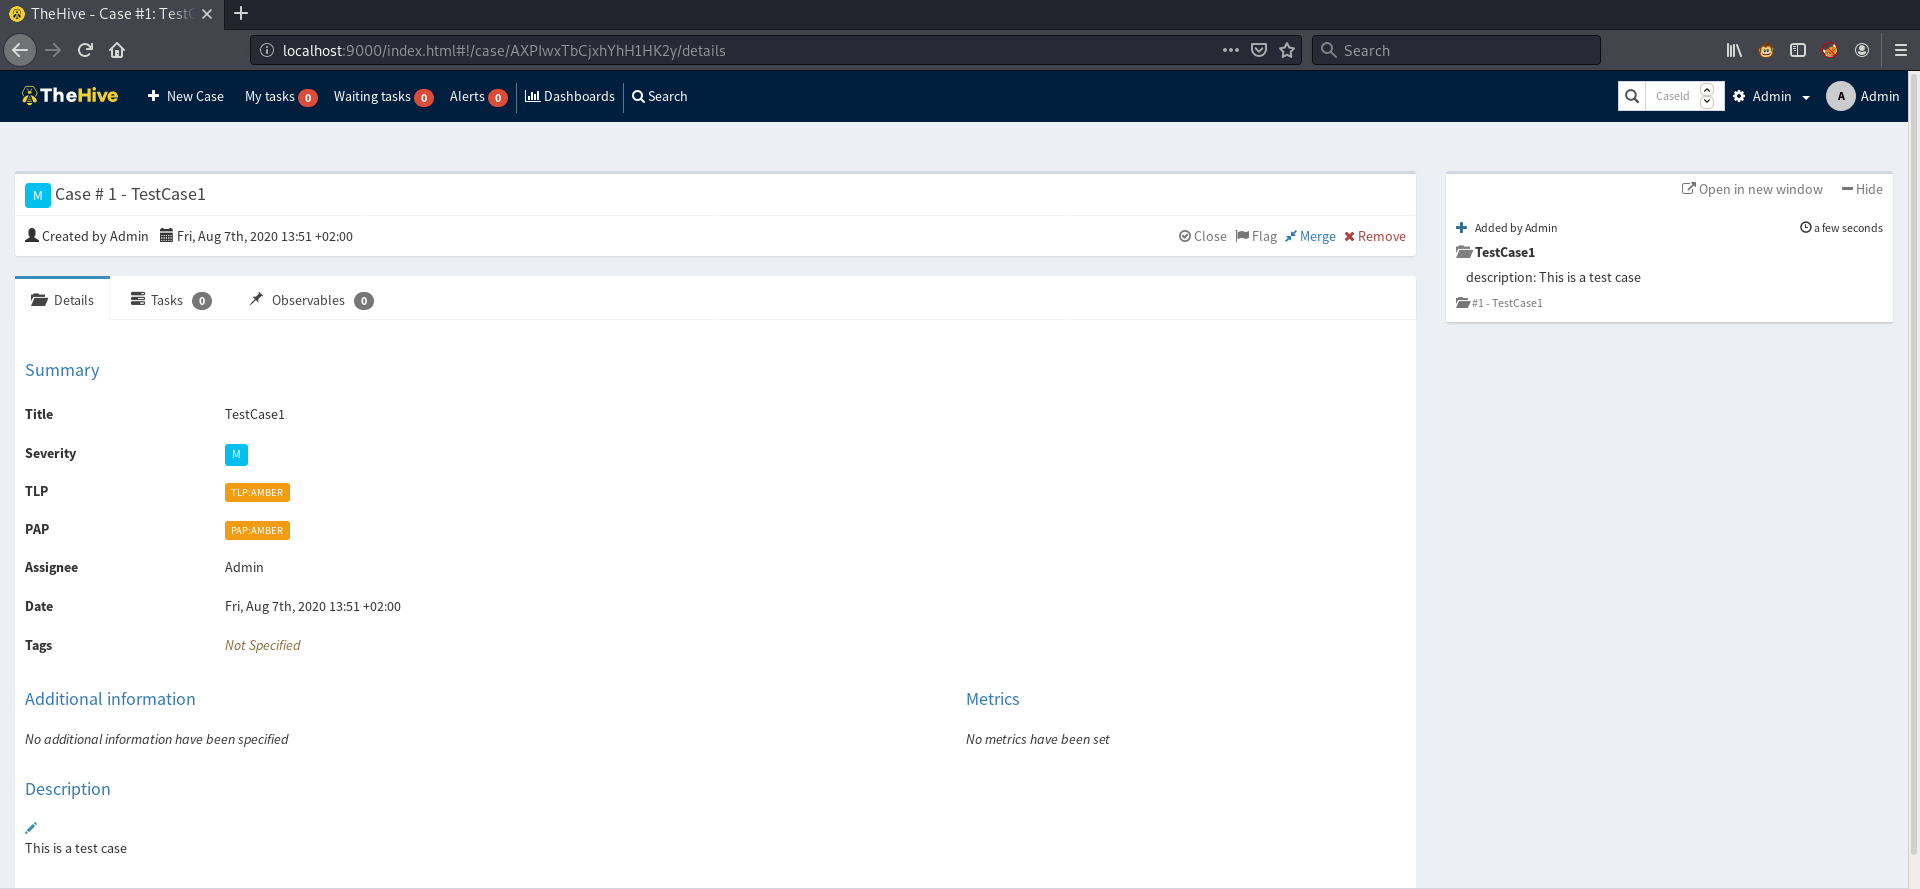
Using the command shown above, we only changed the title and description fields, however, each of the keys that are available within the frontend are also editable with the cURL commands. If you would like to ensure that the commands actually worked on the front-end, you can open TheHive in a web browser and navigate to the homepage which will show you the open cases as shown below:
Part 3: Python Scripting:
For obvious reasons, cURL isn’t the most optimal way to automate this process. In order to ensure that this process is scalable, I decided to access the API with Python. The basic script below will create a new case (exactly the same way as with the cURL command):
1
2
3
4
5
6
7
8
9
10
11
12
import requests

data = {
  'title': 'My First Case',
  'description': 'This case has been created by my custom script'
}

endpoint = "http://127.0.0.1:9000/api/case"
headers = {"Authorization": "Bearer OkfpdlSk6HSjrnHbuQpF22X8Aiq8IBT8"}

print(requests.post(endpoint, data=data, headers=headers).json())
The function makes use of the requests library to handle the relevant API calls. I added in a print statement to view the JSON object, the output of which is shown below:
1
{'owner': 'admin', 'severity': 2, '_routing': 'AXPIzVlICjxhYhH1HK28', 'flag': False, 'customFields': {}, '_type': 'case', 'description': 'This case has been created by my custom script', 'title': 'My First Case', 'createdAt': 1596801767620, '_parent': None, 'createdBy': 'admin', 'caseId': 2, 'tlp': 2, 'metrics': {}, '_id': 'AXPIzVlICjxhYhH1HK28', 'id': 'AXPIzVlICjxhYhH1HK28', '_version': 1, 'pap': 2, 'startDate': 1596801767749, 'status': 'Open'}
Following on from the cURL example, we can also view the output in the front-end as shown below:

Since everything worked as intended, we now have the basis from which we can work. In order to expand this, I decided to make the code align with an Object-oriented programming (OOP) model. This may seem like more effort at the start, but it will definitely help ensure that the code is scalable down the line. The basic script that I created is shown below. At this stage, it includes 4 function calls which align with CRUD, namely:
- create_case
- get_case
- delete_case
- update_case
Making the code align with OOP:
1
2
3
4
5
6
7
8
9
10
11
12
13
14
15
16
17
18
19
20
21
22
23
24
25
26
27
28
29
30
31
32
33
34
35
36
37
38
39
40
41
42
43
44
45
46
47
48
49
50
51
52
53
54
55
56
57
58
59
60
61
62
63
64
65
66
67
68
69
70
71
72
73
74
75
#!/usr/bin/python3
import requests
import json

class CaseInstances:
    endpoint = None
    headers = None

    def create_case(self,prepared_data):
        """
        Prepared data should be json which includes at least `message_url`
        """
        message_url = self.endpoint + 'api/case'
        return requests.post(message_url, data=prepared_data, headers=self.headers)

    def get_case(self):
        message_url = self.endpoint + 'api/case'
        return requests.get(message_url,headers=self.headers)

    def delete_case(self,caseId):
        message_url = self.endpoint + f'api/case/{caseId}'
        return requests.delete(message_url,headers=self.headers)

    def update_case(self,prepared_data,caseId):
        message_url = self.endpoint + f'api/case/{caseId}'
        return requests.patch(message_url,data=prepared_data,headers=self.headers)

class CaseManagement(CaseInstances):
    endpoint = "http://127.0.0.1:9000/"
    headers = {"Authorization": "Bearer uKJfY6Zse2yRDZWboDgDvc7jYIXZ0Si+"}

    def __init__(self, *args, **kwargs):
        super(CaseInstances, self).__init__()

    def create_cases(self):
        case_data = {
          'title': 'My Second Python Case',
          'description': 'This case has been created by my custom Python Script'
        }
        case = self.create_case(case_data).json()
        print("=================== New Case ===================")
        print(case)

    def get_cases(self):
        active_case = self.get_case().json()
        print("=================== Open Cases ===================")
        for case in active_case:
            if(case['status'] == "Open"):
              print("Owner:\t" + str(case['owner']))
              print("Title:\t" + str(case['title']))
              print("Identifier:\t" + str(case['id']) + "\n")
              print(case)

    def delete_cases(self,caseId):
        deleted_case = self.delete_case(caseId)
        print(f"\n=================== Deleted Case {caseId} ===================\n")

    def update_cases(self,caseId):
        case_data = {
          'tlp': 3
        }
        updated_case = self.update_case(case_data, caseId).json()
        print(f"\n=================== Updated Case {caseId} ===================\n")
        print(updated_case)

if __name__ == '__main__':
    case = CaseManagement()

    # Retrieve a list of active cases
    case.get_cases()

    # Modify or Delete cases base on CaseId

    case.delete_cases("AXPIxdp7CjxhYhH1HK21")
    case.update_cases("AXPIzVlICjxhYhH1HK28")
The API calls and required parameters were taken from the Github Documentation which describe the action and the relevant HTTP Method. Even though this functionality isn’t useful as is, it does provide a base to work from, which will be expanded upon during this automation series. I hope all went well and that you successfully managed to create your first case in TheHive!