This is the link to the GitHub repository that you can use to set up logging within your environments!
I have been working on a creating an open source GCP threat hunting lab (to be released later this year..) and during that time the importance having the ability to; automate the creation of several projects, capture logging in a central repository, and create billing alerts automatically, became clear. There are a number of great blog posts on the importance of setting up logging in GCP projects as well as posts on architecting logging projects (which I have used as reference), but I haven’t come across any that guide you through both. If you would like to read more about these topics, I have included the links in the Useful Resources section below.
Overview
This blog post provides a breakdown of the following components which you can use in your own logging project(s):
- Capturing the required logs for the newly created GCP project
- Creating log sinks to export logs to Cloud Storage and BigQuery
- Creating log sinks to export the logs to a centralized logging project (in my case, the administration account)
- Creating billing alerts for your new project
A very basic high-level overview of this setup is provided below:  High-level overview of the GCP project setup
The main modules that are used within the Terraform project (and that we’re going to talk about during this post) are billing and logging. The logging module includes Terraform code to create Storage Bucket and BigQuery log sinks for both the individual GCP project as well as for the centralized logging project, while the billing module handles budgets and alerting channels for your specified budget thresholds. An example of the directory structure for this project is provided below:
1
2
3
4
5
6
7
├───.github
│   └───workflows
└───terraform
    └───gcp-core
        └───modules
            ├───billing
            └───logging
The idea behind this type of a project structure / setup is that you can use the same structure for all of your GCP projects and simply add in additional modules as required. The benefit being that the project structure as well as the logging and billing requirements are already handled when you inevitably create new GCP projects within your personal or organizational GCP accounts.
Prerequisites
The remainder of this post assumes that you have already configured the following:
- GitHub account with a new GitHub repository
- Administrative access to a GCP account or a GCP Service Account with the relevant permissions
- Service account credentials stored in GitHub
Secretsfor the new GitHub repository - Storage bucket within the Administrative / Centralized project for the new
tfstatefile
Project, Organization, and Billing are 3 separate components for permissions. Giving “Organization” level permissions is not enough, the permissions should be given from “Billing Account” as well. Modifying these additional permissions can be done using the Resource Manager view.
During testing, I used an “Administration” project with a Service Account (SA) to deploy the Terraform modules using GitHub Actions. This “administration” account is also the centralized logging project that the logs from all additional GCP projects will be sent to. Additionally, if you are making use of an Administration project, the following APIs have to be enabled within the project:
cloudresourcemanager.googleapis.comlogging.googleapis.comcloudbilling.googleapis.combillingbudgets.googleapis.com
Using GitHub Actions
If you are going to be using this project (as intended), it includes a CICD component through the use of GitHub actions. The GitHub actions workflow should work “out-of-the-box”, but there are some pieces that you would need to configure before deploying this to a personal project.
Example of Credentials Stored within a new GitHub Project:
Once you have your GitHub project set up, you should add your Service Account credentials as a GOOGLE_CREDENTIALS variable to the repository secrets:  Storing Credentials in GitHub Secrets
Example of tfstate Storage Bucket in the Administration Project
For the GitHub actions portion of this project to work effectively with Terraform, it requires a tfstate state file. The method that I have used within my projects is to have an “Adminstration” project which contains all of the state files - this project also functions as the central logging repository for all additional GCP projects. To store the tfstate file, an empty bucket should be created within the relevant GCP project named gcp-logging-project-tfstate. This bucket will be used during the configuration stage when setting this up in your own environment.  tfstate Storage Bucket in the Administrative Project
If you choose to name your bucket something else, you will need to modify bucket variable within the main provider.tf file:
1
2
3
4
5
6
terraform {
  backend "gcs" {
    bucket = "gcp-logging-project-tfstate"
    prefix = "terraform/state"
  }
}
Enabling Cloud Audit Logs at Different Levels
In this project, we are enabling logging at the Project level. This section of the blog post dives into the different levels at which you can enable logging and things to consider when setting it up in your own environment.
Before we dive into the project code, it is important to mention the different levels at which logging can be enabled within GCP. When you are enabling Cloud audit logs, you may have a number of items to consider including cost and storage requirements. I have provided a “Considerations” table below which will hopefully help you narrow down your scope when deciding on log ingestion filters:
| Factor | Organization-Wide | Folder-Specific | Project-Specific |
|---|---|---|---|
| Scope | All resources in the organization | Resources in a specific folder | Resources in a single project |
| Governance | Centralized | Delegated to department/teams | Decentralized, per project |
| Use Case | Broad compliance and security policies | Department/team-specific policies | Customized project requirements |
| Complexity | Simple to manage | Medium | High (scales poorly with many projects) |
| Storage Costs | Can generate large amounts of logs | Moderate | Lowest |
If you are unsure of how to proceed, I recommend the following:
- Start with organization-wide logging for critical logs like Admin Activity and Policy Denied to ensure you have global visibility and compliance.
- Use folder-specific logging to customize for departmental or regional needs without affecting the entire organization.
- Apply project-specific logging sparingly, for exceptions or critical use cases.
- Regularly review logging configurations to optimize storage costs and ensure appropriate coverage.
In GCP, the choice between organization-wide logging, project-specific logging, or folder-specific logging depends on the scope of resources you want to monitor and manage. I have provided a basic summary of each choice in the sections below.
If you configure multiple policies, ensure you:
- Keep track of exemptions and policies at different levels to avoid gaps.
- Use the
exempted_membersattribute to define the override behavior.
Organization-Wide Logging (google_organization_iam_audit_config)
Use organization-wide logging when you want to enforce audit logging policies across all resources within your GCP organization. This is useful when:
- You need consistent logging for compliance or regulatory (e.g. SOX, PCI-DSS, or other regulatory frameworks) requirements across all folders, projects and resources.
- You want to ensure that no project or folder can override the audit logging policy (e.g. Enabling Admin Activity logs for all IAM operations across the organization ensures you track all permission changes)
- Your organization has centralized governance and requires a single source of truth for monitoring and audits.
Folder-Specific Logging (google_folder_iam_audit_config)
Use folder-specific logging when you want to enforce audit logging policies for a subset of projects or resources that share the same parent folder. This is ideal when:
- You have a logical grouping of projects under a folder, such as for departments, environments (e.g., dev/test/prod), or teams.
- The group of projects needs a specific logging configuration different from the rest of the organization (e.g. You may enable Data Access logs for a “Finance” folder containing projects that process sensitive financial data.)
- You need to comply with departmental policies or specific internal standards. This helps when different teams/departments have varied compliance needs.
Project-Specific Logging (google_project_iam_audit_config)
Use project-specific logging when you want to control audit logging at the granularity of individual projects. This is suitable for:
- Tailoring logging policies to the specific use case of a project (e.g. Disable certain audit logs for test or experimental projects to reduce log storage costs.)
- Isolating logging for high-risk or high-visibility projects to meet specific security or compliance needs (e.g. Enable Admin Activity logs on a critical production project to monitor IAM role changes closely.)
- Overriding folder or organization-level settings for customized logging in certain projects.
Breaking Down the Terraform Project
While this post is not going to go into detail about every line of code within the project, I have broken down some of the main concepts below.
Creating a GCP Project
This only works for GCP accounts with an Organization component. If you are using a personal account, you will need to manually create a project and remove this block!
This project assumes that you are going to be setting this up without having an existing GCP project. If you have an existing GCP project or if you are using a personal GCP account, you will need to remove the project creation block. Once removed, add in the project_id to the variables file and replace all instances of google_project.terraform_project.project_id with var.project_id. You will also need to remove depends_on instances for google_project.terraform_project.
1
2
3
4
5
6
7
8
9
10
11
resource "random_id" "project_id" {
  byte_length = 4
}

resource "google_project" "terraform_project" {
  name            = "${var.prefix}"-centralized-logging"
  project_id      = "${var.prefix}-logging-${random_id.project_id.hex}"
  org_id          = var.organization_id
  billing_account = var.billing_account
}
Once the GCP project has been created, the Terraform project has two main modules that it will run: logging and billing.
Setting up Logging within the new GCP Project
For this project, we are defining logging requirements at the project level. The audit log config will include all log types for all services. To enable logging for all services within a project, leave the service attribute empty or specify allServices. If you want to modify the services that are logged or if you want to add exceptions (users, service accounts, etc.), you are able to do so within the “Project’s Logging Configuration Definition” section of the Terraform file.
An example of logging only specific services with exclusions is provided in the code block below:
1
2
3
4
5
6
7
8
9
10
11
12
13
14
15
16
17
resource "google_project_iam_audit_config" "combined_logging" {
  project = "YOUR_PROJECT_ID"

  # Logging for all services
  audit_log_config {
    log_type = "ADMIN_READ"
  }

  # Specific configuration for BigQuery
  audit_log_config {
    service  = "bigquery.googleapis.com"
    log_type = "DATA_WRITE"
    exempted_members = [
      "user:bigquery-exempt@example.com",
    ]
  }
}
Creating Log Sinks
Once logs have enabled for the required GCP services, you need to send them somewhere. Log sinks are a great way to not only store logs in specific resources (PubSub, Storage Bucket, BigQuery, etc.), but they can also be used to send the logs to other projects. The logging module contains a few different functions related to Cloud Storage and BigQuery, but the concept is identical - create a log configuration and use a log sink to send the data to the relevant resource.
The codeblock below shows how we can create a storage bucket sink for our new GCP project:
1
2
3
4
5
6
7
8
9
10
11
12
13
14
15
16
17
18
19
#########################################################################
## Google Logging Bucket Definition
#########################################################################
resource "google_logging_project_bucket_config" "basic_logging" {
    project         = var.project_id
    location        = "global"
    retention_days  = 30
    bucket_id       = "${var.resource_prefix}_logs"
}

# filter - (Optional) The filter to apply when exporting logs. Only log entries that match the filter are exported. \
# e.g. filter                 = "logName:(cloudaudit.googleapis.com OR compute.googleapis.com)"
resource "google_logging_project_sink" "storage_sink" {
  project                = var.project_id
  name                   = "logs-storage-sink"
  destination            = "logging.googleapis.com/projects/${var.project_id}/locations/global/buckets/${google_logging_project_bucket_config.basic_logging.bucket_id}"
  unique_writer_identity = true
  filter                 = "severity >= ERROR"
}
Once this has been enabled, a Storage Bucket should be created in your new GCP project!
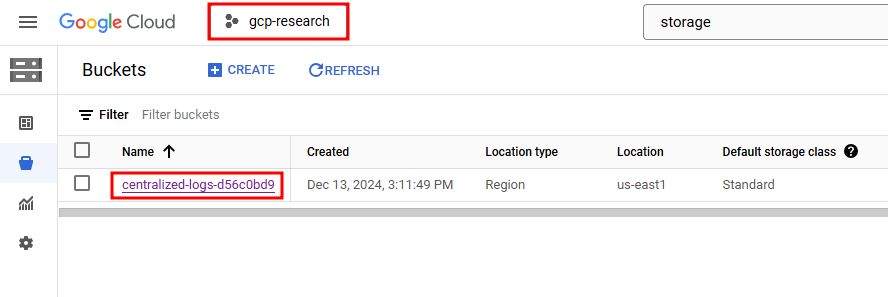 Cloud Logs Storage Bucket in the New GCP Project
As with the Storage Bucket, the codeblock below shows how we can create a BigQuery sink for our new GCP project:
1
2
3
4
5
6
7
8
9
10
11
12
13
14
15
16
17
18
19
20
21
22
23
24
25
26
27
28
29
30
31
32
33
34
#########################################################################
## Google BigQuery Definition
#########################################################################

resource "google_bigquery_dataset" "logs_dataset" {
  dataset_id  = "security_logs"
  description = "Dataset for security logs"
  location    = var.region
  project     = var.project_id
  delete_contents_on_destroy = var.force_destroy
}

resource "google_logging_project_sink" "bigquery_sink" {
  name        = "bigquery-sink"
  destination = "bigquery.googleapis.com/projects/${var.project_id}/datasets/${google_bigquery_dataset.logs_dataset.dataset_id}"
  filter      = "severity >= ERROR"

  unique_writer_identity = true
  project                = var.project_id

  bigquery_options {
    use_partitioned_tables = true # always true if it is false, logs cant export to the bigquery
  }
}

resource "google_bigquery_dataset_iam_binding" "bigquery_writer" {
  project = var.project_id
  dataset_id = google_bigquery_dataset.logs_dataset.dataset_id
  role       = "roles/bigquery.dataEditor"
  members    = [
    google_logging_project_sink.bigquery_sink.writer_identity,
  ]
  depends_on = [google_bigquery_dataset.logs_dataset]
}
Once this has been enabled, a BigQuery table should be created in your project!
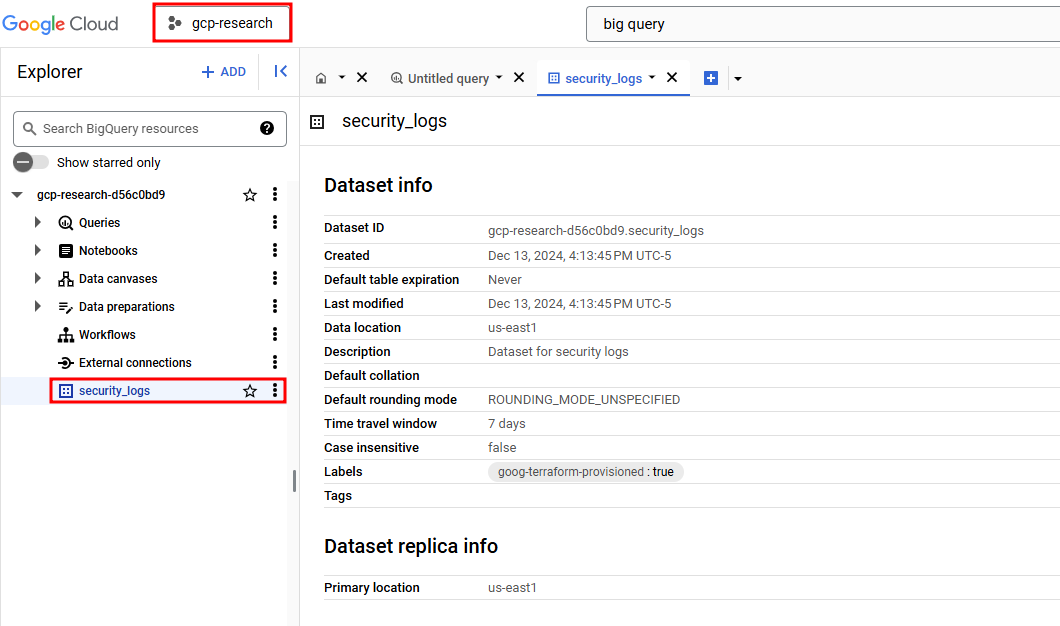 Security Logs sent to the new GCP Project’s BigQuery instance
Sending Logs to the Central Logging Project
The code required to send the logs to a centralized source is almost identical to the per-project logging. The main difference being that you need to modify the admin_project_id variable to the project_id of the central logging project’s ID and everything should automatically connect. To confirm that it is working as expected, you can navigate to the Logging Router within the new GCP project and confirm that 4 manually created log sinks exist.
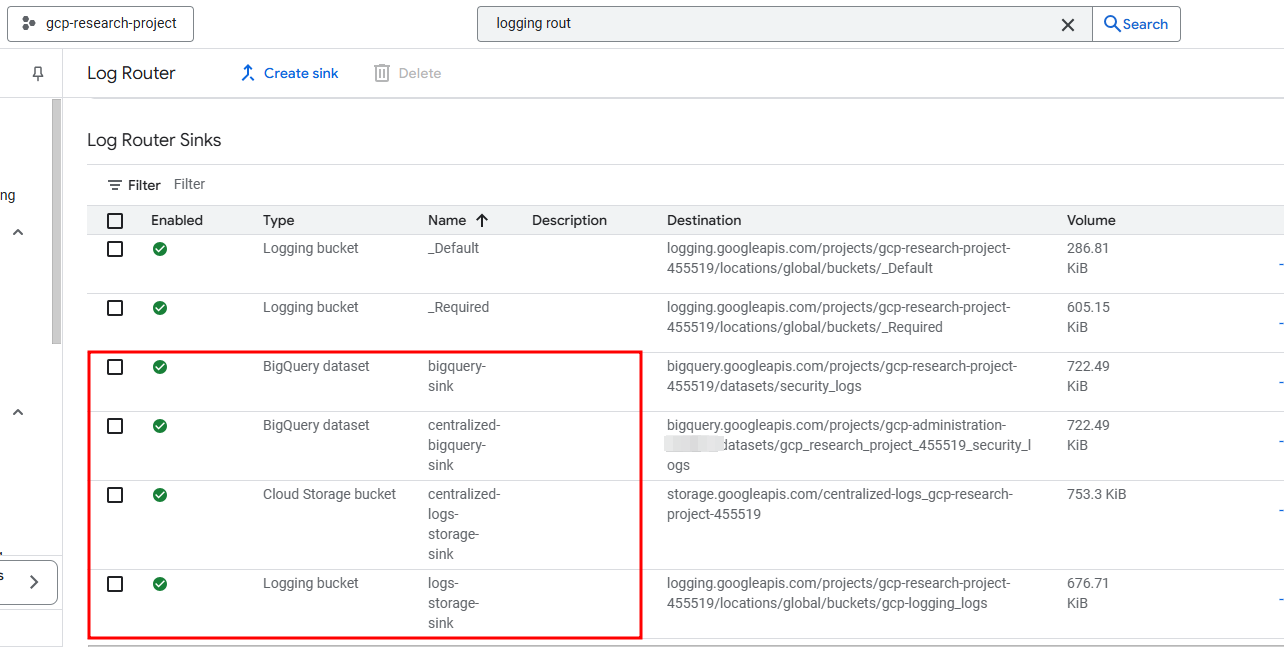 Newly Created Log Sinks within the new GCP Project
You should now be able to navigate to your newly created project, create resources, etc. and the activity will be logged and shared with the central administrative project.
Setting up Project Billing
Now that we have the require logs being sent to the required locations (Storage buckets, BigQuery tables, etc.), as well as the required logs being sent to a centralized logging project, the final step is to ensure that billing alerts are set for our new projects. If you’re looking for more information for each of the key/value pairs allowed within billing alerts, I recommend the following resources:
- https://registry.terraform.io/providers/hashicorp/google/latest/docs/resources/billing_budget
- https://cloud.google.com/billing/docs/how-to/budgets
Billing Credits
Selected credits are applied to the total cost. Budget tracks the total cost minus any applicable selected credits. If you want to be alerted on credits usage as well, you need to exclude the credits option!
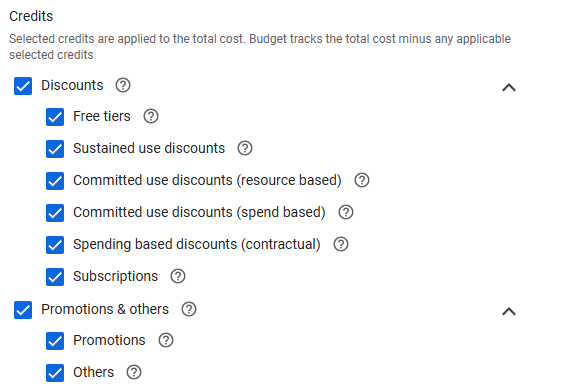 Optional Credits Available when Creating Billing Alerts
Creating Budgets and Billing Alerts
Within the Terraform code, this project uses a spend_basis within the threshold_rules to determine if spend has passed the threshold. If you prefer to have the budget set to actual spend instead of the forecasted spend, simply change the value to CURRENT_SPEND.
1
2
3
4
5
6
7
8
9
10
11
12
13
14
15
16
17
18
19
20
21
22
23
24
25
26
27
28
29
30
31
32
33
34
35
data "google_billing_account" "account" {
  billing_account = {var.billing_account}
}

resource "google_billing_budget" "budget" {
  billing_account   = data.google_billing_account.account.id
  display_name      = "{var.prefix} Billing Budget"

  budget_filter {
	  projects               =["projects/${var.project_id}"]
	  credit_types_treatment = "INCLUDE_ALL_CREDITS"
}

  amount {
    specified_amount {
      currency_code  = "USD"
      units          = "100.00"
    }
  }

threshold_rules =[
	{
		threshold_percent =  0.5
	},
	{
		threshold_percent = 1.0
		spend_basis       = "FORECASTED_SPEND"
	}
]

  all_updates_rule {
    monitoring_notification_channels  = [google_monitoring_notification_channel.notification_channel.id,]
    disable_default_iam_recipients    = true
  }
}
Once you have decided on the budget amount, threshold percentages at which you want to be notified, and any credits that you want to include / exclude from these calculations, you will need to create a notification channel.
Creating a Notification Channel
The final part of creating budgets / billing alerts is notifying the account owner (group or specific individuals) when the thresholds are exceeded. The codeblock below shows the creation of an email based notification channel:
1
2
3
4
5
6
7
8
resource "google_monitoring_notification_channel" "notification_channel" {
  display_name = "${var.prefix} Notification Channel"
  type         = "email"

  labels = {
    email_address = var.billing_email_address
  }
}
Budget / Billing Alert Limitations
Billing alerts and budgets do not prevent the usage of resources if the limit has been exceeded. The easiest way (as recommended by Google) to automatically disable all services / resources within a project is to simply disable the billing account associated with the project. If this is something you want to set up, this GitHub project has a great working version of the Cloud Run function that Google recommended.
Using this method, the project will no longer be visible under the Cloud Billing account and resources in the project are automatically disabled, including the Cloud Run function if it’s in the same project.
Closing Thoughts
I hope you found this post useful for automating the setup of GCP logging and billing alerts with Terraform. The GCP lab that I alluded to at the start of the post is going to include a blog series on the GitHub Actions used within this project, GCP, Terraform, and how to structure GitHub projects with a focus on DevSecOps (A number of concepts have already been implemented in this logging project which can be used as a reference). If you are interested in the GCP lab that I have been working on, please do reach out!
Useful Resources
- https://medium.com/@AaronLJ/implementing-comprehensive-security-logging-in-gcp-with-terraform-76d4b4628346
- https://blog.marcolancini.it/2021/blog-security-logging-cloud-environments-gcp/
- https://medium.com/google-cloud/centralized-log-management-with-terraform-streamlining-log-export-to-supported-destinations-d8222818b1a0
- https://cloud.google.com/architecture/security-foundations/detective-controls
- https://github.com/terraform-google-modules/terraform-example-foundation/tree/master/1-org/modules
- https://cloud.google.com/logging/docs/routing/overview
