I’ve been increasingly bouncing between ChatGPT, Gemini, and Claude depending on the task. LLMs are powerful but I tend to lose track of my open tabs quite frequently. I was thinking about methods that could make it easier to send questions to LLMs from different web pages and came up with the idea of a browser extension. You may say “but Kyhle, don’t they have their own implementations which already to this?” and you would be right. Google and OpenAI both have official methods that they promote to solve this very issue. Google has @gemini and @aimode as shown below:
 Using @Gemini in the Address Bar
 Using @AImode in the Address Bar
ChatGPT also has their own Chrome Extension which you can use to search directly from the Address bar through the @ symbol.
 Using ChatGPT in the Address Bar
However, this leads to the same issue as using the platforms individually. Not only do you need to remember the different methods that a single tool can use from the address bar, but you also need to know how to do it for every AI tool which offers similar functionality. This blogpost showcases the very basic Chrome extension that I created to easily pick between the tools, the extension can be found in my GitHub repo.
Building the Extension
In essence, this extension provides two sets of functionality:
- Popup UI: type a query, pick an LLM, opens a new tab with your question sent to that LLM.
- Google Search Bar Popup: type a question and select the LLM that you want to send it to straight from the Google search bar.
File Structure & Manifest
First, here’s what the extension’s structure looks like:
1
2
3
4
5
6
7
8
9
10
11
12
13
14
Smart AI Chrome Extension/
├── background.js
├── content.js
├── icons
│   ├── robot_icon-128.png
│   ├── robot_icon-16.png
│   ├── robot_icon-32.png
│   ├── robot_icon-48.png
│   └── robot_icon.png
├── manifest.json
├── popup.html
├── popup.js
├── README.md
└── styles.css
If you’d like to learn more about the different file types and their purpose, Google has some documentation on their developer portal which I found useful.
Installing the Chrome Extension
To install the extension in your own browser, you will need to do the following:
- Navigate to
chrome://extensions - Enable Developer mode
- Click on “Load Unpacked” and select the extension folder (which you can download from my GitHub Repo)
- The new extension should appear in the list of installed extensions
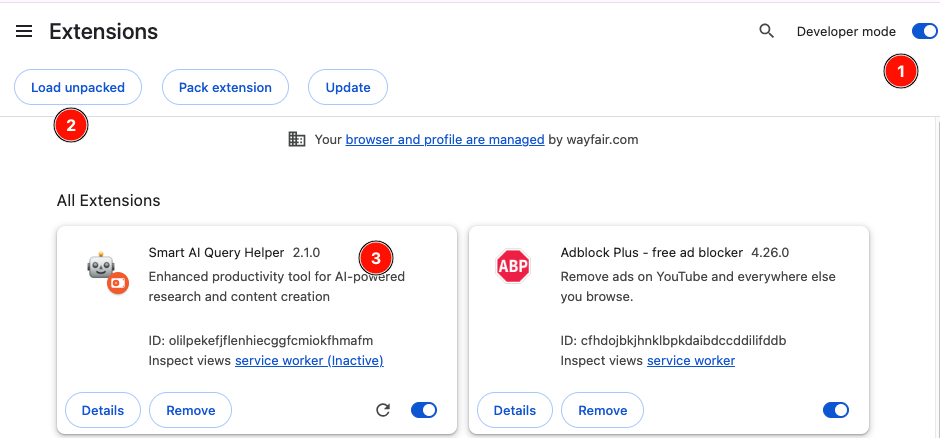 Installing a New Chrome Extension
Using the Smart AI Chrome Extension
Now that it has been installed, you will be able to make use of the functionality. You can query the LLMs by either selecting the Extension directly, or through the search bar of Google.com.
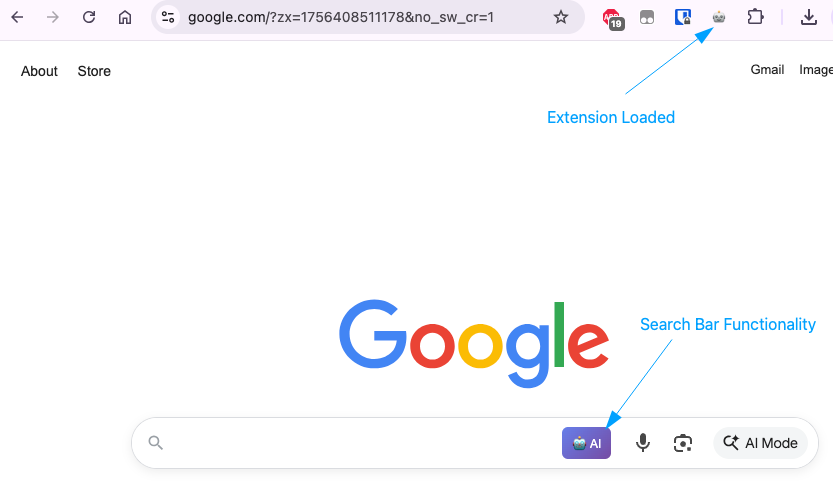 Available Chrome Extension Functionality
If you want to use the extension directly, click on the extension icon, type in your question, select the AI platform you want to send the question to, and finally click “Send Question”.
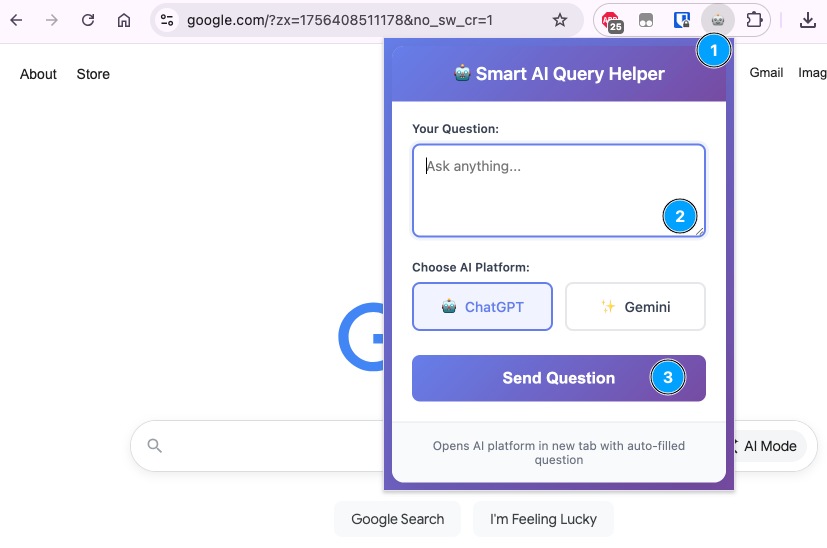 Using the Chrome Extension Directly
If you want to use the extension through the Google search bar; type in your question, click on the extension icon, and select the AI platform you want to send the question to. Alternatively, you can use shortcuts on MacOS (cmd+enter) or Windows (alt+enter) to select the LLM:
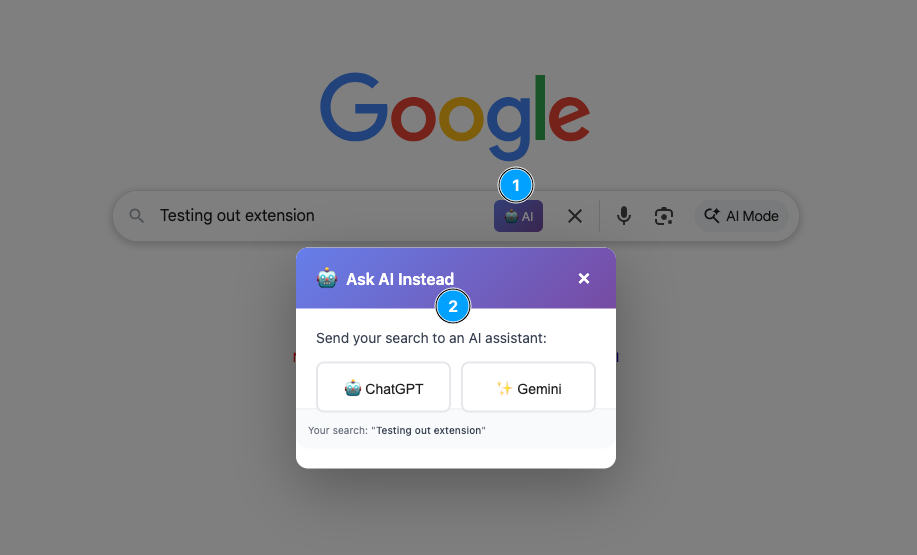 Using the Chrome Extension From the Google Search Bar
Challenges
While I was creating this I faced two issues, the first being the ExtensionInstallBlocklist from Chrome. My initial iterations of the extension tried to use the clipboardRead permission which was blocked by my browser:
 Google Chrome Extension Settings
This has since been bypassed by using alternative methods to send the data, but if you’re creating your own extension and find that it is blocked, it could be due to the Extension settings. The second challenge (which is still an issue) is that the text data which is pasted into OpenAI’s ChatGPT includes the previously pasted data before overwriting it with the new data. I’m not sure why this is happening so if you find a solution to this issue, please let me know!
Conclusion
This is definitely not a perfect solution and it will need to be modified for any other LLMs that you are using in this manner, but it was a pretty fun way for me to test out “Vibe coding” with Cursor (as can be seen in the codebase) while also ending up with a solution to a problem that didn’t even truly exist.
I hope you found this post useful and if you end up trying out the extension, please let me know how it goes! As always, if you have any questions or comments, please reach out!
