
In today’s cloud-driven environment, automation plays a critical role in optimizing workflows and enhancing operational efficiency by minimizing manual interaction. Manual tasks, especially when dealing with sensitive data, introduce risks such as human error, data mismanagement, and inefficiencies. By automating processes such as email notifications, data synchronization, and report generation, we can reduce the reliance on manual intervention, enhancing both productivity and security.
Google Apps Script is a cloud-based scripting language developed by Google that allows you to automate tasks across Google Workspace apps like Gmail, Docs, Sheets, and Drive. In this post, I will dive in to the methods that I have leveraged within Google Apps Script to automate manual tasks and hopefully provide you with a few interesting methods that you can use to automate workflows.
What can Google Apps Script do?
Before we look into how I used Google Apps Script, it’s important to understand where Google Apps Script can be useful. As per Google’s documentation, Google Apps Script is “a rapid application development platform that makes it fast and easy to create business applications that integrate with Google Workspace. You write code in modern JavaScript and have access to built-in libraries for favorite Google Workspace applications like Gmail, Calendar, Drive, and more.”
Google Apps Script has a wide range of use cases, especially for automating tasks and integrating Google Workspace services - I have listed a few common scenarios below:
- Automating Google Sheets Workflows
- Data Collection and Analysis: Automatically import data from APIs or external sources into Google Sheets, process the data, and generate reports.
- Scheduled Updates: Set up scripts to update data in sheets periodically, such as refreshing stock prices or sales data.
- Conditional Formatting and Alerts: Automatically apply formatting based on specific conditions or send email alerts when certain thresholds are met.
- Managing Gmail Automation
- Email Filters and Categorization: Automatically sort, label, and archive incoming emails based on predefined criteria, helping to maintain an organized inbox.
- Scheduled Email Reminders: Send automatic follow-up emails or reminders based on calendar events or custom triggers.
- Mass Emailing: Use Apps Script to automate sending bulk personalized emails, such as newsletters or marketing campaigns.
- Google Calendar Management
- Event Scheduling: Automate the creation of calendar events from Google Forms submissions or specific actions in Google Sheets.
- Automated Notifications: Set up reminders or notifications before important deadlines, meetings, or recurring tasks.
- Calendar Data Export: Automatically pull event details from Google Calendar and export them to Google Sheets for reporting purposes.
- Custom Google Drive Management
- Automated File Organization: Automatically move, rename, or organize files based on specific conditions, like sorting invoices into folders by date.
- File Sharing and Permissions Management: Set up scripts to change file permissions, share documents, or revoke access at certain times.
- Backup Processes: Create automated backups of Google Sheets or Docs to specific Google Drive folders.
- Form Data Processing
- Automated Responses: Automatically send personalized email responses after someone submits a Google Form.
- Data Validation: Validate form submissions in real-time and reject or flag invalid data.
- Form-Triggered Workflows: When a Google Form is submitted, trigger actions such as updating a Google Sheet, sending an email, or creating a calendar event.
- External API Integration
- Pulling Data from External APIs: Fetch data from third-party APIs (e.g., weather, stock data, or social media metrics) and use it in Google Sheets or other Workspace services.
- Pushing Data to External Systems: Integrate with CRM or ERP systems to push data from Google Workspace to external business tools.
- Custom Dashboard and Reporting Tools
- Automated Reports: Create scheduled reports, such as weekly sales summaries or performance metrics, and send them to stakeholders as Google Docs, Sheets, or PDFs.
- Interactive Dashboards: Build custom dashboards within Google Sheets to visualize real-time data from various sources.
These examples highlight a few examples where languages like Google Apps Script can be tailored for various use cases, from simple tasks such as organizing email to complex automation and integrations with external APIs. In my opinion, the main benefit of any of these use cases relate to Repetitive Task Automation. This allows you to eliminate the need for manual input by automating tasks such as data entry, document generation, or copying files.
How to Get Started
The method that I used to get started was to just dive in to the documents and start coding, but that may not be the best method for everyone. This blog post is not meant to be a full crash course in JavaScript but, fortunately, Google has pretty good documentation on this topic as well as some coding labs to help you get started:
Once you are happy with your ability to create JavaScript functions, you will be able to execute the functions against the Apps Script API. There are several methods which you can use to do this, I would suggest starting with the Apps Script Editor to test out your code. Once you have a script, you need to run it using Trigger-Based Actions - these will allow you to automatically execute tasks at specific times or in response to user activity. Google Apps Script makes use of the following Trigger Types:
- Add On: The execution originated from an add-on.
- Execution API: The execution originated from an invocation of the Apps Script API.
- Time Driven: The execution was caused by a time event.
- Trigger: The execution originated from a trigger source.
- Webapp: The execution originated from a deployed web app.
- Editor: The execution originated from the Apps Script editor.
I have only used Apps Script as standalone scripts which have different deployment / trigger options than writing these scripts in Google documents.
Important Concepts
Regardless of coding language, I believe that being able to reuse code is essential. Therefore, within the code that I have provided in this blog post, I have used two concepts that I think everyone should use:
- Global Variables: Common variables that you will use throughout the script
- Functions: Modules which can be called from other functions within the script
These two concepts not only make it easier to reuse code, but it also ensures that the code is maintainable. The excerpt below shows how to create functions and call global variables using JavaScript:
1
2
3
4
5
6
7
8
9
10
11
12
function globalVariables(){
  var variables = {
    filename: "Important File",
    google_sheet_link: "https://docs.google.com/spreadsheets/d/<ID>/edit?gid=0#gid=0"
  };
  return variables;
}

function triggerEvents() {
    Logger.log("Retrieving Global Variable - Google Sheet Link: " + globalVariables().google_sheet_link);

}
Now that you have a basic understanding, let’s dive in to the first example, updating an existing Google Sheet.
Example 1 - Creating New Columns in a Google Sheet
- Reason: Current process is manual and I need to Create new columns with a new date every week
- Task: Automate the creation of new columns on a weekly basis
The screenshot below shows the example Google sheet that I was manually updating, the idea is to create 3 new columns on a weekly basis (scheduled every Friday between 3pm-4pm) for the following week.
 Google Sheet - Copy Columns
To accomplish this, I needed to do the following:
- Identify the correct spreadsheet (in this case the
google_sheet_link) - Get the date / date range that I want to provide in the columns
- Insert new columns based on current column requirements
- Insert the required column title information and match the format to the other columns within the document.
The script that I created to accomplish this (with comments) is provided below:
1
2
3
4
5
6
7
8
9
10
11
12
13
14
15
16
17
18
19
20
21
22
23
24
25
26
27
28
29
30
31
32
33
34
35
36
37
38
39
40
41
42
43
44
45
46
47
48
49
50
51
52
53
54
55
56
57
58
59
60
61
62
63
64
65
66
67
68
69
70
function globalVariables(){
  // This can be found in the URL (something like this: "https://drive.google.com/drive/folders/{entity-id}") visible when you open the directory of the Shared Drive
  // To use a variable call: globalVariables().VARIABLENAME;, e.g. var soc_shared_folder_url = DriveApp.getFolderById(globalVariables().soc_shared_drive_id).getUrl();
  var variables = {
    filename: "Project Updates",
    google_sheet_link: "https://docs.google.com/spreadsheets/d/<ID>/edit?gid=0#gid=0"
  };
  return variables;
}

function triggerEvents() {
  Logger.log("Starting column copy process...");

  // Get the current date (should be a Friday!)
  var current_date = new Date()
  current_date.setDate(current_date.getDate());

  // Get the date of the following Monday
  var next_monday = new Date()
  next_monday.setDate(current_date.getDate() + 3);
  var next_monday_string = Utilities.formatDate(next_monday, "EST", "MM/dd");

  // Get the date of the following Friday
  var next_friday = new Date()
  next_friday.setDate(current_date.getDate() + 7);
  var next_friday_string = Utilities.formatDate(next_friday, "EST", "MM/dd");

  Logger.log("Monday: " + next_monday_string +"\nFriday: " + next_friday_string)

  Logger.log("Inserting and Formatting new Columns...")
  // Insert new columns for the following week
  insertColumns(next_monday_string, next_friday_string)

  Logger.log("New Columns Successfully Created...")
}

function insertColumns(next_monday_string, next_friday_string) {
  // Opens the spreadsheet file by its URL. If you created your script from within a
  // Google Sheets file, you can use SpreadsheetApp.getActiveSpreadsheet() instead.
  Logger.log("Spreadsheet: " + globalVariables().google_sheet_link);
  var ss = SpreadsheetApp.openByUrl(globalVariables().google_sheet_link);

  // Gets a sheet by its name and insert 3 blank columns after the 3rd column
  const sheet = ss.getSheetByName('Updates');
  sheet.insertColumnsAfter(3, 3);

  // The size of the two-dimensional array must match the size of the range.
  var values =
  [
    [
      "Plans\n"+next_monday_string + " - " + next_friday_string,
      "Progress\n"+next_monday_string + " - " + next_friday_string,
      "Problems / Blockers\n"+next_monday_string + " - " + next_friday_string
    ]
  ];

  // Get the range of the new columns and set the values
  var range = sheet.getRange("D1:F1");
  range.setValues(values);

  // Retrieve the formatting row / template row format
  var RefCell = sheet.getRange("G1"); //Cell G1 considered as reference for formatting

  //Copy formatting to the newly created columns
  RefCell.copyTo(range, {formatOnly: true});

  // Get reference width and set the new column widths
  var width = sheet.getColumnWidth(7)
  sheet.setColumnWidths(4,6, width);
}
With the completed script in hand, I set a weekly (Time-based) trigger to run the triggerEvents function. I also created a slack workflow to remind the team to fill out the plans for the new week, thereby completely removing the manual work that I previously performed for this function. (If you are interested in the Slack workflow, feel free to message me!)
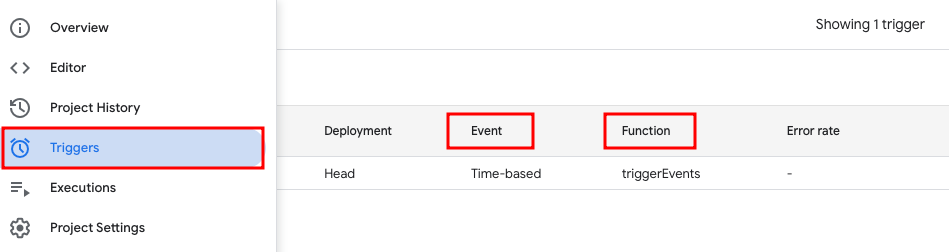 Google Apps Script - Trigger Function
Example 2 - Copying a Template and Sending a Slack Message
- Reason: My team uses a weekly meeting document and the copying / creation of this document was manual
- Task: Automate the copying of the previous week’s meeting document and rename the copy to reflect the current week. Additionally, send Slack reminders to the team to update the document.
- Additional Requirements: Requires a Slack App / method to use webhook
To accomplish this, I needed to do the following:
- Get the current date and identify the previous document (in this case the
previous_filename) - Create a copy of the document with a new name reflecting the new dates
- Send a Slack message to the team
The script that I created to accomplish this (with comments) is provided below:
1
2
3
4
5
6
7
8
9
10
11
12
13
14
15
16
17
18
19
20
21
22
23
24
25
26
27
28
29
30
31
32
33
34
35
36
37
38
39
40
41
42
43
44
45
46
47
48
49
50
51
52
53
54
55
56
57
58
59
60
61
62
63
64
65
66
67
68
69
70
71
72
73
74
75
76
77
78
79
80
81
82
83
84
85
86
87
88
89
90
91
92
93
94
95
96
97
98
99
100
101
function globalVariables(){
  // This can be found in the URL (something like this: "https://drive.google.com/drive/folders/{entity-id}") visible when you open the directory of the Shared Drive
  // To use a variable call: globalVariables().VARIABLENAME;, e.g. var soc_shared_folder_url = DriveApp.getFolderById(globalVariables().soc_shared_drive_id).getUrl();
  var variables = {
    soc_shared_drive_id: "<ID>",
    meeting_notes_folder_id: "<ID>",
    filename: "Weekly Meeting Agenda",
    slack_webhook: "https://hooks.slack.com/services/<ID>",
    ppp_link: "https://docs.google.com/spreadsheets/d/<ID>edit#gid=0"
  };
  return variables;
}

function triggerEvents() {
  Logger.log("Starting template creation process...");

  // Get the date for the next weekly meeting
  var current_date = new Date()
  current_date.setDate(current_date.getDate() + 1);
  var current_date_string = Utilities.formatDate(current_date, "EST", "MM.dd.yy");

  // Get the date for the previous weekly meeting
  var previous_date = new Date()
  previous_date.setDate(previous_date.getDate() - 6);
  var previous_date_string = Utilities.formatDate(previous_date, "EST", "MM.dd.yy");

  // Create the filename based on the date of the next weekly meeting
  var new_filename = current_date_string +" -  " + globalVariables().filename;
  var previous_filename = previous_date_string +" -  " + globalVariables().filename;

  // Create a copy of the previous weekly meeting
  var file_url = copyFile(previous_filename, new_filename)

  // Create a link from the file ID and send a slack message to the team
  Logger.log("Creating Slack message with URL: " + file_url)
  var slack_message = buildAlert(file_url)
  sendSlackMessage(slack_message)
  Logger.log("New File Successfully Created...")
}

function copyFile(previous_filename, new_filename) {
  Logger.log("Copying File..." + previous_filename);
  var meeting_notes_files = DriveApp.getFilesByName(previous_filename);
  var new_file = ""

  // Get the previous file and create a new file
  while (meeting_notes_files.hasNext()) {
    var file = meeting_notes_files.next();
    Logger.log("File with name: " + file + "\nURL: " + file.getUrl())
    Logger.log("Name: " + file.getName())
    new_file = file.makeCopy(new_filename, DriveApp.getFolderById(globalVariables().meeting_notes_folder_id));
  }
  return new_file.getUrl()
}

function sendSlackMessage(payload){
  // Create a JSON payload and send to slack via webhook
  const webhook = globalVariables().slack_webhook;
  var options = {
    "method": "post",
    "contentType": "application/json",
    "muteHttpExceptions": true,
    "payload": JSON.stringify(payload)
  };

  try {
    UrlFetchApp.fetch(webhook, options);
    Logger.log("Options: " + options)
  } catch(e) {
    Logger.log(e);
  }
}

// Build a slack message using markdown
function buildAlert(data) {
  let message = "Hey team, here is the link for tomorrow’s <"+data+"|Meeting agenda> and <"+globalVariables().ppp_link+"|OKR weekly PPP> - please update it when you get a chance!"
  Logger.log("Created Slack Message: " + message)
  let payload = {
    "blocks": [
      {
        "type": "section",
        "text": {
          "type": "mrkdwn",
          "text": "*Weekly Reminder*"
        }
      },
      {
        "type": "divider"
      },
      {
        "type": "section",
        "text": {
          "type": "mrkdwn",
          "text": message
        }
      }
    ]
  };
  return payload;
}
Using this method, I removed the requirement for a separate Slack workflow and automated the task through the use of a webhook.
Example 3 - Creating a Web Deployment to Automate Template Generation
- Reason: When an investigation was required, the team needed to manually spin up new folders, copy over templates, etc.
- Task: Automate the creation of new investigation folders and copy the templates to the new folder
- Additional Requirements: Requires a basic frontend / web app
To accomplish this, I needed to do the following:
- Create a Basic Web App to Trigger the use case (
index.html) - Get the user input from the web app
- Create a new folder in the current year for the incident (or create a new year folder if it doesn’t exist)
- Copy the templates to the new folder
- Update the web app with a link to the new folder
The script that I created to accomplish this (with comments) is provided below:
1
2
3
4
5
6
7
8
9
10
11
12
13
14
15
16
17
18
19
20
21
22
23
24
25
26
27
28
29
30
31
32
33
34
35
36
37
38
39
40
41
42
43
44
45
46
47
48
49
50
51
52
53
54
55
56
57
58
59
60
61
62
63
64
65
66
67
68
69
70
71
72
73
74
75
76
77
78
79
80
81
82
83
84
85
86
87
88
89
90
91
92
93
94
95
96
97
98
99
100
101
102
103
104
105
106
107
108
109
110
111
112
113
114
115
116
117
118
119
// Basic web app functions
function doGet(request) {
  return HtmlService.createTemplateFromFile('index')
      .evaluate();
}

function include(filename) {
  return HtmlService.createHtmlOutputFromFile(filename)
      .getContent();
}

// Update the form (web app) with the location of the created folder
function processForm(formObject) {
  var formBlob = formObject;
  var folder_url = triggerEvents(formBlob.investigation_ticket)
  return "Template creation process has been completed! <br><br>The templates can be found here: <a href="+folder_url+">" + formBlob.investigation_ticket +"</a>";
}

function globalVariables(){
  // This can be found in the URL (something like this: "https://drive.google.com/drive/folders/{entity-id}") visible when you open the directory of the Shared Drive
  // To use a variable call: globalVariables().VARIABLENAME;, e.g. var soc_shared_folder_url = DriveApp.getFolderById(globalVariables().soc_shared_drive_id).getUrl();
  var variables = {
    soc_shared_drive_id: "<ID>",
    investigations_folder_id: "<ID>",
    templates_folder_id: "<ID>",
    ir_investigation_templates: "<ID>"
  };
  return variables;
}

function triggerEvents(investigation_ticket) {
  Logger.log("Starting template creation process...");

  // Get incident name from the trigger
  var incident_name = investigation_ticket

  // Retrieve the parent folder's ID where the new folder + templates will be created
  var parent_folder_id = globalVariables().investigations_folder_id;
  Logger.log("'IR Investigation's' Folder ID: " + parent_folder_id);

  // Retrieve the template folder's ID
  var template_folder_id = globalVariables().ir_investigation_templates;
  Logger.log("'IR Templates' Folder ID: " + template_folder_id);

  // Determine which year's subfolder to use and create a new one if needed
  var current_year = new Date().getFullYear();
  folder_status = getSubFolders(parent_folder_id, current_year);
  if (folder_status == false) {
    var container_folder_id = createSubFolder(parent_folder_id, current_year);
    Logger.log("'"+current_year+"' Folder ID: " + container_folder_id);
  }
  var new_parent_folder_id = getSubFolderIdByParentId(parent_folder_id, current_year);

  // Create a new subfolder for the current incident and return the folder ID
  var incident_folder_id = createSubFolder(new_parent_folder_id, incident_name);
  Logger.log("'"+incident_name+"' Folder ID: " + incident_folder_id);

  // Create a new artifacts folder for the incident folder
  var artifacts_folder_id = createSubFolder(incident_folder_id, "Artifacts");
  Logger.log("'Artifacts' Folder ID: " + artifacts_folder_id);

  // Copy the templates to the newly created subfolder
  var status = copyTemplates(template_folder_id,incident_folder_id);
  Logger.log(status);

  var folder_url = DriveApp.getFolderById(incident_folder_id).getUrl();

  return folder_url;
}

function getFolderId(folder_name) {
  var folder_id = DriveApp.getFoldersByName(folder_name).next().getId();
  return folder_id
}

function getSubFolderIdByParentId(parent_folder_id, current_year) {
  var childFolder = DriveApp.getFolderById(parent_folder_id).getFolders();
  var sub_folder_id = "";
  while(childFolder.hasNext()) {
    var child = childFolder.next();
    if(child.getName() == current_year){
      sub_folder_id = child.getId();
    }
  }
  return sub_folder_id;
}

function getSubFolders(parent_folder_id, current_year) {
  var childFolder = DriveApp.getFolderById(parent_folder_id).getFolders();
  var folder_status = false;
  while(childFolder.hasNext()) {
    var child = childFolder.next();
    Logger.log(child.getName());
    if(child.getName() == current_year){
      folder_status = true;
    }
  }
  return folder_status;
}

function createSubFolder(parent_folder_id, folder_name) {
  var new_folder = DriveApp.getFolderById(parent_folder_id).createFolder(folder_name);
  var new_folder_id = new_folder.getId();
  return new_folder_id;
}

// Once the folder has been created, copy the templates from the existing templates folder into the newly created investigation folder
function copyTemplates(template_folder_id, new_folder_id) {
  var destination_folder = DriveApp.getFolderById(new_folder_id);
  var templates_folder = DriveApp.getFolderById(template_folder_id);
  var template_files = templates_folder.getFiles();

  while (template_files.hasNext()) {
    var template_file = template_files.next();
    Logger.log("Copying template file:" + template_file);
    template_file.makeCopy(template_file.getName(), destination_folder);
  }
  return "Template creation process has been completed...";
}
For this use case, a basic front-end was also created in Google Apps Script. The HTML and CSS code is provided below:
1
2
3
4
5
6
7
8
9
10
11
12
13
14
15
16
17
18
19
20
21
22
23
24
25
26
27
28
29
30
31
32
33
34
35
36
37
38
39
40
41
42
43
44
45
46
47
48
49
50
51
52
53
54
55
56
57
58
59
60
61
62
63
<!DOCTYPE html>
<html>
  <head>
    <base target="_top">
     <?!= include('Stylesheet'); ?>
    <script>
      // Prevent forms from submitting.
      function preventFormSubmit() {
        var forms = document.querySelectorAll('form');
        for (var i = 0; i < forms.length; i++) {
          forms[i].addEventListener('submit', function(event) {
            event.preventDefault();
          });
        }
      }
      window.addEventListener('load', preventFormSubmit);

      function handleFormSubmit(formObject) {
        var div = document.getElementById('output');
        div.innerHTML = "Templates are being created...<br>" ;
        google.script.run.withSuccessHandler(create_templates).processForm(formObject);
      }
      function create_templates(investigation_ticket) {
        var div = document.getElementById('output');
        div.innerHTML += investigation_ticket ;
      }
    </script>
  </head>
  <body>
    <h1 class="center">Welcome to Template Automation!</h1>
    <div id="form_div">
      <h2>What is this App?</h2>
      <p>This App was created to help automate the setup of incident templates for SOC team members.</p>

      <h3>User Input Process:</h3>
      <ul>
        <li><b>Step 1:</b> Create a Slack Channel with the Incident Ticket Name (SOC-xxxx)</li>
        <li><b>Step 2:</b> Insert the name into the field below and click "Submit"</li>
      </ul>

      <h3>How the template works:</h3>
      <ul>
        <li>The automation will create a new folder located at "SOC -> IR Investigations -> Ticket_Name"</li>
        <li>Once created, it will copy the Incident Response (IR) templates to the location</li>
        <li>The folder will contain the following items:</li>
        <ul>
          <li><b>Investigation Task Tracker:</b> This is used to assign and track tasks during the investigation.</li>
          <li><b>Investigation Timeline:</b> This is used to create a timeline for the incident including a list of IoCs.</li>
          <li><b>Investigation Narrative:</b> This is the main narrative for the investigation and will contain proof of the questions asked in the "Investigation Task Tracker".</li>
          <li><b>Artifacts Folder:</b> A folder to store all relevant investigation artifacts.</li>
        </ul>
      </ul>

      <h2>Required User Input</h2>
      <form id="myForm" onsubmit="handleFormSubmit(this)">
        <b>Investigation Ticket #:</b> <input name="investigation_ticket" type="text" /></br></br>
        <input type="submit" value="Submit" />
      </form>
    </div>
    <div id="output"></div>
 </body>
</html>
1
2
3
4
5
6
7
8
9
10
11
12
13
14
<style>
h1,h2, h3, b {
  color: #741b47;
}

.center {
  text-align: center;
}

#output {
  text-align: center;
  color: #741b47;
}
</style>
1
2
3
4
5
<script>
window.addEventListener('load', function() {
  console.log('Page is loaded');
});
</script>
The last piece of this was to create a new web app deployment which would create a Google hosted URL for you to use. Within the Apps Script editor, click on Deploy → New deployment (or Manage deployments if you have already created the web application).
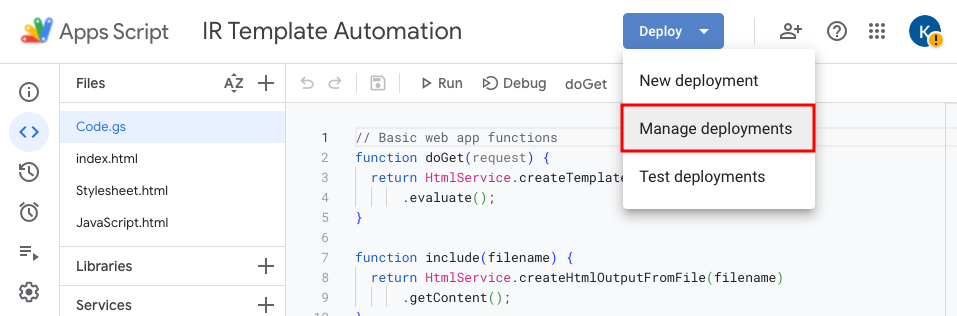 Google Apps Script - Manage Deployments
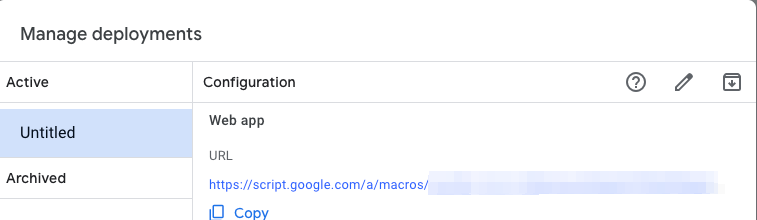 Google Apps Script - Retrieve URLs
The final web app (with my amazing front-end development skills) is shown below:
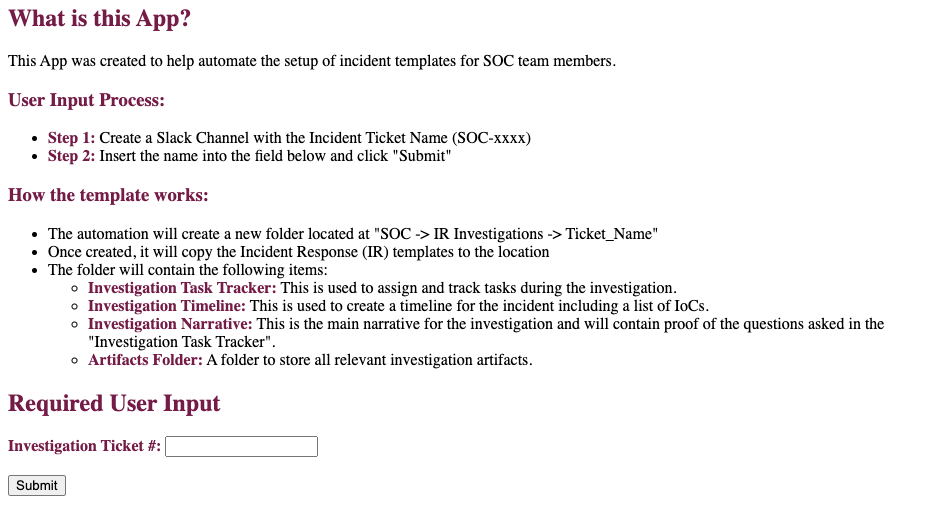 Google Apps Script - Web App
Conclusion
While this blog post focused on Google Apps Script, most automation projects can be accomplished using various programming languages and external services. For this specific use case, Apps Script simplified this process by working natively within the Google ecosystem and I would generally recommend finding native integrations when automatic your manual day-to-day tasks.
I hope that you have learned something from this post and, as always, feel free to reach out to me with any comments!